Create (and automatically correct) multiple choice tests with AMC
Feb 4, 2022 by Alexandre Croix | 11894 views
https://cylab.be/blog/200/create-and-automatically-correct-multiple-choice-tests-with-amc
AMC, for Auto Multiple Choice, is software that allows a teacher to create multiple-choice tests in a very simple way.
But, the most interesting part of AMC, is the ability to automatically correct the tests of all students!
![]()
The first important thing to know: AMC is only available on Linux and macOS. It is not possible to use it directly on Windows.
Installation
AMC is available on your packet manager. On Debian based distributions (Ubuntu, ZorinOS, Linux Mint,…), the command to install it is
sudo apt install auto-multiple-choice
Create a project
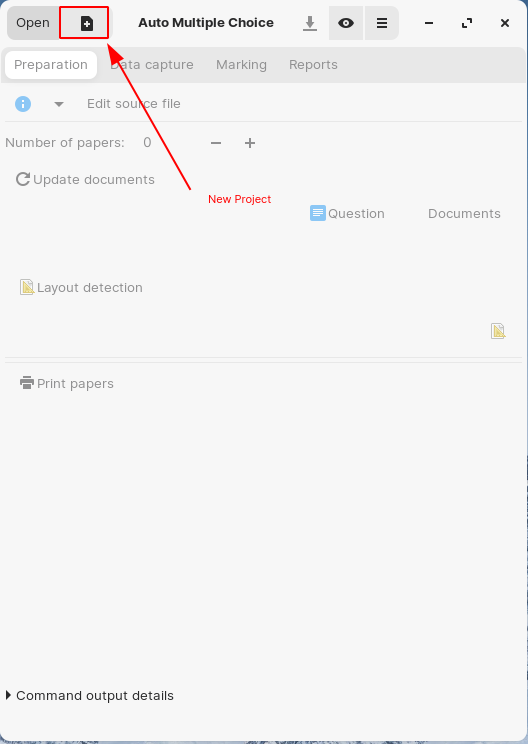
Creating a new project is very simple.
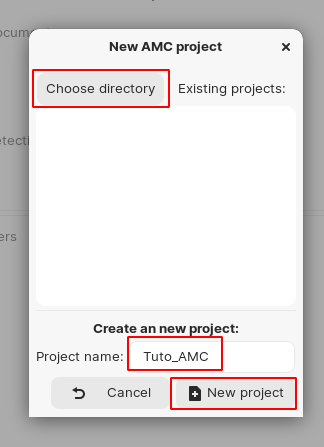
Then, select the directory you want to store your project, give a name and create your project.
AMC asks you which kind of project you want to create:
- a project from a template: AMC provides a list of different basic templates
- a project from a file: you can create a project from a questions file you already prepared
- an empty project
- a project from an archive
A project from a template is very useful to understand how AMC work. However, they are very basic and you will lose a lot of time by replacing example questions with yours. After this tutorial, you should be able to use directly an empty project. In this example, we will use an empty project and will create a complete test step by step.

Edit your questions
With AMC, the teacher can write his questions in two different languages: Latex and AMC-TXT. Latex is, of course, the best for a fine personalized layout but requires a basic knowledge of this language. AMC-TXT is a proprietary format and is very similar to the Markdown language. It is very simple to use and, for most uses, it is clearly sufficient. In this article, we will use the AMC-TXT format.
By default, the Latex format is selected. Click on it and change to ACM-TXT.

You are now ready to edit your questions. Click on the Edit your question button. Your default text editor will open a .txt file that contains 3 lines:
- a comment line: that begins with a # symbol
- a Title line: keyword to indicate the title of your test
- a Presentation line: keyword to add some context for the exams: rules, time,…
Complete these sections with the text you want. For example:
# AMC-TXT file
Title: Test for AMC tutorial
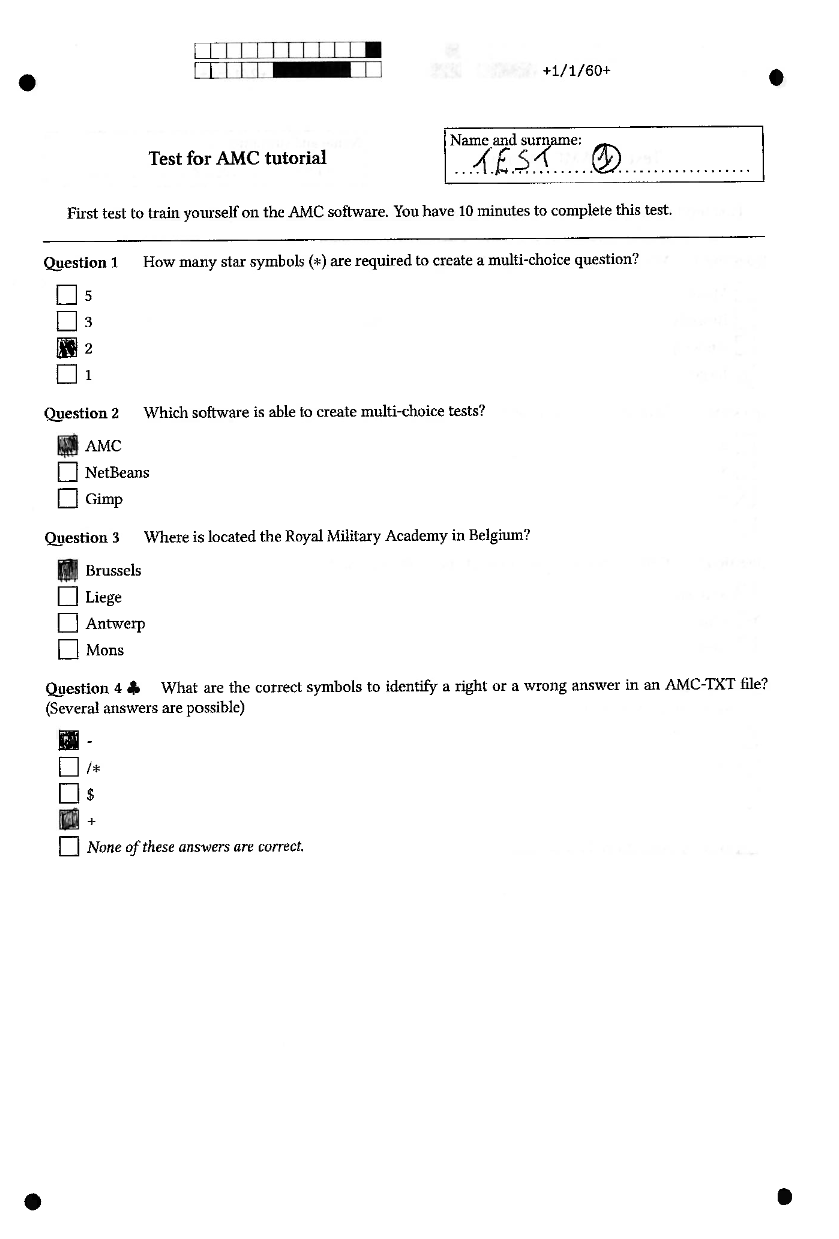
Presentation: First test to train yourself on the AMC software. You have 10 minutes to complete this test.
It is possible, now, to add your questions to the .txt file. Here is a simple example to understand the structure of a question.
# ACM-TXT file
Title: Test for AMC tutorial
Presentation: First test to train yourself on the AMC software. You have 10 minutes to complete this test.

* Where is located the Royal Military Academy in Belgium?
- Liege
- Mons
+ Brussels
- Antwerp

* Which software is able to create multi-choice tests?
+ AMC
- Gimp
- NetBeans

** What are the correct symbols to identify a right or a wrong answer in an AMC-TXT file? (Several answers are possible)
+ +
+ -
- $
- /*

* How many star symbols (*) are required to create a multi-choice question?
- 3
- 5
+ 2
- 1
As you can understand from this example, there are two kinds of questions:
- Simple choice question: these questions start with a simple ** * ** (star symbol). Only one answer to check.
- Multi-choice question: these questions start with a double ** ** ** (star symbol). One or more answers to check. For this kind of question, an additional option will be added by AMC None of these answers are correct.
And, of course, there are two kinds of answers:
- Correct answer: identified with a + (plus symbol)
- Wrong answer: identified with a - (minus symbol)
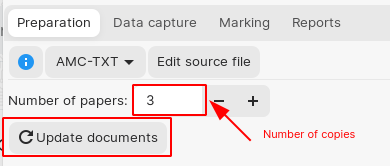
Your first test is now almost ready to be generated! AMC allows the teacher to generate the test with questions and answers in a different order (to avoid cheating between neighbours). Select the number of different copies you want and then, click on Update documents. In this example, we consider a class with 3 students.
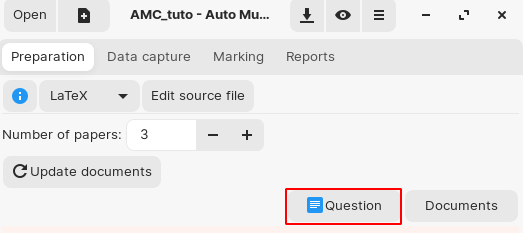
AMC will generate three versions of the test. The Questions button open your PDF reader and display the file with the different test versions.

On each test version, a code is visible. This code is an identifier that allows AMC to recognize the test version during the correction phase. This code is in the green rectangle on the previous figure.
Test and correction
Your test is ready and printed. The students can pass it. Attention! You cannot modify your test after the printing. Indeed, AMC generates randomly the tests each time you press the Update document button. AMC won’t be able to correct automatically the test if you change something after the printing.
Don’t forget to press the Layout detection button. AMC will detect, on each test version, all the important areas for the correction: identification code, name/surname area and checkboxes. It is necessary for the correction step.
Scan all the pages (one single document or several, AMC can manage the two options). The following figure is an example of a scanned test.
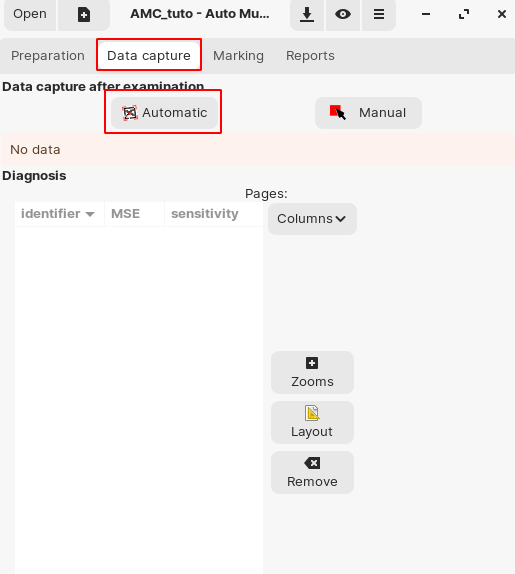
To import the file(s) to AMC, select the Data capture tab and click on the Automatic button.
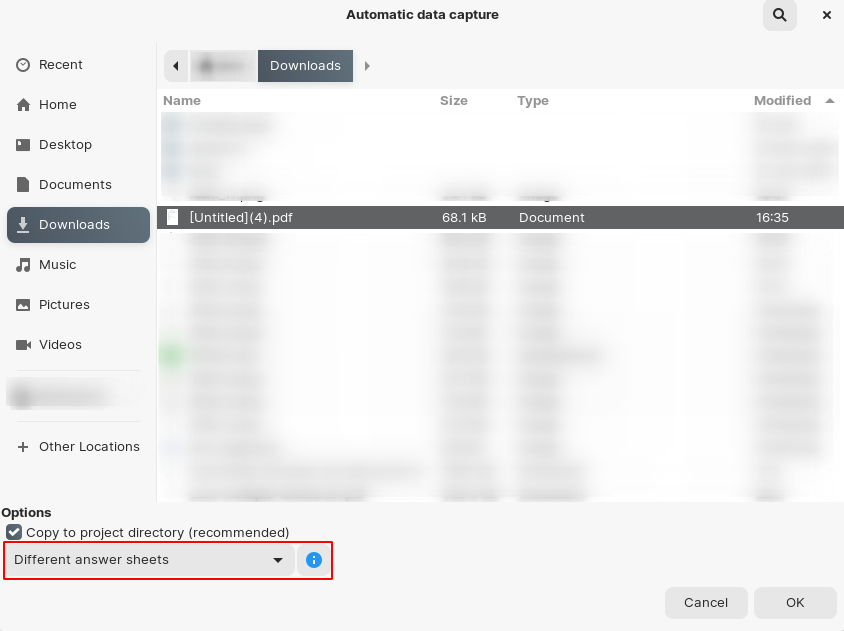
On the next window, in the option field, select Different answer sheets. Select your scan file(s) and click on OK.
AMC will process for a few seconds or a few minutes. It depends on the number of pages you have. As shown in the following figure, AMC displays different columns:
- identifier: the test version and the page of the test.
- MSE: an indicator for the alignment during the scan. If the value is too high, the detection could be wrong.
- sensitivity: a detection indicator for the checked answer. Is AMC sure that it has detected all the checked boxes correctly? If the value is higher than 7 or 8, you should check manually.
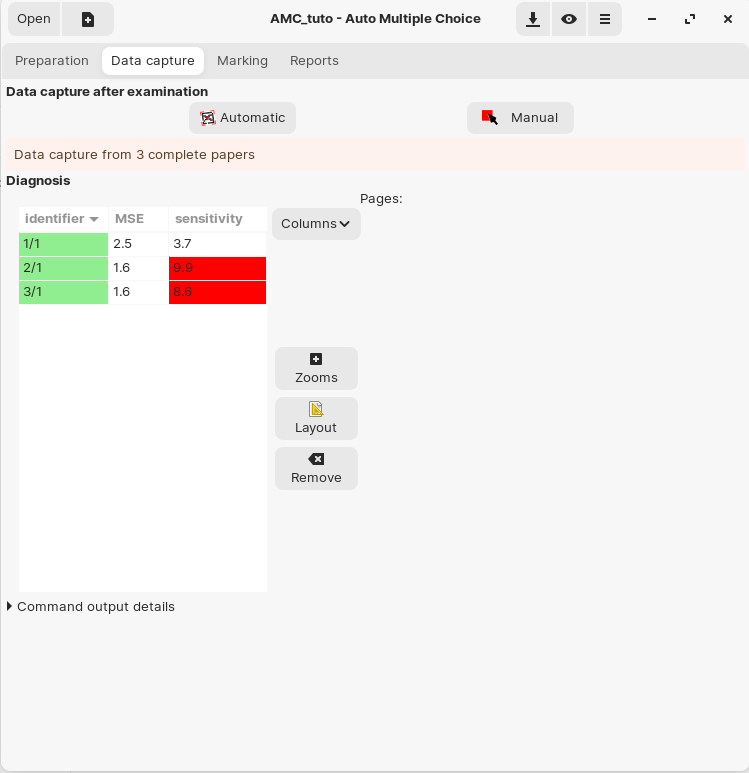
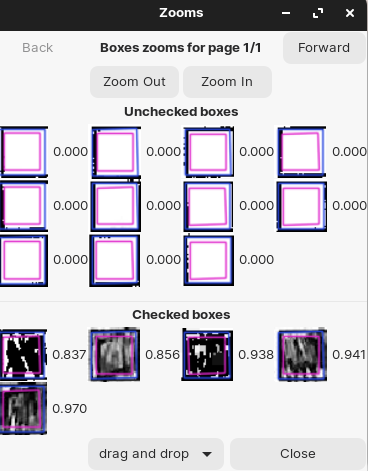
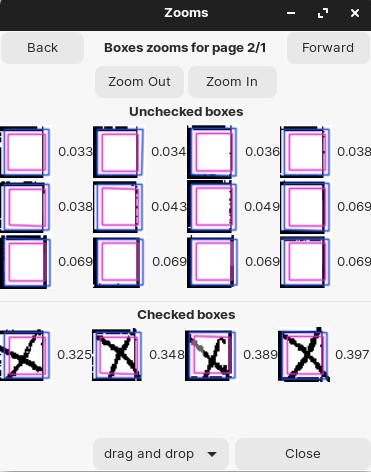
In the previous figure, the MSE is good for the three copies. The sensitivity is perfect for copy 1 (the checkboxes were coloured) but bigger than 9 for copies 2 and 3 (checkboxes ticked). AMC allows the teacher to manage manually some potential detection errors. If the sensitivity is a little bit too high, select the copy and click on the Zoom button. If a correction is needed (a checked box in the unchecked category or the opposite), simply drag-and-drop the box into the correct category.
Marking the copies
The purpose of the third tab (Marking) is to compute the score of each copy and associate the mark to a specific student.
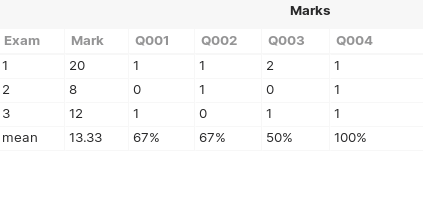
By clicking on the mark button, all the grades will be computed. AMC will display the mean score of your students and allow you to see a detailed summary for all your questions and the students by clicking the information green button.

The details are presented in a table.
You can now associate each copy to a specific student. To perform that, a CSV file is needed. This file must contain at least a column Name and another one Surname. The file has to contain a column with a unique identifier. This identifier can be the name or the surname if your class does not have several Bob for example.
Here is a typical example for our three students class. All the students have the same name Test, the surname is a number written in letters. The column ID is optional (unique identifier of the students for example).
ID,Name,Surname
1145,Test,One
2455,Test,Two
3548,Test,Three
Import the file thanks to the Set File button and select your CSV file. The file imported, you can directly modify it with the Edit file button in AMC.
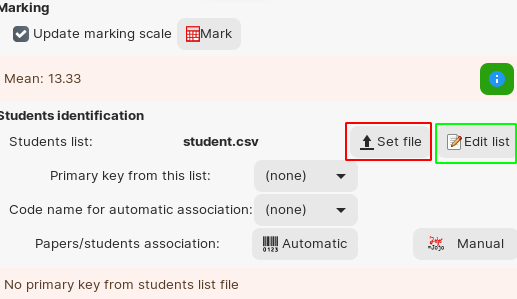
Select the Primary key from the list in the drop-down menu. In our case, the primary key is the ID (unique identifier). AMC provides two ways to associate copy with students. In this tutorial, we will use the manual method. In the next tutorial, we will describe more advanced features such as Automatic association.
The Manual button will open a window with a list of all your student (from the CSV file) and will present you the name and surname written by the student on the copy. The teacher has to click on the student that matches the scan.

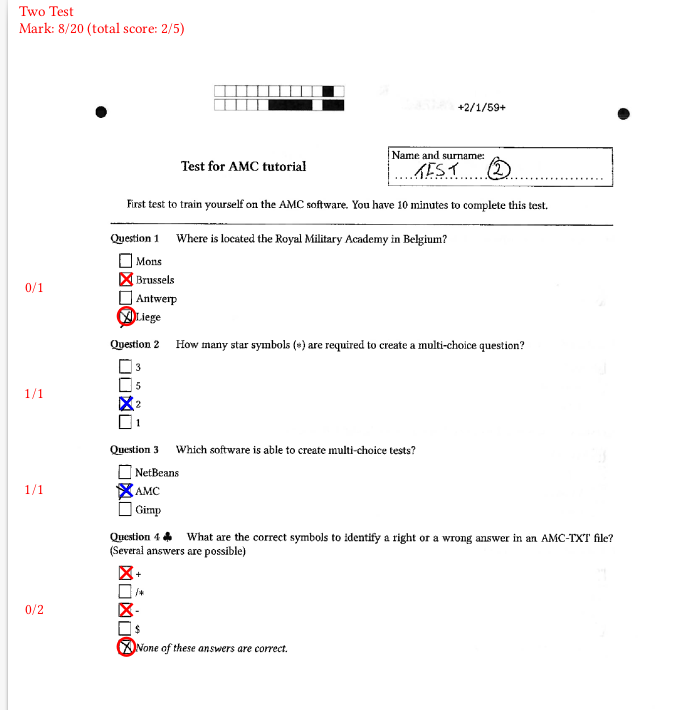
Reports generation
The last tab in the AMC interface is for the report generation. AMC can generate CSV, LibreOffice or PDF files with the results of all students. But a very interesting part is the ability to annotate all the scanned copies with the correction and the marks for all questions. This way, students can see exactly where they made mistakes.
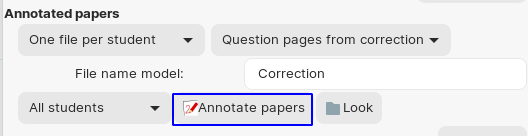
On the Report tab, select the file output you want to use and adapt the settings to your needs. In this example, we will use a CSV file sorted by name.

To annotate the solution files, simply click on the Annotate papers button.
Conclusion
AMC is a very powerful software that provides very interesting features to help teachers that use Multiple choice tests. In this tutorial, we only describe basic features. In a future blog post, we will show how to automatically match copies to the right student, and how to directly send by email the annotated copies to the student. We will also describe some interesting commands to improve the structure of your test (columns, introduction text,…).
If you want a very accurate personalization, we encourage you to use the Latex source file to generate your tests. Indeed, there are more options than in ACM-TXT.
This blog post is licensed under
CC BY-SA 4.0


