Use a Raspberry Pi for (dynamic) routing
Oct 13, 2022 by Alexandre Croix | 7297 views
https://cylab.be/blog/239/use-a-raspberry-pi-for-dynamic-routing
A Raspberry Pi is a fabulous computer card. It is possible to use it as a Retro Gaming emulator, a media centre, or a home automation box,… It is also widely used for educational purposes: learn programming, run a small webserver, use it as an access point. It is widely used in network laboratory purposes.
Today we will describe how to use a Raspberry Pi as a router.
Topology
The Raspberry Pi is used to provide Internet access to the different subnets (172.16.1.0/24, 172.16.2.0/24, 172.16.3.0/24) represented in the following Figure.
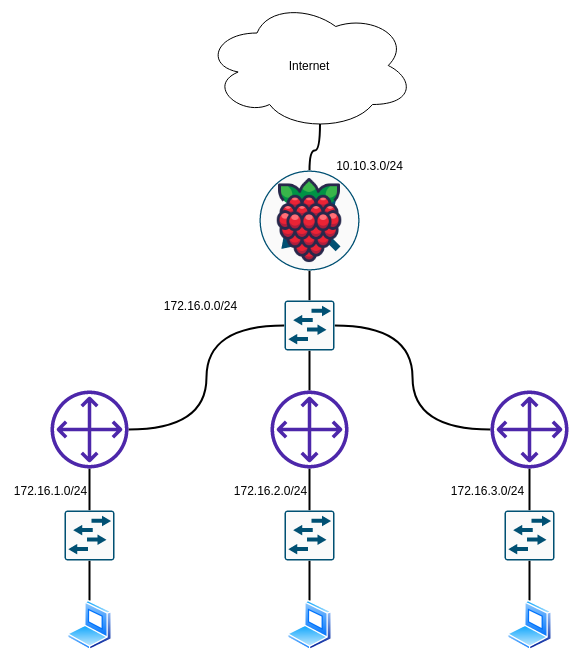
All devices must be able to have access to the Internet through the Raspberry Pi and be able to connect to any device on any subnet. E.g: machine 172.16.1.10 can ping 172.16.3.20.
Static routing + NAT
The first step is to use the Raspberry Pi to do NAT/PAT and enable IPv4 packet forwarding.
Set static IPs
To avoid potential DHCP conflict, we set up static IPs on each Raspberry Pi interface. On a Raspberry Pi, there are several ways to put static IPs. Here, we will change the default configuration in the DHCP client.
Open the file /etc/dhcpcd.conf and add the following lines at the end of the file. Adapt the file to your needs:
// External interface (Internet side)
interface eth0                          //interface name
static routers=10.10.3.1                //"default gateway" of this network next-hop)
static ip_address=10.10.3.50/24         //static IP
static domain_name_servers=10.10.3.100  //DNS server

// Internal interface (internal side)
interface eth1
static ip_address=172.16.0.100/24
And then, reload the DHCP client deamon:
pi@raspberry:~$ sudo systemctl daemon-reload && sudo systemctl restart dhcpcd
You can check your IP addresses with ifconfig.
Enable IPv4 forwarding
Open the file /etc/sysctl.conf and uncomment the following line (remove the #):
# net.ipv4.ip_forward=1
This command enable the forwarding of IPv4 packets. By default, this feature is disabled.
Enable NAT/PAT
The perform NAT/PAT on a Raspberry PI, we can use the iptables package. Install it (if not already installed): sudo apt install iptables
Enter the following three commands to enable NAT on the Raspberry Pi (again, adapt to your needs)
pi@raspberry:~$ sudo iptables -t nat -A POSTROUTING -o eth0 -j MASQUERADE
pi@raspberry:~$ sudo iptables -A FORWARD -i eth1 -o eth0 -j ACCEPT
pi@raspberry:~$ sudo iptables -A FORWARD -i eth0 -o eth1 -m state --state RELATED,ESTABLISHED -j ACCEPT
These two first commands enable the NAT process and allow communication from the inside to the outside. The third command allows communication in the other direction if the communication was previously established and initiated by a device in the inside network.
By default, the rules added with iptables are not persistent after a reboot. To avoid to set these commands each time your RPi is unplugged, we will install iptables-persistent by doing sudo apt install iptables-persistent. During the installation, iptables-persistent will ask you if you want to save your IPv4 rules.
Reboot your RPi and test it. You should be able to access to the Internet. You can observe the NAT process with tcpdump or wireshark.
Dynamic routing protocol
In the topology described earlier, to have a connection to the Internet from a subnet (e.g 172.16.2.0/24), the routers of this subnet must have a route to the RPi router. It is possible to add it manually, but if we change the static IP of the Raspberry, we have to change the routes on all routers connected to it.
To avoid this tedious task, we will use a dynamic routing protocol. Routers running dynamic routing protocol will exchange information about themself (directly connected routers, IP addresses,…). Thanks to these information, routers will determine and install automatically the routes in the routing table. If a change occurs in the topology, the routers automatically adapt their routing tables.
There are several dynamic routing protocols available for this task. In our case, we decide to use OSPF.
Installation
A nice tool to use dynamic routing protocol is quagga. During the installation, quagga install several sub-programs: zebra, ospfd, bgpd,… Basically, it is one program/service for each routing protocol. All these routing protocols are managed by zebra.
In our case, we have to configure zebra (the manager) and ospfd (the routing protocol we will use).
Configuration and start process
The configuration files are very similar to running-config files in Cisco network devices. It is also possible to configure your “router” with IOS Cisco command in an interactive terminal. We will use this second method.
First, we have to basically configure zebra. To do that, create a file /etc/quagga/zebra.conf.
We will create the minimal configuration file: we have to allow remote access to the “virtual zebra device”. In the configuration file, add the two following lines and save the file.
line vty
no login
For ospf, we can create a /etc/quagga/ospfd.conf file with the same content.
We can now start the different processes:
pi@raspberry:~$ sudo service zebra start
pi@raspberry:~$ sudo service ospfd start
Interactive terminal
It is possible to interact with “virtual device” to configure it dynamically. From your RPi open a telnet connection to your localhost at 2604 port. This port is used to access your OSPF virtual device. The port will be different for another dynamic routing protocol (you can check with cat /etc/services | grep zebra).
To interact with your OSPF service, the command will be:
pi@raspberry:~$ telnet 127.0.0.1 2604
You can configure your OSPF device like a Cisco router (some small differences). For example, a typical configuration will be to change the hostname, set a enable password, configure an interface to use OSPF on area 1 and set the router as default-information originate.
raspberry>
raspberry>enable
raspberry#configure terminal
raspberry(config)#hostname ospf
ospf(config)#password ospf
ospf(config)#enable password ospf
ospf(config)#interface eth1
ospf(config-if)#ip ospf area 1
ospf(config-if)#exit
ospf(config)#router ospf
ospf(config-router)#default-information originate
ospf(config-router)#end
ospf#copy running-config startup-config
Configuration saved to /etc/quagga/ospfd.conf
Don’t forget to save your configuration! Indeed, if the ospfd service is restarted, it will load the very simple configuration file you created earlier.
Conclusions
This simple tutorial shows us how to set up a Raspberry Pi as a router with some dynamic routing protocols. The process to use other routing protocols (like RIP, BGP, ISIS,…) is very similar
This blog post is licensed under
CC BY-SA 4.0


