MongoDB sharding on a single server
Aug 29, 2019 by Thibault Debatty | 6961 views
https://cylab.be/blog/36/mongodb-sharding-on-a-single-server
Sharding is a method for distributing data (and load) across multiple machines. In this blog post we show how to test MongoDB sharding by running multiple MongoDB instances on a single Ubuntu 16.04 machine.
Anatomy of a MongoDB cluster
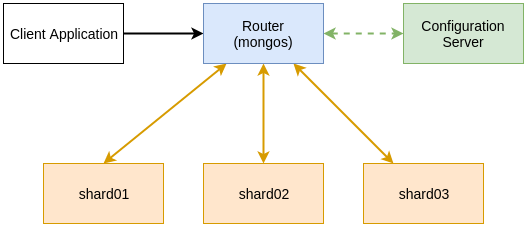
A MongoDB cluster consists of 3 components:
- 2 or more shard servers that contain the actual data. You can start a shard server by running
mongod --shardsvron the command line (hence the same as for a regular MongoDB server).
In MongoDB, shard servers do not perform automatic discovery or automatic data distribution. Hence the cluster requires
- 1 (or 3) configuration server that will hold the configuration of the cluster. You can start the configuration server running
mongod --configsvr
The driver API of MongoDB (the one you import in your client application) is not able to use sharded cluster directly. Hence the cluster also requires
- 1 or more routers. These act like a proxy: your client application connects to the router that transparently forwards the queries to the correct shard servers, using metadata fetched from the configuration server. You can start a router by running
mongos --configdb <config server>(hence this time it’s another binary).
Shard key and range-based sharding
MongoDB uses a shard key to distribute the data between the servers. You can use the _id of each record, but any other simple or compound key is possible.
By default, MongoDB performs range-based sharding:
- all possible values of the shard key are divided into ranges;
- all records belonging to the same range are stored in a chunk, on the same shard server.
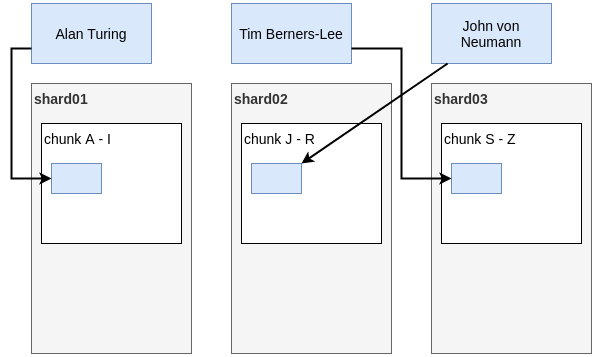
Range-based sharding allows to speedup range queries. However, this requires the user to apriori choose appropriate shard keys. A poorly chosen shard key may result in serious imbalance between servers. Luckily, MongoDB is able to automatically modify shard key ranges to re-distribute data between the servers.
Starting the servers
For this example, we will run all MongoDB servers on a single machine. Therefore we have to:
- let the servers listen on different ports;
- let the servers store data in different directories.
We will have 2 shard servers, 1 configuration server and 1 router :
- shard01 will listen on port 27018 (the default)
- shard02 will listen on port 27020
- config will listen on port 27019 (the default)
- router will listen on port 27017 (the default)
First of all, make sure MongoDB is installed and is correctly stopped:
sudo apt-get install mongodb
sudo service mongdb stop
Now you can start shard01 in a terminal:
mkdir -p /srv/mongodb/shard01
mongod --shardsvr --port 27018 --dbpath /srv/mongodb/shard01
In another terminal, start shard02:
mkdir -p /srv/mongodb/shard02
mongod --shardsvr --port 27020 --dbpath /srv/mongodb/shard02
Then config:
mkdir -p /srv/mongodb/config
mongod --configsvr --port 27019 --dbpath /srv/mongodb/config
And finally we can start the router:
mongos --port 27017 --configdb 127.0.0.1:27019
Alternatively, you can start them all using a single script:
#!/bin/bash

ROOT="~/mongodb"
mkdir -p "$ROOT/log"

mkdir -p "$ROOT/shard01"
mongod --shardsvr --port 27018 --dbpath "$ROOT/shard01" --fork \
--logpath "$ROOT/log/shard01.log"

mkdir -p "$ROOT/shard02"
mongod --shardsvr --port 27020 --dbpath "$ROOT/shard02" --fork \
--logpath "$ROOT/log/shard02.log"

mkdir -p "$ROOT/config"
mongod --configsvr --port 27019 --dbpath "$ROOT/config" --fork \
--logpath "$ROOT/log/config.log"

mongos --port 27017 --configdb 127.0.0.1:27019 --fork \
--logpath "$ROOT/log/router.log"
Configuring the cluster
Until now, the router knows where the config server is located, but the configuration server has no information about the running shard servers. We have to configure this manually, by connecting to the router:
mongo localhost:27017
To add the shards:
sh.addShard("127.0.0.1:27018")
sh.addShard("127.0.0.1:27020")
Then enable sharding for our database:
sh.enableSharding("test")
And finally enable sharding for the collection:
sh.shardCollection("test.testcollection", {_id:1})
We can now use the sharded cluster, as if it was a single MongoDB cluster:
use test
db.testcollection.insert({name: "Me"})
db.testcollection.find()
We can always obtain additional information about the shard by running:
sh.status()

...

shards:
	{  "_id" : "shard0000",  "host" : "127.0.0.1:27018" }
	{  "_id" : "shard0001",  "host" : "127.0.0.1:27019" }
databases:
	{  "_id" : "admin",  "partitioned" : false,  "primary" : "config" }
	{  "_id" : "test",  "partitioned" : true,  "primary" : "shard0000" }
		test.testcollection
			shard key: { "_id" : 1 }
			chunks:
				shard0001	1
				shard0000	1
			{ "_id" : { "$minKey" : 1 } } -->>
 			    { "_id" : ObjectId("5d677cf65b26b77c1eba1c00") }
			    on : shard0001 Timestamp(2, 0)
			{ "_id" : ObjectId("5d677cf65b26b77c1eba1c00") } -->>
			    { "_id" : { "$maxKey" : 1 } }
			    on : shard0000 Timestamp(2, 1)
The last lines of this command also shows which ranges of the shard key are split in chunks and distributed between the different shard servers.
This blog post is licensed under
CC BY-SA 4.0


