Build a kernel, initramfs and Busybox to create your own micro-Linux
Feb 10, 2024 by Thibault Debatty | 22632 views
https://cylab.be/blog/320/build-a-kernel-initramfs-and-busybox-to-create-your-own-micro-linux
A regular Linux user will probably never have to compile its own Linux kernel. But doing so is actually a great way to discover the features and working of the Linux kernel. So in this blog post we will guide you to compile a small kernel, create a minimal root filesystem that fits into memory, and finally create a micro-Linux system based on Busybox…
The kernel boot process and initramfs
Typically, the Linux kernel only has a few built-in drivers. Additional drivers are compiled as modules that must be separately loaded in memory. Some of these modules may be required to mount the root filesystem. Hence the Linux boot process typically has 2 steps:
- the bootloader loads the kernel into memory, and mounts an initial filesystem (initramfs)
- the initramfs contains kernel modules and an init script that will load required modules and mount the actual filesystem so the kernel can continue the boot process
The initramfs is a compressed (gz) cpio archive. Cpio is an archive format similar to tar, but is much more simple and requires only little code in the kernel [1]. There is an older but similar mechanism called the initial RAM disk or initrd, that uses a full disk image as inital firlesystem. Still now, some bootloaders, and qemu (as we will see below) use the parameter -initrd to load the initramfs.
In this blog post, we compile a small Linux kernel, and we will create a minimal initramfs archive that contains the basic Linux command line tools. This allows to create a minimal system running directly from memory.
Prerequisites
To build the kernel and test with qemu, you will need a few tools and libraries:
sudo apt install -y build-essential libncurses-dev libelf-dev libssl-dev
And, to test with qemu:
sudo apt install qemu-system-x86
Kernel
So, the first step consists in downloading, configuring and building the kernel….
Download and extract the kernel sources. For this blog post we will use the current longterm kernel version (6.6.16):
wget https://cdn.kernel.org/pub/linux/kernel/v6.x/linux-6.6.16.tar.xz
tar -xvf linux-6.6.16.tar.xz
cd linux-6.6.16
The Linux kernel has a lot of features and configuration options. It can be quite challenging to find the correct options required to build a bootable kernel. Luckily there are different possibilities to create a sound starting point:
- use the minimal working configuration for this kernel version:
make tinyconfig - use the default configuration for this kernel version:
make defconfig - copy the configuration of the currently running kernel:
cp /boot/config-$(uname -r) .config
In this blog post, we will test the kernel using qemu, so we can start with a simple default kernel:
make defconfig
Then, we can add or remove features using
make menuconfig
This will open a ncurses menu that allows to select kernel features.
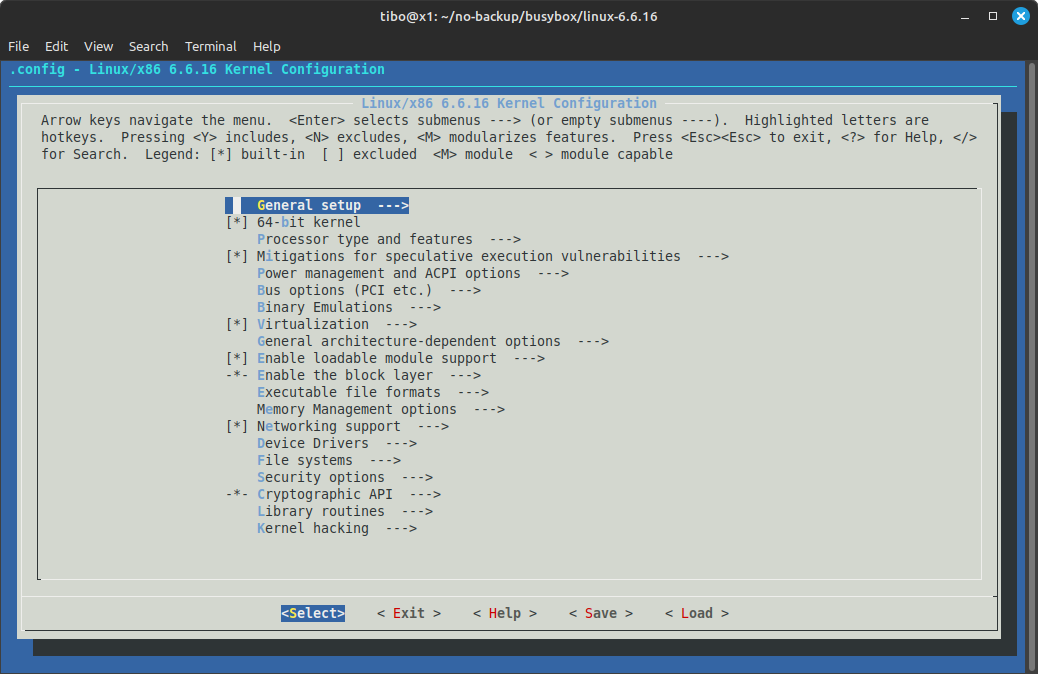
As a bare minimum, make sure the following options are enabled:
- General setup:
- Initial RAM filesystem and RAM disk (initramfs/initrd) support
- 64-bit kernel
- Device Drivers —> Generic Driver Options:
- Maintain a devtmpfs filesystem to mount at /dev
- Automount devtmpfs at /dev, after the kernel mounted the rootfs
When done, save your kernel configuration and exit.
Hint: you can hit / to search for a given feature.
You can now compile your kernel with
make -j 8 bzImage
where -j 8 tells make to run 8 jobs in parallel.
After a few minutes, the build process should end with Kernel: arch/x86/boot/bzImage is ready. Let’s copy the kernel to the root of our project:
cp arch/x86_64/boot/bzImage ../
Busybox
BusyBox is a single binary that provides most common Unix/Linux utilities. It was specifically created for embedded systems with very limited resources. The single binary takes roughly 2,5MB and implements a simplified version of almost 300 common Unix commands. It is thus perfect for creating micro systems.
wget https://github.com/mirror/busybox/archive/refs/tags/1_36_0.tar.gz
tar -xvzf 1_36_0.tar.gz
cd busybox-1_36_0
Again, we will use the menu configuration:
make menuconfig
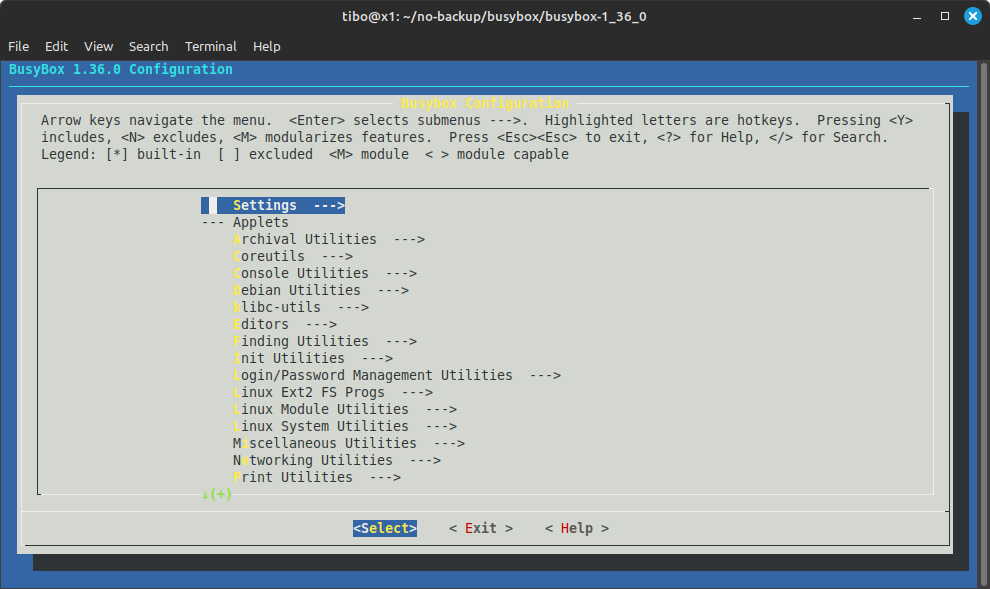
This time, make sure to enable Settings ---> Build static binary (no shared libs)
After saving, we can compile:
make -j 8
make install
The busybox binary and links will be installed in _install
Initramfs
We can now create the structure of the root filesystem:
mkdir initramfs
mkdir -p initramfs/bin initramfs/sbin initramfs/etc initramfs/proc initramfs/sys initramfs/dev initramfs/usr/bin initramfs/usr/sbin
Copy the busybox binary and links:
cp -a busybox-1_36_0/_install/* ./initramfs
Create the init script initramfs/init with the following content:
#!/bin/sh
mount -t devtmpfs devtmpfs /dev
mount -t proc none /proc
mount -t sysfs none /sys
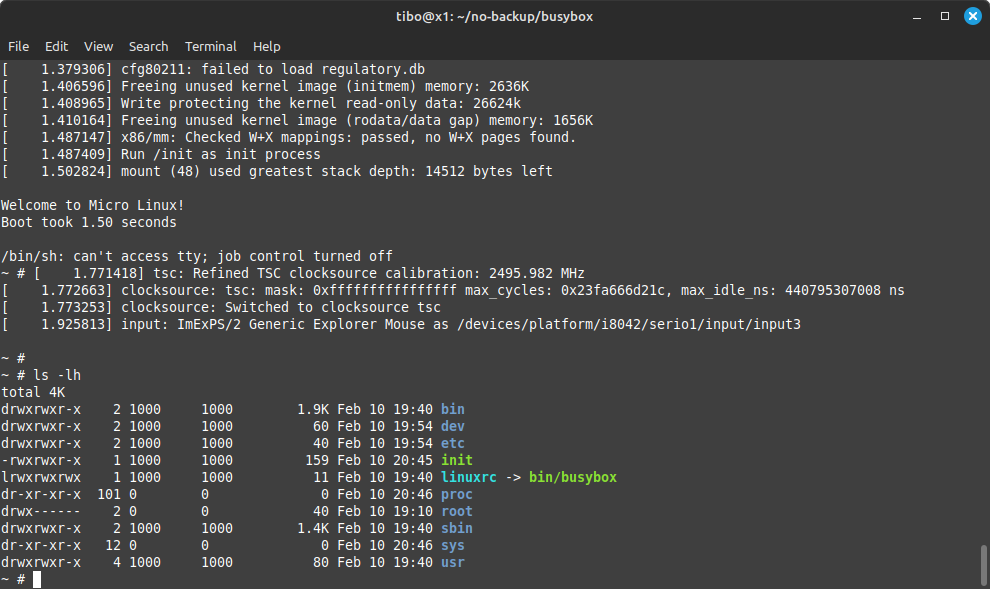
cat <<!
Welcome to Micro Linux!
Boot took $(cut -d' ' -f1 /proc/uptime) seconds
!
exec /bin/sh
Make the init script executable:
chmod +x initramfs/init
And finally, create the compressed initramfs archive:
cd initramfs
find . -print0 | cpio --null -ov --format=newc | gzip -9 > ../initramfs.cpio.gz
cd ..
Testing with qemu
We can now test the micro system with qemu:
qemu-system-x86_64 -kernel bzImage \
	-initrd initramfs.cpio.gz -nographic \
	-append "console=ttyS0"
You can stop qemu by hitting ctrl + a and then x.
Once this is working, you can continue by testing other features and modify the init script…
References
- https://docs.kernel.org/filesystems/ramfs-rootfs-initramfs.html
- https://nostarch.com/howlinuxworks3
- https://gist.github.com/chrisdone/02e165a0004be33734ac2334f215380e
- https://bugzilla.kernel.org/show_bug.cgi?id=82191
- https://askubuntu.com/questions/216110/how-do-i-find-what-kernel-module-is-behind-a-network-interface
- https://busybox.net/
This blog post is licensed under
CC BY-SA 4.0


