Shadow analysis #2: Guessing Time with Zero Context
May 7, 2025 by Cylab Researcher | 2140 views
https://cylab.be/blog/417/shadow-analysis-2-guessing-time-with-zero-context
How to find time without object height and shadow length?
That’s the question this second blog slant seeks to answer. In trying to answer this question, I realised that some OSINT analysts were making an approximation error in their measurements. This blog bias seeks to find out if there is a new method that would remove this approximation. Unfortunately, there is no method today that can give the exact time without approximation. Nevertheless, we mention in the future work a technique called homography which could be made from 2 different photos of the same scene that could delete this approximation.
First of all, we need to define what I mean by “zero context”. It means that the ground doesn’t allow us to calculate the size of the shadow. And that it’s impossible to know the size of the object. However, if we’re not in a desert and we have clear landmarks on the ground like cobblestones, then it’s still possible to calculate the size of the shadow using google maps. To understand this better, I refer you to the video by bendobrown.
This blog is the logical continuation of the first.
Introduction
This blog is therefore divided into 3 parts. Firstly, it presents the technique currently used by some OSINT analysts to determine the time without any context about the object being studied. Secondly, we highlight the fact that there is an approximation error and explain its origin. Finally, I propose a new technique that could be studied in a future work to reduce the margin of error.
Current technique
The technique currently used consists of taking the image and measuring the size of the object being studied, as well as its shadow in pixels. This still allows us to calculate our theta angle, which gives us the altitude of the sun in the sky. This technique was highlighted by bendobrown when he replied to a comment under his video.
Anyway, here’s what it does: it measures the size of the object in pixels and its shadow. This seems logical since it allows us to find the altitude of the sun in the sky by taking the tangent of the angle. So we can give it a try. Let’s take the same image as in the previous blog, open GIMP and measure the size of the dustbin and its shadow in pixels.
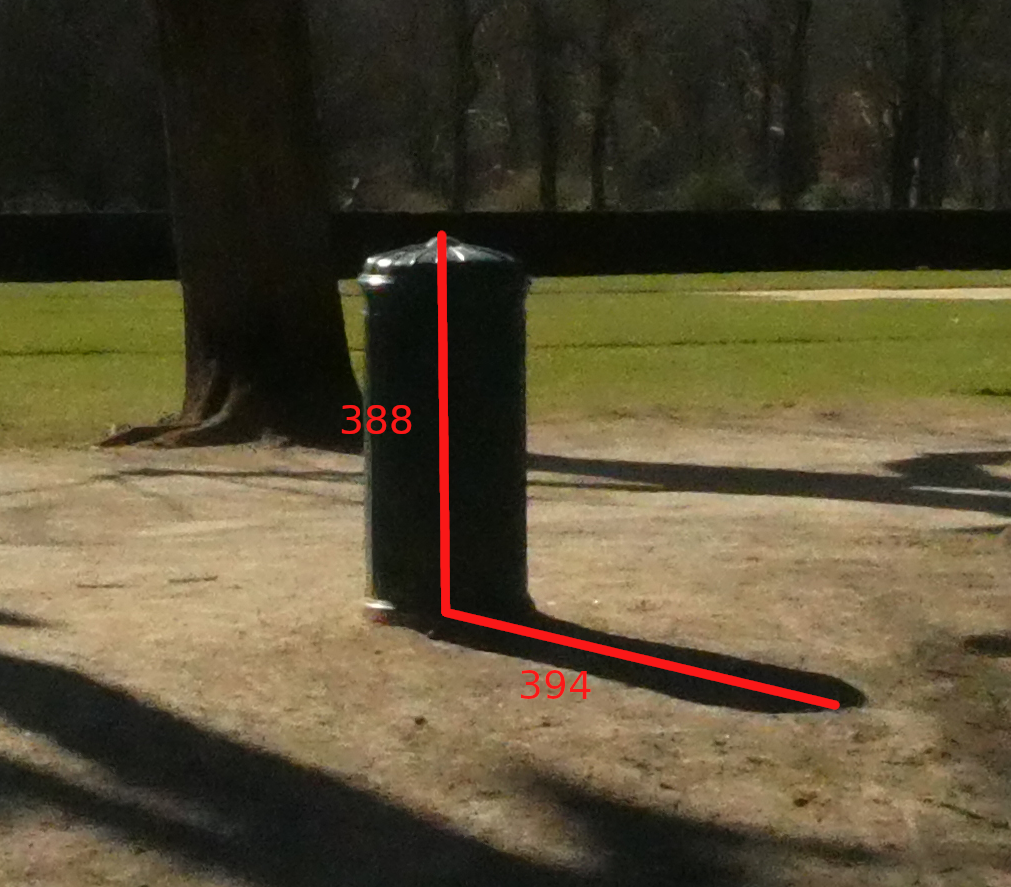
We can see that the dustbin is 388 pixels high and its shadow is 394 pixels high. As before, we calculate the height of the sun in the sky and we have 44.56°. tan(θ) = 388⁄394 θ = 44.5604°
Finally, we can go to suncalc and enter our values to try and find the date and time the photo was taken. Note that the azimuth of the sun at the time of the photo was calculated in the same way as in the first blog post. On the suncalc site, we can play with the dates or the API to find a date that corresponds to 44.56° for the sun’s altitude and 187.19° for the azimuth. Unfortunately, the sun is only this high in July and August! However, thanks to our analysis with our true values, we know that the photo was taken in March.
This method therefore has a significant approximation error that we can’t deny, and which we have to take into account when it comes to outputting the results. But where does this approximation come from, and in what cases can we accept it?
Approximation error
The origin
Let’s go back to the calculations from the previous blog and calculate the altitude of the sun using these values. So we had a height of 107cm and a shadow of 140cm. We can already compare the proportinality measurements and see that it’s already quite far:
- With measurements: 140/107 = 1.31
- Without measurement: 394/388 = 1.05
The same applies to the sun’s altitude, where the approximation is truly enormous:
- With measurements: θ = 37.3901°
- Without measurements: θ = 44.5604°
This highlights an error in relation to reality. The result is 44.56°, a long way from the 37.4° we had previously. But where does this margin of error come from and how can we correct it? This error comes from the distortions caused by projecting a 3D scene onto a 2D plane. In such a projection, lengths depend on the relative position of the object in relation to the image plane and the direction of observation. In particular, the depth axis is squashed, making it impossible to conserve metrics between objects located at different distances from the lens. This is exactly the case in our picture, where the end of the shadow is not at the same distance from the lens as the dustbin.
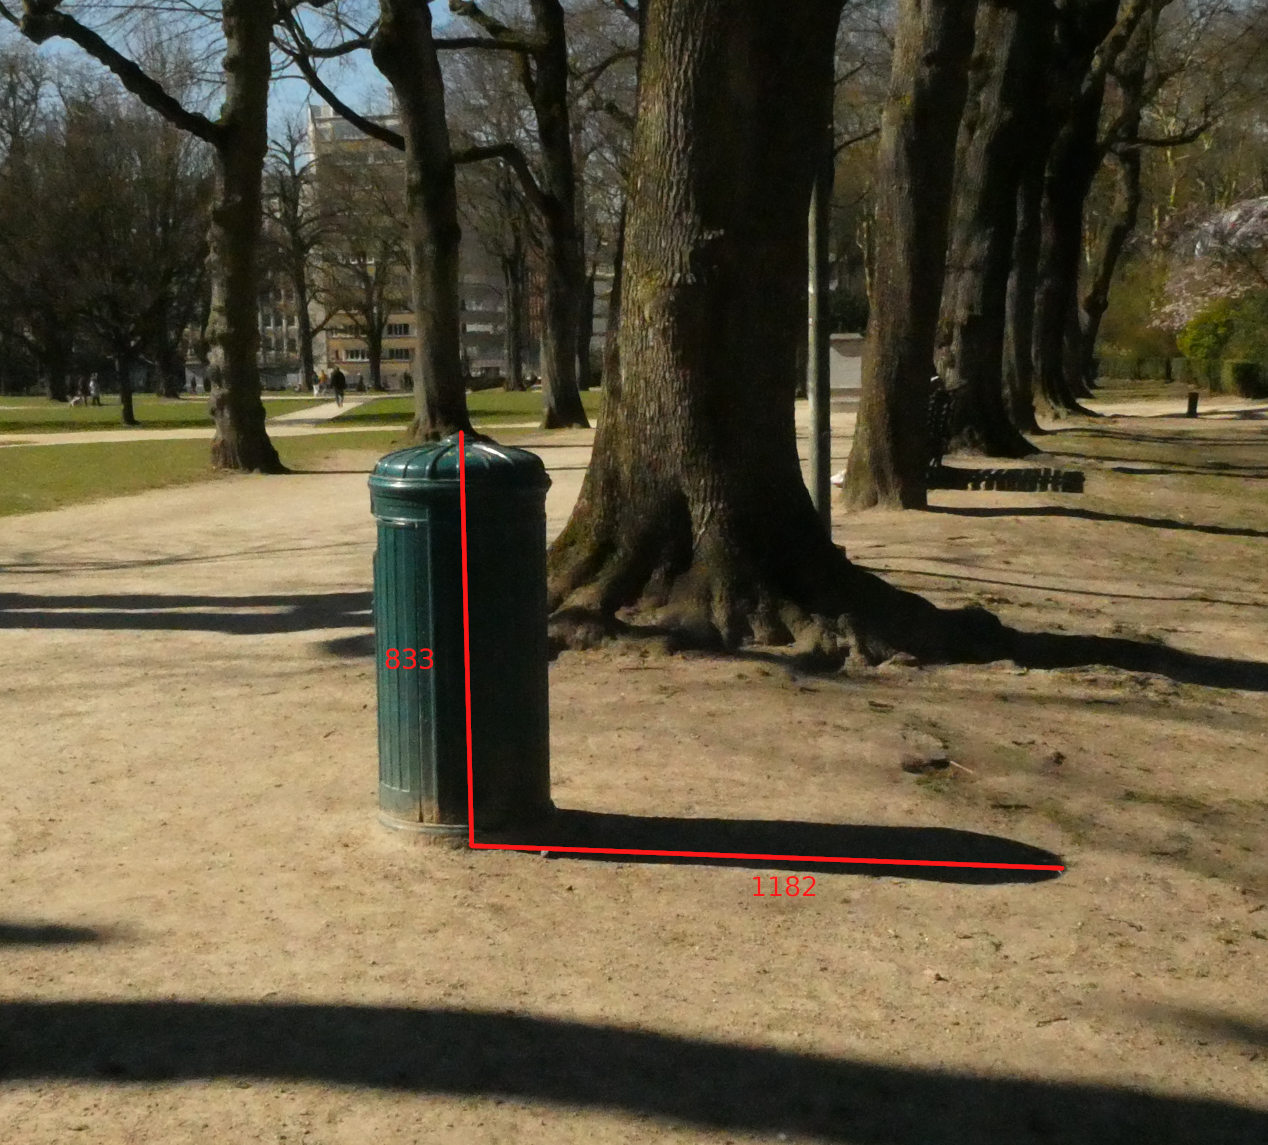
Therefore, there is one ideal case in which we can do without this depth dimension, which is lost in 2D projection. This is when the photo has been taken perpendicular to the sun’s axis, as in the image below. We can use the pixel method and have a correct altitude with a lower approximation. tan(θ) = 833⁄1182 θ = 35.1738° (real value 37°)
How bad is it, really?
So let’s return to our basic case and ask ourselves whether this approximation is serious. In the situation, where we are not perpendicular to the sun’s axis, it is impossible to find the exact date and time when the photo was taken. However, from a date range, it is possible to approximate the date and time when the photo was taken.
For example, let’s take the best situation we could have: the day on which the photo was taken, i.e. March 18, 2025. On that day, the sun was no higher than 39°. And given that the results of our calculations for that day give us 44°, we know that it was at its highest in the sky, i.e. around midday. So we focus on the azimuth and find our correct values. March 18, 2025 at 1:13 pm
So is this approximation serious? Well, not in this particular case, as we’re inat midday. So the sun doesn’t have much difference in degrees between the hours at this time. In fact, between 12:30 and 13:30 there’s only a one-degree difference, whereas between 8:30 and 9:30 there’s a 10° difference.
Conclusion
In conclusion, there is no method today that, without any context, can give the exact date and time when a photo was taken based on shadows. There will always be an approximate error that needs to be taken into account. But that doesn’t mean it can’t be used. In fact, there are 2 cases:
- The photo has been taken in line with the sun, and it is therefore possible to use this method while drastically reducing the approximation.
- We have a date range and we’d like to reduce this range to find the date on which the photo was taken to within a few days or a few hours.
An OSINT analyst can therefore not only rely on the image’s measurement, but on the actuals if he wants to make an accurate approximation that could be brought into an investigation.
Future work
During the writing of this blog, computer vision methods such as projective transformation and homography were used to suppress approximation. However, none of these methods proved successful in achieving the goal of approximation removal. On the other hand, it did open the door to a possible future project. The deduction of shadow size using homography. Indeed, it might be possible to use homography to deduce shadow size if we have 2 different photos of the same scene. So there’s a possibility here that doesn’t seem to have been explored before, and which could take shadow analysis into a new perspective.
This blog post is licensed under
CC BY-SA 4.0


