Optimizing and compressing your Windows Virtual Machine
Mar 22, 2021 by Georgi Nikolov | 5865 views
https://cylab.be/blog/135/optimizing-and-compressing-your-windows-virtual-machine
As I mentioned in the previous blog posts on the subject of the GHOSTS framework, I often use virtual machines to set up and run my tests. In the case of GHOSTS, i have the main GHOSTS server API running on a Linux VM with docker and docker-compose, and the GHOSTS client is running on a Windows 10 virtual machine. If you are interested to read about it, you can find the previous blogs at the following links:
- Simulate user activity with the GHOSTS framework : Introduction
- Simulate user activity with the GHOSTS framework: Client set-up and Timelines
Setting up the GHOSTS client is all fine and well, until we want to export it from VirtualBox, to be able to import it on another physical machine or share it with a colleague. All of a sudden we are left with an *.ova file of 10 or more gigabytes, which is not very practical. Luckily, there are ways to compress and minimize the size of the exported Virtual Machine.
Compressing your Virtual Machine
The steps that follow are not specific for a VM running GHOSTS, they can be used for any Windows VM you want to export.
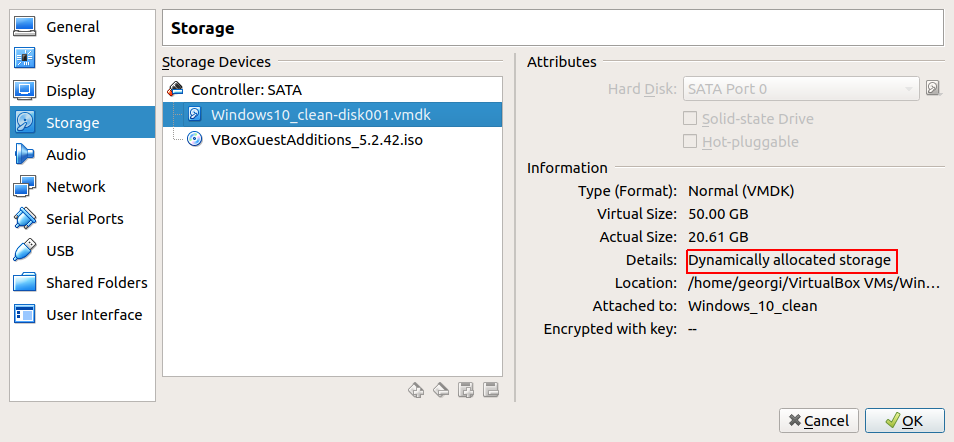
STEP 1: Using Dynamic Disk allocation
When creating a Virtual Machine with VirtualBox, we have the option to create a dynamically allocated storage that can be used by this VM. The benefit of a dynamic disk is that it can grow and shrink in size, depending on the needs of the VM. Initially we set a certain maximum size, for example 40 GB, but the disk will only grow to this size when data needs to be stored.
By going to the “Settings>Storage” window of your VM in VirtualBox, we can check what type of virtual disk we are using and, if needed, change from fixed disk to dynamically allocated.
STEP 2: Writing Zeros to the Virtual Disk
First and foremost, when we want to clean and compress the size of the VM, we need to free up some space on the hard disk. To do this, it is recommended to delete any data that we no longer need. This might mean deleting files we don’t use any more, or uninstalling unused programs. It is imperative to empty the Recycle Bin too.
Deleting files from your folders, or even emptying the Recycle Bin, does not mean that the files are gone for ever. More often than not, fragments of the removed files and programs are retained in the unallocated space of the system. What this means, in technical terms, is that the files are still somewhere on the hard disk, but all pointers to the files are removed so they are not accessible any more. If new files or programs need to be installed on the hard disk, and no space is available, the old files will be overwritten. But in the meantime, they will just hang out in the unallocated space, not being useful at all (except for Forensic Analysis, but that is a topic for another discussion).
To remove any lingering deleted files or uninstalled programs, we can overwrite the “empty” space in the unallocated space with zeroes.
Defragmenting the Virtual Hard Disk
After deleting unnecessary files and programs, and emptying the Recycle Bin, we can continue by defragmenting the disk. To do that, we can search for “Defragment” in the Start menu and launch the “Disk Defragment” or “Defragment and Optimize Drives” tool. In the tool, select the disk we want to compact and click “Optimize”. The disk will be analyzed and compressed accordingly. The status of the process will be shown under the “Current status” column.

Writing zeros to the Virtual Hard Disk
After the defragmentation, the data on the virtual hard disk has been analyzed and organized by moving it around. Now we can overwrite deleted data with zeros so that later, when we want to export our VM, VirtualBox will see a large amount of zeros (empty space) and compact the disk accordingly.
We can use the SDelete utility, supplied by Microsoft. After downloading it, we can extract the zip in a folder on our computer.
Next we open the Command Prompt, by typing “command prompt” or “cmd” in the search charm. We need to go to the directory where we extracted SDelete. That can be easily done by typing:
cd "C:path ofolder"
I usually create a folder “Tools” on the C: hard disk, so if i want to access the SDelete folder, I would type:
cd "C:Toolssdelete"
We can use auto-complete when typing in the command prompt, by pressing Space or Tab.

Once in the folder, we can use dir to view the content. We can see that there are three different versions of the SDelete tool. Depending on your Operating System, you might use the sdelete.exe for 32-bit, or sdelete64.exe, for 64-bit OS.
Now we can start writing zeros to the unallocated space by using the command:
sdelete.exe c: -z
The command will start writing to the C: hard disk and the -z parameter will tell the tool that we are doing it on a Virtual Machine and it will adapt accordingly. A license agreement will be displayed to us and by clicking “Agree”, the tool will start.
After SDelete has completed its task, there is still one more step to do before we are ready to export our image.
Compacting the Virtual Hard Disk
VirtualBox gives us the possibility to compact virtual disks using a specific command.
With a Linux Host we can use the following command:
vboxmanage modifymedium --compact /path/to/thedisk.vdi
With a Windows Host we can use the following command:
VBoxManage.exe modifymedium --compact c:path o hedisk.vdi
With a Mac Host we can use the following command:
VBoxManage modifymedium --compact /path/to/thedisk.vdi
Now we are ready to export our compressed image!
This blog post is licensed under
CC BY-SA 4.0


