Implementing email verification in Laravel
Mar 24, 2021 by Zacharia Mansouri | 5110 views
https://cylab.be/blog/137/implementing-email-verification-in-laravel
Have you ever wanted to ensure your users use email addresses they actually possess? Here is a quick way to achieve it. This tutorial assumes that you already have:
- the latest version of composer;
- two email addresses (one for sending emails and one for registering).
Setting Up Gmail access from less secure apps
Let’s assume we have a Gmail address and we’d like to use it to send emails from the Laravel app that we’re going to build in a minute. You can configure Gmail that way:
- connect on Gmail;
- click on your avatar at the top right;
- click on the Manage your Google Account button;
- click on the Security tab;
- click on Less secure app access and turn the access on.
Disclaimer: be extremely careful when using Gmail less secure app access. In fact, your email address and password will be written in your .env file (this will be done in a few steps).
Building the app
Now let’s build a Laravel app called email-app and add it the necessary authentication package:
composer create-project laravel/laravel email-app
cd email-app
composer require laravel/ui "^3.0"
php artisan ui vue --auth
npm install && npm run dev
Note that it is required to use the 3.0 version of laravel/ui. If the npm commands show an error, it means that some packages have yet to be installed. Just run it again and everything should be working fine.
Creating and configuring the database
For this tutorial a simple sqlite database will suffice:
touch storage/app/db.sqlite
Here is the .env database and email configuration we need:
DB_CONNECTION=sqlite
DB_DATABASE=/absolute/path/to/db.sqlite
#DB_HOST=127.0.0.1
#DB_PORT=3306
#DB_USERNAME=
#DB_PASSWORD=

MAIL_MAILER=smtp
MAIL_HOST=smtp.gmail.com
MAIL_PORT=587
MAIL_USERNAME="your_gmail_address"
MAIL_PASSWORD="your_gmail_pasword"
MAIL_ENCRYPTION=tls
MAIL_FROM_ADDRESS="your_gmail_address"
MAIL_FROM_NAME="${APP_NAME}"
Note that:
- /absolute/path/to/db.sqlite refers to the absolute path to the db.sqlite file created in the previous step;
- DB_HOST, DB_PORT, DB_USERNAME, DB_PASSWORD are commented, but you can just get rid of them;
- the MAIL_MAILER, MAIL_HOST, MAIL_PORT and MAIL_ENCRYPTION data vary from one mail provider to another;
Don’t forget to write your Gmail address next to MAIL_USERNAME, MAIL_FROM_ADDRESS and to write your Gmail password next to MAIL_PASSWORD.
Make the user model implement the email verification
In app/Models/User.php: add implements MustVerifyEmail to the class definition. Here is how you User class should look like:
<?php

namespace AppModels;

use IlluminateContractsAuthMustVerifyEmail;
use IlluminateDatabaseEloquentFactoriesHasFactory;
use IlluminateFoundationAuthUser as Authenticatable;
use IlluminateNotificationsNotifiable;

class User extends Authenticatable implements MustVerifyEmail
{
    use HasFactory, Notifiable;

    ....

}
Enable the email verification
We need to add the verification middleware to the routes that need the user to be verified. To achieve that, let’s first ensure that the verification is available to all the routes by replacing in routes/web.php the line:
Auth::routes();
by
Auth::routes(['verify' => true]);
Then we enable the verification for the /home route. This route is served by the HomeController in app/Http/Controllers/HomeController.php. To do that, we just need to add the verified middleware by replacing the following line in the constructor:
$this->middleware('auth');
by
$this->middleware(['auth', 'verified']);
Final Steps
We now just need to create the database using:
php artisan migrate
And then launch the server:
php artisan serve
Now you can go on: http://localhost:8000/register and register using an email address you possess so that you can verify it.
When you try to access the /home route (http://localhost:8000/home), here is what you should see unless you verify your email:
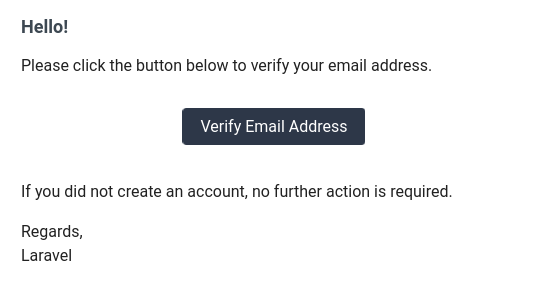
You should have received the following email. Just click on the Verify Email Address button to verify your email.
And when you’re verified, go to the /home route:
You’re now able to require each user to verify his/her email address before accessing certain content of your Laravel website!
If you’re insterested in how to customise your Laravel user verification email process, you should check this link: https://brabeum.com/2019/10/customise-the-laravel-user-verification-email/
Also, if your website uses HTTPS, you may want to check this post to ensure that the email verification works with both HTTP and HTTPS: Using HTTPS over a reverse proxy in Laravel.
This blog post is licensed under
CC BY-SA 4.0


