Exposing a Kubernetes application : Service, HostPort, NodePort, LoadBalancer or IngressController?
Jul 6, 2021 by Thibault Debatty | 17323 views
Having your app running on Kubernetes is one important step. Now you have to make this killer app accessible from the Internet. And as usual with Kubernetes, there are a lot of possibilities Here are a few definitions and examples to help you understand your choices…
First let’s start with
Some definitions
In Kubernetes, pods can be automatically destroyed and recreated, which means their IP address will also change frequently. This causes a challenge: most of the time you need to access your pods in a reliable way. For example you need to access your application from the Internet, or your frontend pod must access your database pods in a reliable way. Therefore you can use a Service. A Service will:
- provide a stable IP and port to access the pods;
- distribute incoming traffic between participating pods (using a simple Round-Robin algorithm).
Different types of services exist. The interesting ones in this context are the NodePort and the LoadBalancer.
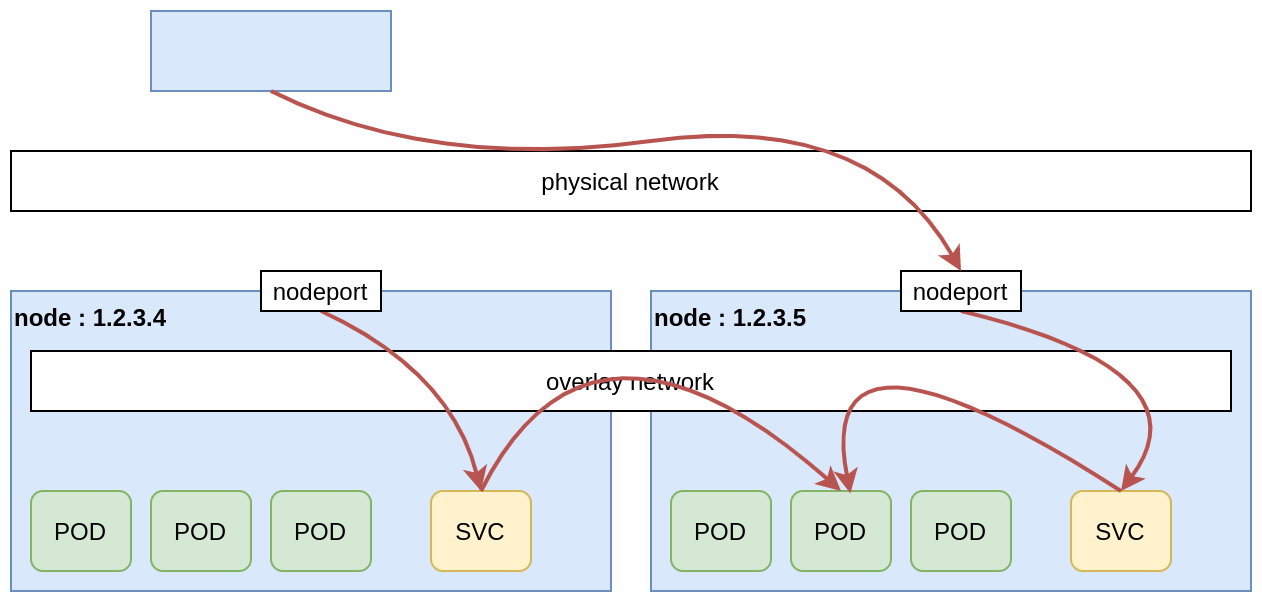
A NodePort Service will open a port on all nodes of the cluster, to make the pods available. The port number can be automatically chosen by kubernetes, or manually specified. But it must lie in the range 30000-32767 (by default).
Here is an example of NodePort Service configuration:
apiVersion: v1
kind: Service
metadata:
  name: hello-svc
spec:
  type: NodePort
  ports:
  - port: 80
    nodePort: 30001
    protocol: TCP
  selector:
    app: hello-app
Some kubernetes cluster providers, like GKE, Azure, OVH or Scaleway allow to automatically provision and configure an external Load Balancer, using a LoadBalancer Service definition. So the LoadBalancer Service is only available if the cluster is configured accordingly. Moreover, it does not modify the cluster itfself, but allows to configure another external machine.
Here is an example of a LoadBalancer Service:
apiVersion: v1
kind: Service
metadata:
  name: hello-svc
spec:
  type: LoadBalancer
  ports:
  - port: 80
    targetPort: 80
    protocol: TCP
  selector:
    app: hello-app
An IngressController is a special kind of Pod that acts like a reverse proxy. The IngressController allows:
- TLS termination (to provide httpS);
- to serve multiple domains on the same cluster (like Apache VirtualHost);
- on a single domain, to map different paths to different services and pods.
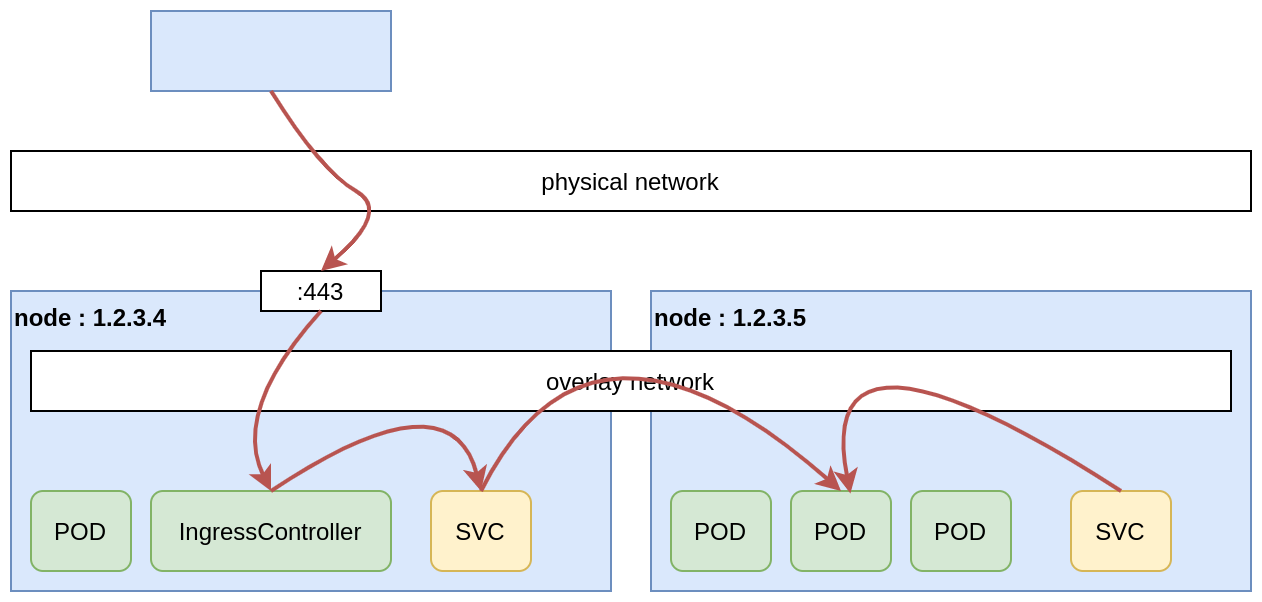
Because the IngressController is a Pod, it has to be exposed so it can be reached from the Internet. One simple way to do so is using a HostPort. A HostPort will open a port only on the Node where the Pod is running (so NOT on all nodes of the clusters). So if you have only one IngressController Pod in your cluster, the HostPort will opened only on the node where this Pod is running… Unlike a NodePort, a HostPort can be any port number. So typically, for an IngressController ports 80 and 443 are used.
Nginx is the default IngressController on Kubernetes, but Traefik is also widely used.
So, with all these building blocks in hand, let’s look at some possible architectures for exposing a Kubernetes application.
NodePort and manual load balancer configuration
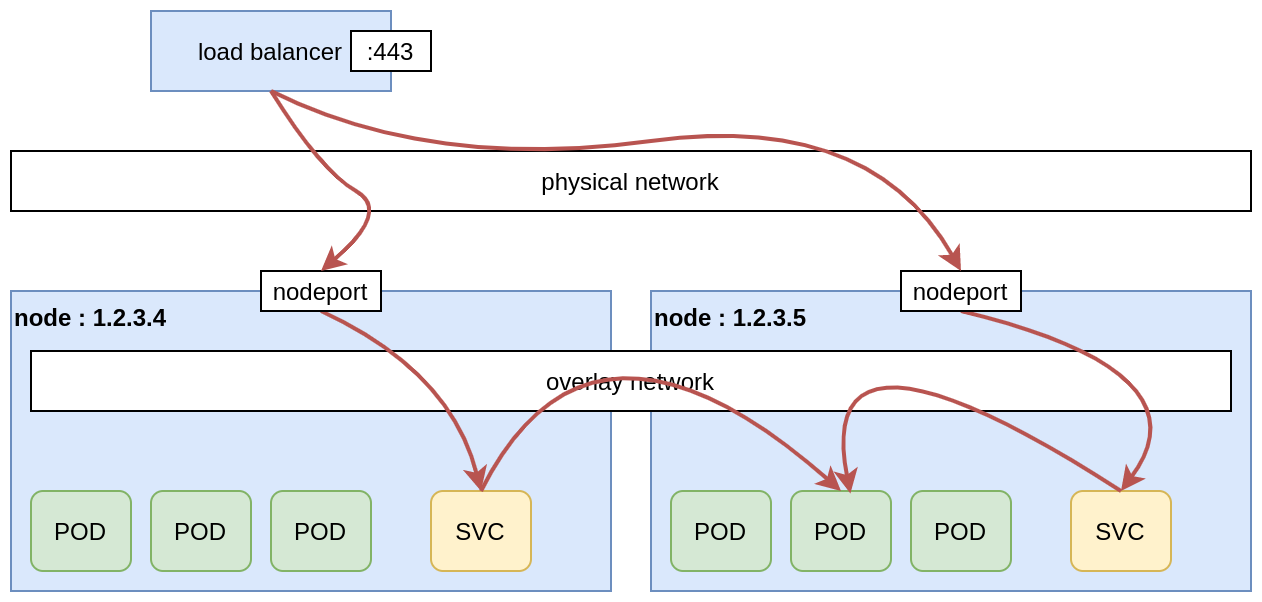
A first solution consists in using a NodePort Service to expose the app on all nodes, on a fixed port (for example 30155). Then an external load balancer is manually configured to perform TLS termination and to forward the traffic to the nodes of the cluster. Usually these external load balancers can detect unreachable nodes, so it will automatically forward traffic to available nodes in the cluster, to provide high availability.
Pros:
- simple to implement;
- no downtime.
Cons:
- the external load balancer is a single point of failure, so we rely on the provider to make sure it’s truly reliable;
- if one node of the cluster crashes and is replaced with a new one (and a new IP), the load balancer must be manually reconfigured;
- a load balancer is not for free.
Automatic load balancer configuration
If the cluster provider supports this option, we can use a LoadBalancer Service to automatically configure (and reconfigure) the external load balancer, that will forward the traffic to the nodes of our cluster. However, in this setup, TLS termination is only supported by some providers, like AWS:
https://kubernetes.io/docs/concepts/services-networking/service/#ssl-support-on-aws
Pros:
- relatively simple to implement.
Cons:
- TLS termination is only partially supported;
- the external load balancer is a single point of failure, so we rely on the provider to make sure it’s truly reliable;
- a load balancer is not for free.
IngressController and HostPort
Next possibility consists in using a single IngressController Pod, that will perform TLS termination, and expose the Pod using a HostPort, on ports 80 and 443.
Pros:
- no need for an external load balancer.
Cons:
- IngressController configuration can be delicate;
- if the IngressController is rescheduled on another Node (and another IP), the application will be unreachable until we change the corresponding DNS entry.
IngressController, DaemonSet and HostPort
With a DaemonSet, an instance of the IngressController will be running on each node of the cluster. Then we can configure multiple DNS A records to point our domain name to the different IP’s of the cluster nodes.
Pro:
- no need for an external load balancer.
Cons:
- if a node crashes, the application will be intermittently unreachable (because of the DNS round-robin distribution);
- IngressController configuration can be delicate;
- moreover, some IngressControllers like the widely used Traefik, require additional configuration to support TLS termination in this architecture: https://doc.traefik.io/traefik/providers/kubernetes-ingress/#letsencrypt-support-with-the-ingress-provider.
IngressController and automatic load balancer configuration
Finally, we can combine an IngressController that will perform TLS termination with an external Load Balancer that is automatically configured. In this configuration the load balancer is used to provide a fixed and stable IP to expose our application. So it replaces in some way the dummy round-robin distribution used by multiple DNS A records.
This is usually the architecture used in large production deployments.
Pros:
- no downtime.
Cons:
- the external load balancer is a single point of failure, so we rely on the provider to make sure it’s truly reliable;
- a load balancer is not for free.
This blog post is licensed under
CC BY-SA 4.0


