Secure your project with the GitLab SAST analyzers
Oct 28, 2021 by Zacharia Mansouri | 11726 views
Secure Software Development GitLab PHP Cyber-Wise
https://cylab.be/blog/181/secure-your-project-with-the-gitlab-sast-analyzers
Learn how to secure any project with the GitLab SAST analyzers and easily separate the false positives from the real threats that should be addressed before deploying the project.
GitLab SAST analyzers
SAST is an acronym for Static Application Security Testing. Such analyzers will search for known vulnerabilities in the source code of a project. GitLab CI/CD provides pipeline jobs running those analyzers.
With the following lines in your .gitlab-ci.yml configuration file, you can create those SAST analyzer jobs that will produce JSON report files in the pipeline artifacts:
include:
  - template: Security/SAST.gitlab-ci.yml
variables:
  SAST_DEFAULT_ANALYZERS: "eslint,nodejs-scan,phpcs-security-audit"
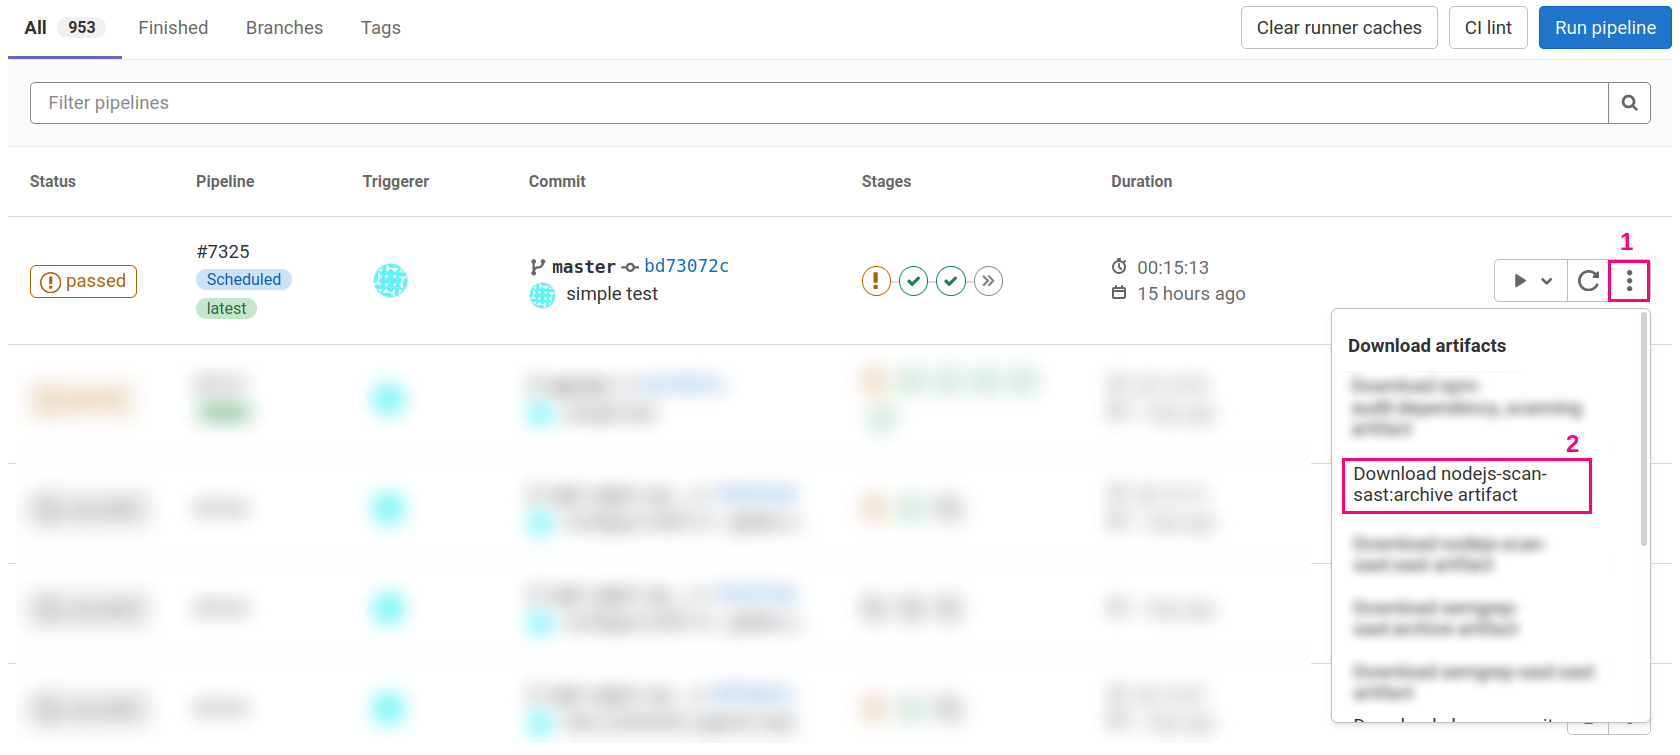
The above configuration will run 3 different analyzers (eslint, nodejs-scan and phpcs-security-audit) in 3 jobs at the test stage. They will each produce a report file called gl-sast-report.json. The reports are available to download through the pipelines interface, as shown in the picture hereunder:
Now let’s take a look at the content of one of these reports (e.g. nodejs-scan):
{
  "version": "14.0.0",
  "vulnerabilities": [
    {
      "id": "ee16f7cb8063e197a041799b615cac9b47c3f21f51f364e4a37d74e96775f72b",
      "category": "sast",
      "name": "vue_template",
      "message": "The Vue.js template has an unescaped variable. Untrusted user input passed to this variable results in Cross Site Scripting (XSS).",
      "description": "The Vue.js template has an unescaped variable. Untrusted user input passed to this variable results in Cross Site Scripting (XSS).",
      "cve": "resources/js/components/Utils/PFooter.vue:27:vue_template:CWE-79",
      "severity": "High",
      "scanner": {
        "id": "nodejs-scan",
        "name": "NodeJsScan"
      },
      "location": {
        "file": "resources/js/components/Utils/PFooter.vue",
        "start_line": 27,
        "end_line": 27
      },
      "identifiers": [
        {
          "type": "njsscan_rule_type",
          "name": "vue_template",
          "value": "The Vue.js template has an unescaped variable. Untrusted user input passed to this variable results in Cross Site Scripting (XSS)."
        },
        {
          "type": "cwe",
          "name": "CWE-79",
          "value": "vue_template"
        }
      ]
    },
    /*
     * This comment replaces the other vulnerabilities of the list...
     */
  ],
  "remediations": [],
  "scan": {
    "scanner": {
      "id": "njsscan",
      "name": "njsscan",
      "url": "https://github.com/ajinabraham/njsscan",
      "vendor": {
        "name": "GitLab"
      },
      "version": "0.2.8"
    },
    "type": "sast",
    "start_time": "2021-10-21T20:03:26",
    "end_time": "2021-10-21T20:05:30",
    "status": "success"
  }
}
That report contains the data concerning the scanner (version, git url, status…) and the list of all the vulnerabilities it found. In the above report, we kept one sample of the list of vulnerabilities, informing us that a highly severe vulnerability has been found:
The Vue.js template has an unescaped variable. Untrusted user input passed to this variable results in Cross Site Scripting (XSS)…
But if you a take a look at the pipelines picture above, the unblurred pipeline #7325 has no sign of failure. And it is precisely the problem that is solved through this blogpost.
GitLab limitations
The results of the vulnerability reports, whether vulnerabilities have been found or not, will not have any effect on the pipeline. If you want more features than just being able to download reports, you can see on this page the features you can get if you upgrade your GitLab account to a Ultimate account.
But do you really need to upgrade to a Ultimate account in order to manage the vulnerability reports? Of course not, since this blogpost presents you a way to create and customize jobs that will check the content of the reports. Here is how it is achieved:
- SAST analyzer jobs produce reports during the test stage;
- the reports are checked during the next stage so that the pipeline fails if you did not explicitly mark all the vulnerabilities found as being false positives.
The reports will be stored by GitLab as artifacts. The default .gitlab-ci.yml configuration shown in the last section will produce those artifacts which are called pipeline artifacts. These are not available between the jobs of successive stages of the pipeline since they are not explicitly managed by the .gitlab-ci.yml definitions. We will therefore need to use of a different kind of artifact: the job artifact. Such an artifact can be passed from the job of a stage to the ones of the next stage. Let’s thus start by building a more complex pipeline configuration in the next section.
Custom pipeline
The following configuration replaces the old one in .gitlab-ci.yml:
# 'include' is not useful anymore since we'll manually create the jobs

stages:
  - test

nodejs-scan-sast:
  image: registry.gitlab.com/security-products/sast/nodejs-scan:2 # specific image for nodejs-scan-sast
  stage: test # the report is produced at the test stage
  artifacts:
    paths:
      - gl-sast-report.json # the report will be accessible to the jobs of the next stage
  script:
    - /analyzer run # standard command to launch the analyzer
Each report filename, no matter which SAST analyzer image you use, is called gl-sast-report.json. Let’s add a new stage called sast-vuln that will run one job whose purpose is to check the vulnerability report coming from the nodejs-scan-sast job.
stages:
  - test
  - sast-vuln # new stage

nodejs-scan-sast:
  # Defined above

sast-vuln:nodejs-scan-sast:
  image: cylab/php:7.4 # any image that can run php
  stage: sast-vuln
  needs:
    - job: nodejs-scan-sast
  script:
    - php sast-vuln-checker.php gl-sast-report.json
The sast-vuln-checker.php file from the script will be detailed later. The presence of the needs keyword indicates that the sast-vuln:nodejs-scan-sast job can start right after the nodejs-scan-sast one finishes and also retrieves all its generated job artifacts.
The same can be done for all the GitLab SAST analyzers (eslint, phpcs-security-audit…), the only things that must differ are the job names (don’t forget the name pointed by needs) and the analyzer image (in the test stage). Here is a list of all the GitLab SAST analyzer images.
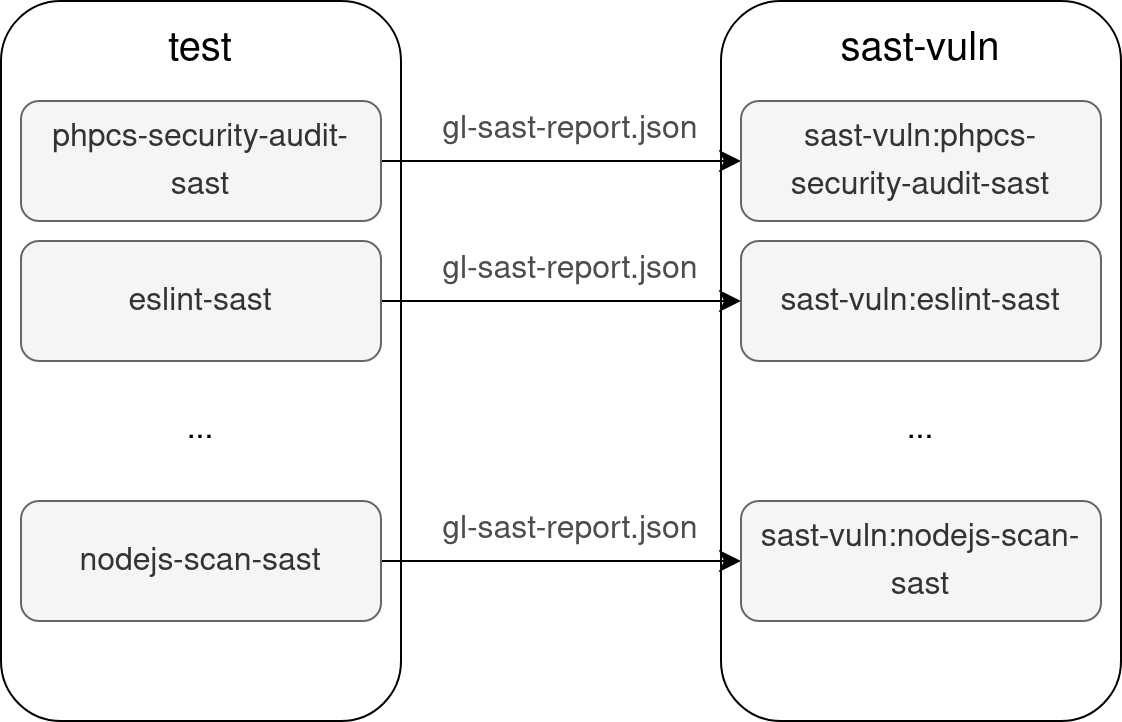
Each test job running an analyzer will therefore produce a report called gl-sast-report.json that will be retrieved by the corresponding sast-vuln job. We will call those jobs checkers from now on. Analyzers and checkers are illustrated in the following diagram.
An all in one solution to ignore false positives
The different SAST analyzers use different tags to ignore certain code portions. Here are two examples:
- ESLint:
const res = eval('42'); // eslint-disable-line
- PHPCS (PHP Code Sniffer):
$toParse = file_get_contents($argv[1]); // phpcs:ignore
The two above examples show that different tags are used. Moreover, the same analyzer can use different tags to ignore a whole file, a block of code… which can lead to the need to remember a lot of them!
The solution we propose here is to combine all of them into a simple tag, made to ignore portions of code, mostly single lines, while specifying the reasons why those lines are ignored. Here is what the two above pieces of code become:
- ESLint:
const res = eval('42'); // @SAST-BYPASS[eval is used on an hardcoded value]
- PHPCS (PHP Code Sniffer):
$toParse = file_get_contents($argv[1]); // @SAST-BYPASS[the filename is hardcoded in other server scripts]
This new tag has the following structure: @SAST-BYPASS[text justifying why the line is ignored]. The text justifying why the line is ignored will appear in the GitLab logs under the description of the vulnerability that has been ignored by the checkers.
Of course, you can combine the analyzer-specific tags along the @SAST-BYPASS tag, but the lines ignored by the analyzers in the test stage will not appear in the logs of the checkers in the sast-vuln stage.
When you look at the vulnerabilities inside the JSON report (as in the sample from the first section above), you can observe that the filename and lines where each vulnerability was found is indicated:
"location": {
  "file": "resources/js/components/Utils/PFooter.vue",
  "start_line": 27,
  "end_line": 27
},
The script the checkers run, called sast-vuln-checker.php, will check the lines at the different vulnerability locations and will return an error if at least one vulnerability is not ignored and explained with a @SAST-BYPASS[…] tag. That way, the pipeline will stop, until those vulnerabilities are corrected or explained.
The sast-vuln-checker.php script works as follows:
- decoding the JSON report file into a PHP JSON object containing the analyzer’s data about the vulnerabilities it found;
- checking for each vulnerability if it is explained;
- printing each vulnerability and, if it exists, its explanation (using different colors for visualization purposes);
- returning an error if the number of unexplained vulnerabilities is non-zero.
Solution snippet
The full solution containing the sast-vuln-checker.php script, a few words on its usage and how to integrate it into a pipeline is available in the following snippet.
The development of this tool is part of our Cyber-Wise project against phishing.
This blog post is licensed under
CC BY-SA 4.0


