Getting started with Ansible
Jun 22, 2022 by Thibault Debatty | 4578 views
Ansible is an extremely powerful configuration management system. Ansible is able to perform a wide range of tasks on a large and heterogeneous ensemble of devices. Indeed, it relies on a system of modules (plugins) that allow to perform different tasks like software provisioning, system and application configuration management, application-deployment etc. Moreover, Ansible modules exist to manage a wide variety of devices like Linux and Windows computers, but also network equipment like switches and routers, kubernetes clusters and other cloud services like AWS, GCE and Azure. For this reasons, Ansible is sometimes coined as an infrastructure automation engine.
In this blog post we will show how to get started with Ansible. For the example we use servers running Ubuntu 22.04.
With Ansible the master, called ‘control node’ pushes the desired configuration to the ‘managed nodes’. The main advantage is that there is (almost) nothing to install on the managed nodes: Ansible uses SSH to connect to the managed nodes (so there must be an SSH server installed), and python to run the modules.
The drawback of this architecture is that the managed nodes must be reachable from the control node. So it is not optimal if the managed nodes are hidden behind a NAT, or only intermittently available (like laptops).
Control node installation
Easiest way to install Ansible on the control node is using apt:
sudo apt update
sudo apt install software-properties-common
sudo add-apt-repository --yes --update ppa:ansible/ansible
sudo apt install ansible
By default, Ansible assumes you connect to managed devices using ssh keys. So you should first generate a ssh key pair on the control server:
ssh-keygen -t ed25519
Managed node configuration
For this example, I will create a dedicated user for ansible (but this is not required):
sudo adduser ansible
The user must have administrator privileges:
sudo adduser ansible sudo
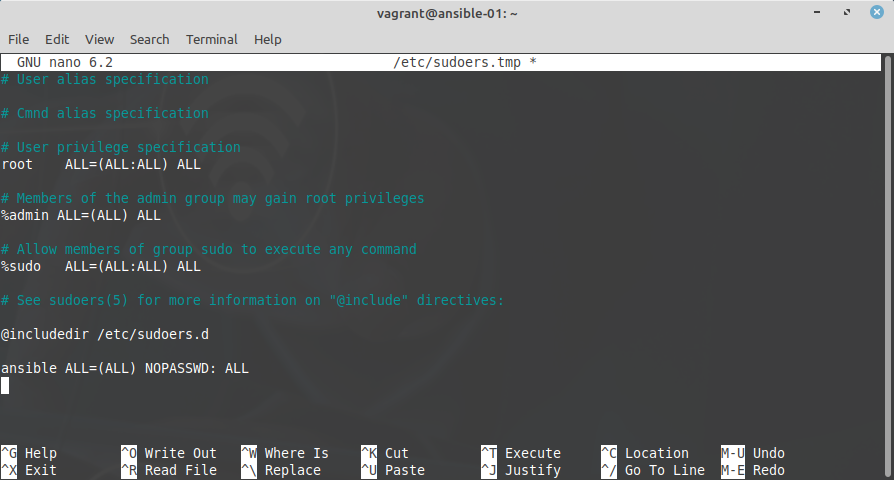
And to make management easier, I will configure sudo such that no password is required for user ansible:
sudo visudo
and add the following line at the end:
ansible ALL=(ALL) NOPASSWD:ALL
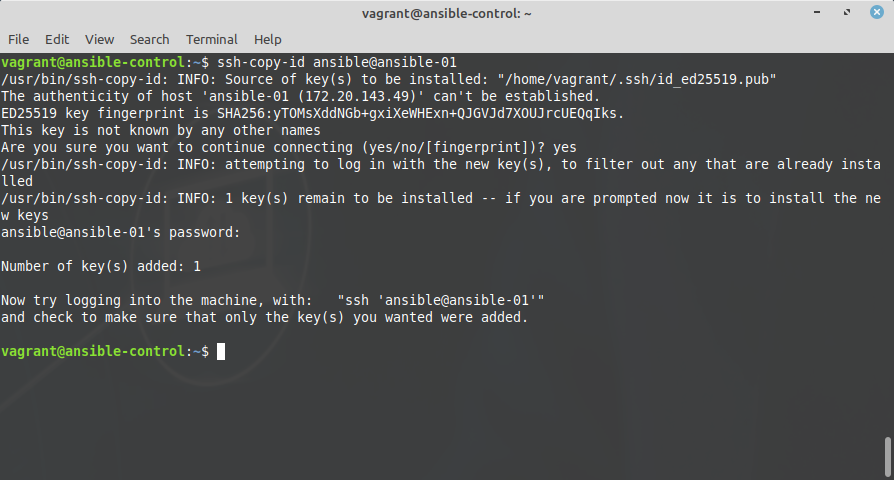
Now, back on the control node, you can copy the public ssh key with
ssh-copy-id ansible@<managed.node>
For example:
Inventory
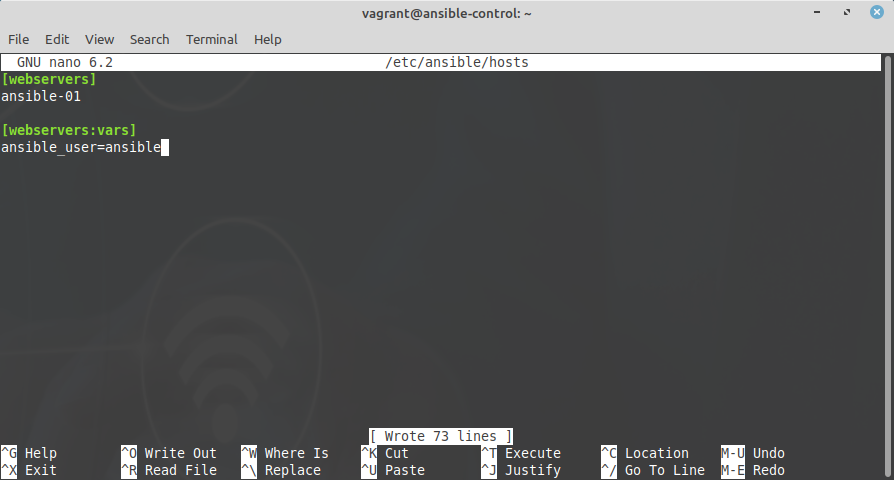
The inventory is a simple ini file that lists all devices to configure. You can use hostnames or IP addresses, and similar devices can be grouped together. By default, Ansible will look for the inventory at /etc/ansible/hosts, but you can choose another location…
Here is a simple example:
[webservers]
ansible-01
The inventory also allows to define some variables for each device, or for a group of devices. In the example below we indicate which user should be used to connect to the devices (with ssh):
[webservers]
ansible-01

[webservers:vars]
ansible_user=ansible
You can find the complete list of inventory possibilities in the documentation of Ansible inventory: https://docs.ansible.com/ansible/latest/user_guide/intro_inventory.html
Running tasks
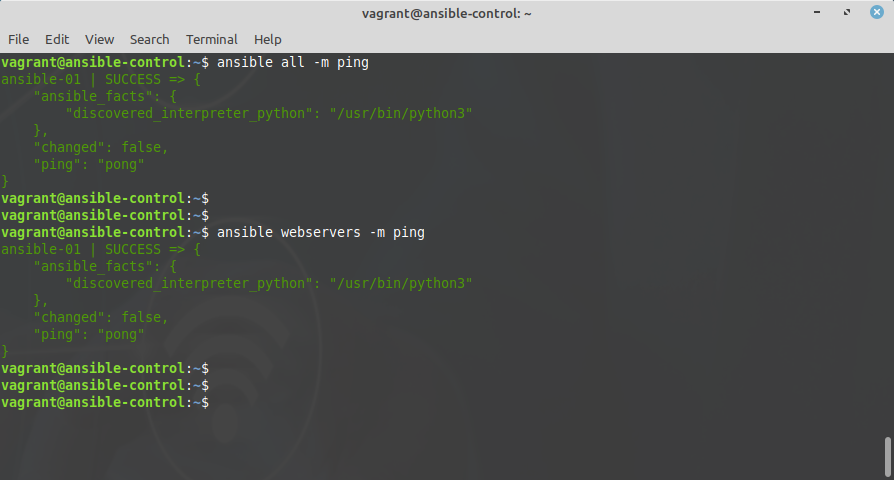
You can now run tasks on your devices using the ansible command. It has one required argument : a pattern to define on which hosts the task must be executed. You can use a hostname, a group name, an actual pattern, or simply ‘all’.
As an example (and a test), you can execute the ping module against all devices with:
ansible all -m ping
If needed, you can also run a direct command with the -a parameter:
ansible all -a "sudo reboot"
To perform configuration management, the desired configuration of the devices should be described in text files. This is the role of playbooks…
A simple playbook
A playbook is a yaml (text) file that describes the desired configuration of devices. For example:
# apache.yaml
- name: Apache
  hosts: webservers
  become: yes
  tasks:
  - name: Install Apache
    ansible.builtin.apt:
      name: apache2

  - name: Copy site config
    ansible.builtin.copy:
      src: assets/001-mysite.conf
      dest: /etc/apache2/sites-enabled/001-mysite.conf
      owner: root
      group: root
      mode: '0644'
As you can see, the playbook:
- indicates on which devices this playbook must be executed with
hosts: webservers; - indicates that the playbook requires administrator privileges with
become: yes; - lists a series of tasks to execute.
For example, the copy module allows to upload files from the control node to the managed nodes. You can find a list of available modules at https://docs.ansible.com/ansible/latest/collections/ansible/builtin/
Handlers: running operations on change
In some cases, you want a task to run only when a change is made on a device. In the example above, we want to restart apache if the configuration has changed, but not if the configuration is unchanged. Ansible has handlers to implement this:
- name: Apache
  hosts: webservers
  become: yes
  tasks:
  - name: Install Apache
    ansible.builtin.apt:
      name: apache2

  - name: Copy site config
    ansible.builtin.copy:
      src: assets/001-mysite.conf
      dest: /etc/apache2/sites-enabled/001-mysite.conf
      owner: root
      group: root
      mode: '0644'
    notify:
      - Restart apache

  handlers:
  - name: Restart apache
    ansible.builtin.service:
      name: apache2
      state: restarted
See that this time the copy module notifies the handler “Restart apache” if the module has caused a modification on the device.
You can run a playbook with
ansible-playbook <playbook.yaml>
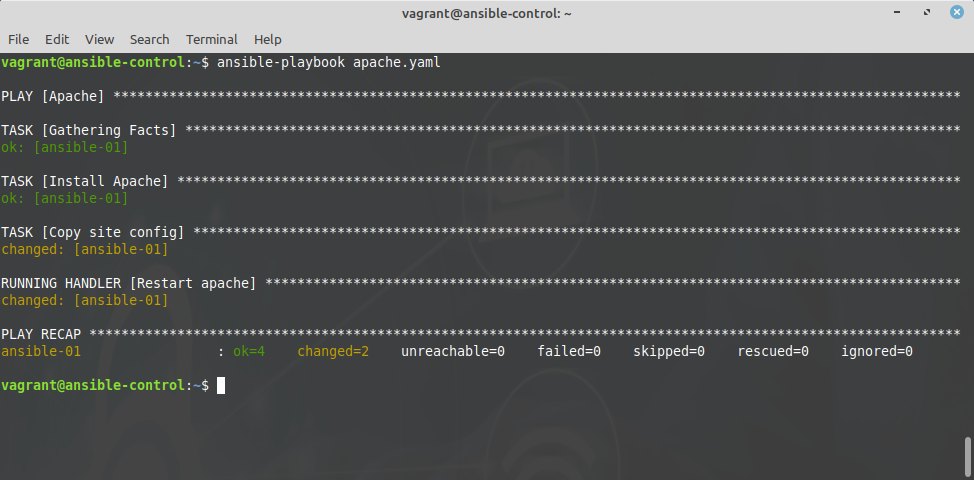
Moreover, Ansible modules are smart enough to check if they cause a modification on the device. If you run the playbook above multiple times, apache will be restarted only if the configuration file has been created or changed on the managed device.
You can find more information about handlers in the documentation: https://docs.ansible.com/ansible/latest/user_guide/playbooks_handlers.html
Roles and directory organisation
When your infrastructure evolves, your playbook will become very large and complex. Hence you will usually organize your Ansible configurations with:
- an inventory to map devices to groups;
- the playbook to map groups to roles;
- a single directory for each role, with a sub-directory for tasks, a sub-directory for handlers, and so on…
Here is an example of a playbook:
#
# playbook.yml
#
- hosts: webservers
  roles:
    - server
    - webserver
For each role, Ansible will look for role files:
- in ````/etc/ansible/roles```;
- in a directory called
roles/, relative to the playbook file; - and in a few other places…
Then, for each role, Ansible will look for
- a file
roles/<role>/tasks/main.ymlfor a list of tasks; - a file
roles/<role>/handlers/main.ymlfor a list of handlers; - and again, some other definition files.
So you could reorganize the previous example as follows:
| playbook.yml
+ roles/
  + server/
    + tasks/
      | main.yml
  + webserver/
    + tasks/
      | main.yml
      + assets/
        | 001-mysite.conf
    + handlers
      | main.yml
Roles are fully described in the documentation of Ansible: https://docs.ansible.com/ansible/latest/user_guide/playbooks_reuse_roles.html
Web API and web interface
Ansible is now developed by RedHat. RedHat also provides a commercial web interface with a REST API called Ansible Automation controller (and formerly known as Ansible tower). This interface has 2 roles:
- provide an easy to use web interface;
- provide a webservice so Ansible can interact with external tools.

There is also an open source project called Ansible Semaphore that provides a similar web interface for Ansible.
This blog post is licensed under
CC BY-SA 4.0


