Collecting data with Filebeat
Apr 20, 2021 by Georgi Nikolov | 8083 views
In modern network infrastructures, there are a lot of sources of data, that can be of interest for collection and analysis, to see if possible suspicious activity is present in the network. More often than not, this data is collected and send to a Security Information and Event Management (SIEM) tool, running on the network, where it can be processed and reviewed by domain specialists.
In a previous blog we learned about the ELK Stack SIEM open-project and how to deploy it. Next step is to actually collect data and forward it to the ELK Stack, so it can be visualized. The simplest way would be to use netcat and pass the data from a log file, line per line, but that is not as efficient, compared to using specialized collection and parsing tools, such as Filebeat.
What is Filebeat?
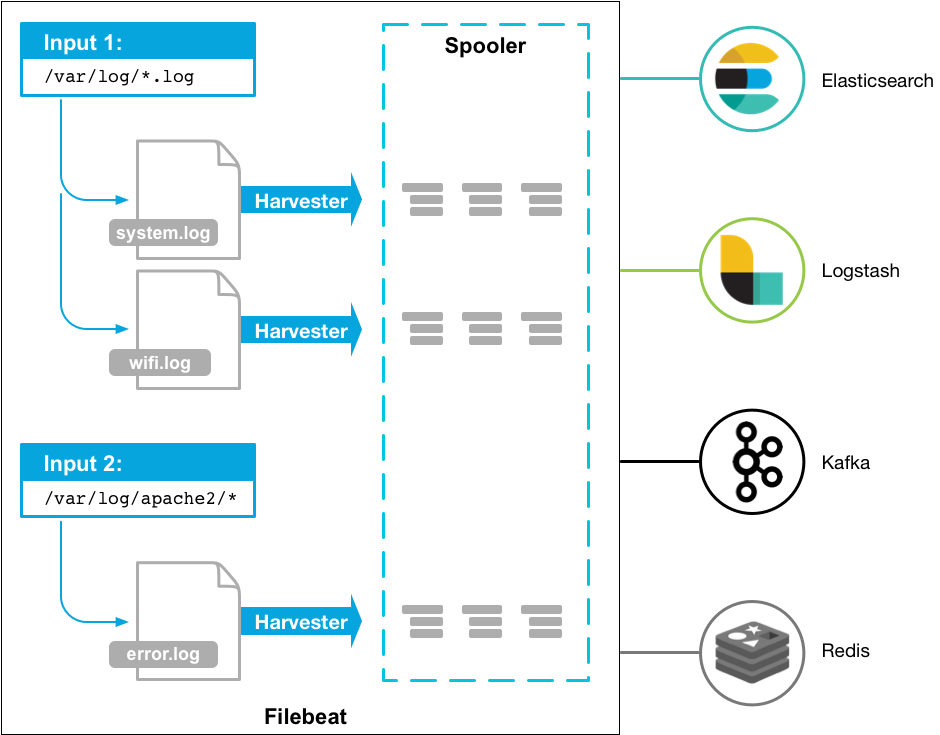
Filebeat is a light-weight collection and parsing tool, that can be installed on your server and aggregate data from multiple sources. This data can be parsed, enriched and forwarded to Logstash, to be indexed by Elastic Search. If we install Filebeat as an agent on our server, the agent will monitor any log files we direct it to, collect new entries, parse them and forward them to our SIEM for indexing.
Setting up and starting Filebeat
To test and run the ELK Stack, we configured a simple squid proxy server to collect HTTP data from multiple machines, running the GHOSTS Framework client. The first step in sending the squid log data to the ELK Stack, is installing the Filebeat agent on the squid proxy server. The proxy server is configured on a Linux Server Virtual Machine, so to install Filebeat we can run the following commands:
$ curl -L -O https://artifacts.elastic.co/downloads/beats/filebeat/filebeat-7.12.0-linux-x86_64.tar.gz
$ tar xzvf filebeat-7.12.0-linux-x86_64.tar.gz
Filebeat uses a filebeat.yml configuration file, where we can add all the needed information, needed by the agent to run correctly. The yml file is quite well documented and the different parts, that are needed to be filled in, are easy to find.
Step 1: Specifying the log files
The first information, that we need to fill in, is the log files, which we want to monitor and where to find them.
filebeat.inputs:

# Each - is an input. Most options can be set at the input level, so
# you can use different inputs for various configurations.
# Below are the input specific configurations.

- type: log (1)

  # Change to true to enable this input configuration.
  enabled: true (2)

  # Paths that should be crawled and fetched. Glob based paths.
  paths:
    - /var/log/squid/access.log (3)
    #- c:programdataelasticsearchlogs*
(1) the extension of the log file that we will use as input
(2) set to true so filebeat knows that this part of the configuration file should be used
(3) path to the log file, to be used as input
Step 2: Set-up Kibana
If we want to connect Filebeat directly to Kibana, to visualize the data directly with a predefined dashboard, we can configure the Kibana API.
setup.kibana:
  host: "172.20.116.33:5601" (1)
  username: kibana (2)
  password: "XXXXXXXXXXXXXXXXX" (3)
(1) the IP and port of the Kibana host
(2) username, to be used to connect to Kibana API
(3) password, to be used to connect to Kibana API
Step 3: Set-up Logstash output
We want to forward the squid logs to our Logstash machine, so they can be parsed and indexed by Elastic Search.
output.logstash:
  # The Logstash hosts
  hosts: ["172.20.116.33:5044"] (1)
  index: filebeat_logs (2)
(1) the IP and port of the Logstash host
(2) index to be used for the squid logs
Step 4: Configure Filebeat pipeline
The pipelines used by Filebeat are set-up automatically the first time we run Filebeat and they are configured as though Elasticsearch output has been enabled. In our case, we are using the Logstash output, so we need to configure the pipelines manually using the setup command. If we use any extra modules, we need to specify them too.
$ ./filebeat setup --pipelines --modules system,nginx,mysql
Step 5: Start Filebeat
Before we start Filebeat, it is important to modify the privileges of the filebeat.yml and specify the user who is authorized to publish events.
$ sudo chown root filebeat.yml (1)
$ sudo chown root modules.d/system.yml (1)
$ sudo ./filebeat -e
(1) give the root user privileges over the configuration files
Afterwards, we can start the Filebeat agent using the following command:
$ sudo service filebeat start
We can also start and stop Filebeat using systemctl, or check the logs of the Filebeat agent. Another interesting option is, if we want to set-up the Filebeat service to start at boot or not.
$ systemctl start filebeat (1)
$ systemctl stop filebeat (2)
$ systemctl enable filebeat (3)
$ systemctl disable filebeat (4)
$ systemctl status filebeat (5)
$ journalctl -u filebeat.service (6)
(1) start the Filebeat service
(2) stop the Filebeat service
(3) enable the Filebeat service to start at boot
(4) disable the Filebeat service to not start at boot
(5) get the Filebeat service status
(6) view the Filebeat service logs, by default stored in journalId.
Step 5.5: Possible restarting of the Filebeat service
Filebeat constantly monitors the input log files for new entries and sends them to Logstash. The agent knows if new entries are added, because it keeps the current position in the logs, to be read. If for some reason, we need to re-read the log file from the start, we can do this by removing the saved position. The position is kept in /var/lib/filebeat/registry/filebeat, in a file called log.json.
(...)
{"op":"set","id":544914}
{"k":"filebeat::logs::native::54265208-2050","v":{"source":"/var/log/squid/access.log","offset":761691,"type":"log","FileStateOS":{"inode":54265208,"device":2050},"identifier_name":"native","id":"native::54265208-2050","prev_id":"","timestamp":[307456793,1618911594],"ttl":-1}}
{"op":"set","id":544915}
{"k":"filebeat::logs::native::54265208-2050","v":{"FileStateOS":{"inode":54265208,"device":2050},"id":"native::54265208-2050","source":"/var/log/squid/access.log","ttl":-1,"type":"log","prev_id":"","offset":761824,"timestamp":[310444157,1618911597],"identifier_name":"native"}}
{"op":"set","id":544916}
{"k":"filebeat::logs::native::54265208-2050","v":{"source":"/var/log/squid/access.log","type":"log","FileStateOS":{"inode":54265208,"device":2050},"identifier_name":"native","id":"native::54265208-2050","offset":762219,"timestamp":[326443571,1618911604],"ttl":-1,"prev_id":""}}
{"op":"set","id":544917}
{"k":"filebeat::logs::native::54265208-2050","v":{"identifier_name":"native","id":"native::54265208-2050","source":"/var/log/squid/access.log","timestamp":[323245967,1618911605],"type":"log","FileStateOS":{"inode":54265208,"device":2050},"prev_id":"","offset":762352,"ttl":-1}}
If we need to restart Filebeat and start reading the log file from the start again, we can just delete, or empty the log.json file.
(Side Note) From Filebeat to Logstash
As a side note, the data sent from Filebeat to Logstash is in json format. In my case, I had an error with the data, when trying to parse it with Logstash. The [host] field from Filebeat is an object, but Logstash tries to parse it as text. To solve this, we can change how Logstash parses the data it receives, by modifying the logstash.conf file on our ELK Stack machine and then restart Logstash. There are two ways to modify the configuration file, to solve the problem:
- We can “remove” the field, that way Logstash won’t try to parse it. We can add the following filter to the pipeline configuration:
## Add your filters / logstash plugins configuration here
filter {
    mutate {
      remove_field => [ "host" ]
    }
}
- If we want to keep the
[host]field, so we know from where the data originated from, we can just change the value of the field to a specific value from the object:
## Add your filters / logstash plugins configuration here
filter {
  mutate {
    update => { "host" => "%{[host][hostname]}" }
  }
}
Conclusion
The final step in our ELK Stack deployment has been completed. Now we have connected all the pieces in our network of machines- from the GHOST machines generating data, the squid proxy server collecting the data, to the ELK Stack that recieves the data from Filebeat and indexes it. From here on out, we can start playing with Kibana and the different available visualizations to create a custom Dashboard for our log files and maybe gain some insight from it.
This blog post is licensed under
CC BY-SA 4.0


