HTTP benchmarking with wrk2
Jun 18, 2021 by Thibault Debatty | 9525 views
One important step of any DevOps toolchain consists in testing the performance of the web application before the new version is deployed in production. HTTP benchmarking is a complex subject as a lot of parameters intervene in the perceived performance of the application.
For example:
- a web application with a lot of heavy javascript code will seem slow to the user;
- a web application that requires a lot requests to download images and static files will be slow to display the first page…
- and if those elements are not correctly cached on the browser, it will also be slow for subsequent pages;
- finally, even with optimized javascript code and heavily cached static content, the web application may be slow if the server is not able to process the requests of all users hitting the site at the same time.
For this blog post we focus on this last situation, using wrk2. Like ApacheBench (ab) or the original wrk, wrk2 will send requests to a single URL and measure the response time from the server. So it will not download the whole page, and it will not execute javascript code.
Unlike the other tools, wrk2 tries to measure the behavior of the server at a fixed request rate. This provides a fair measure of the response time from the server when multiple users hit this particular url concurrently…
Docker
The easiest way to run wrk2 is using the Docker image:
docker run --rm cylab/wrk2
wrk accepts numerous parameters. Here are the main ones:
-R <rate>: number of requests per second to send (required)-L: show latency statistics-d <duration>: duration of test (should be at least 30 seconds for accurate results)-t <threads>: number of threads to use to generate the workload-c <connections>: total number of concurrent TCP connections
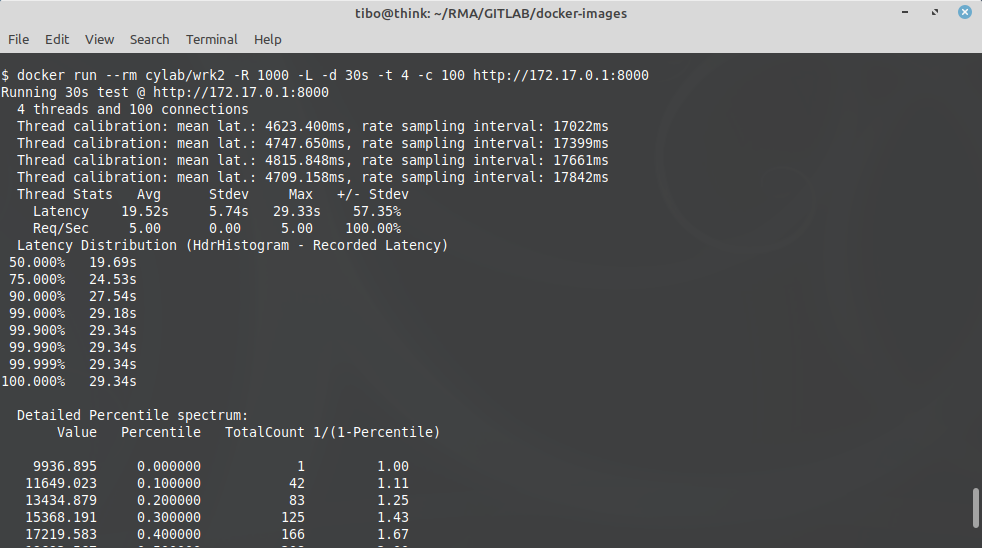
So a real test example would look like:
docker run --rm cylab/wrk2 -R 1000 -L -d 30s -t 4 -c 100 http://172.17.0.1:8000
GitLab
You can also use wrk2 as a job in your .gitlab-ci.yaml, to check the performance of the new version after you deployed your code to a test environment. There is one trick here, you should overwrite the “entrypoint” definition of the container:
stages:
  - test
  - build
  - deploy-staging
  - test-staging

functional:wrk2:
  # test-staging takes place after the application has been deployed
  # to the staging environment
  stage: test-staging
  environment:
    name: staging
    url: http://my.stating.com
  image:
    name: cylab/wrk2
    entrypoint: [""]
  script:
    - wrk -R 200 -L -d 30s -t 10 -c 100 http://my.stating.com
Choosing parameters
Choosing test parameters can be quite challenging. Here are a few rules of thumb to define a starting point:
- imagine you want to test if your test server is able to serve
Uusers; - if your users are skimming through the website, they will click on links once every 2 or 3 seconds, so
Uusers would generateU / 2clicks per second; - if your code is correctly optimized, all static content (images, js files, css files) will be cached on the browser, or served from a CDN, so a single click will require only a single request from the server, which leads to
R = U / 2requests per second;
Now, how many connections and threads do we need to generate this workload?
Based on my experience, it’s not uncommon to see a web page that requires 200 ms to be ‘processed’ by a web server (in PHP, if opcache is disabled, you will likely run around 500 ms / request). Within a connection, the next request can only be sent once the previous one is finished. Hence, to keep some margin we should use c = R / 2 = U / 4.
Finally, and this is purely empirical, I usually use 10 connections per thread, hence t = c / 10 = R / 20.
Thresholds
The Docker image cylab/wrk2 also contains a small utility called wrk-threshold that allows to fail your build if the latency measured by wrk2 is above a provided threshold. It takes 3 parameters: the path to a text report created by wrk2, a percentile, and a latency threshold in milliseconds. So your .gitlab-ci.yaml job would look like this:
stages:
  - test
  - build
  - deploy-staging
  - test-staging

staging:wrk2:
  # test-staging takes place after the application has been deployed
  # to the staging environment
  stage: test-staging
  environment:
    name: staging
    url: http://my.stating.com
  image:
    name: cylab/wrk2
    entrypoint: [""]
  script:
    - wrk -R 200 -L -d 30s -t 10 -c 100 http://my.stating.com > wrk-200.txt
    - wrk-threshold wrk-200.txt 99.9 200
In this example, we send 200 requests per second to our staging server and measure the response latency. Then we consider the test as successful only if it at least 99.9% of requests are served within 200 ms.
This blog post is licensed under
CC BY-SA 4.0


