Run a local instance of Stable Diffusion and use AI to generate images
Aug 13, 2024 by Thibault Debatty | 12798 views
https://cylab.be/blog/358/run-a-local-instance-of-stable-diffusion-and-use-ai-to-generate-images
Next to ChatGPT, the apparition of image generation AI was a real breakthrough. These algorithms are able to create stunning and detailed images from textual descriptions. In this field, Stable Diffusion stands out by the quality of the images, but also by its open and accessible nature. Unlike many proprietary AI tools, Stable Diffusion makes its source code and models freely available.
Moreover, Stable Diffusion claims no rights on generated images and freely gives users the rights of usage to any generated images from the model, provided that the image content is not illegal or harmful to individuals. This makes Stable Diffusion a fantastic tool that you can run locally, to experiment and discover AI image generation.
A photograph of an astronaut riding a horse | Image generated by Stable Diffusion, prompt inspired by Wikipedia.
Thanks to the availability of the source code and model of Stable Diffusion, project AUTOMATIC1111 was created on GitHub to facilitate installation and usage of the algorithm. This project offers:
- a web interface to easily create images using Stable Diffusion and
- a script to facilitate the installation of the model and web interface
Stable Diffusion and AUTOMATIC1111 can run on Linux, Windows and Mac, and with a integrated or discrete GPU (NVidia, AMD or Intel).
In this blog post, I’ll show how to install and use AUTOMATIC1111 and Stable Diffusion on Linux, with and AMD GPU (Radeon RX 7600).
AMD GPU
First, if you are using an AMD GPU, you’ll have to install AMD ROCm and HIP. ROCm is a software stack that allows to run AI and HPC applictions on AMD GPUs. It includes a lot of components like libraries, tools, models, tools, compilers, the HIP runtime library etc.
Procedure is explained on https://rocm.docs.amd.com/en/latest/
At the end, you’ll have to run (default install, include ROCm plus other common stuff):
sudo amdgpu-install
or, to select what you install:
sudo amdgpu-install --usecase "rocm"
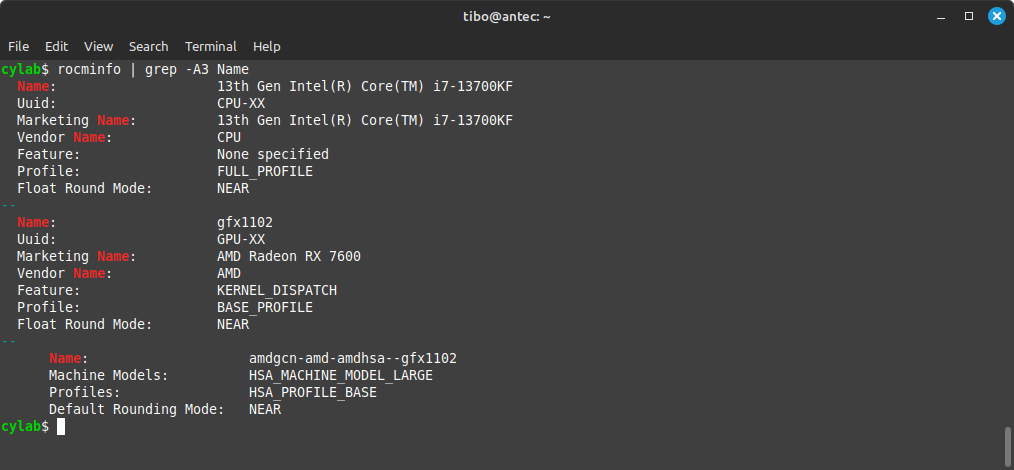
In anyway, make sure ROCm is correctly installed, and has detected your GPU:
rocminfo
Dependencies
There are a few classical packages to install:
sudo apt install wget git python3 python3-venv libgl1 libglib2.0-0
Not mandatory, but it’s highly recommended to install tcmalloc, to improve performance (a bit) and reduce RAM usage (a lot):
sudo apt install libgoogle-perftools4
Python
You will need Python version 3.10 or 3.11. Something more recent will not work!
So check the installed version of Python:
python3 --version
If you have Python 3.12 or higher, you have to install Python 3.11:
sudo add-apt-repository ppa:deadsnakes/ppa
sudo apt update
sudo apt install python3.11 python3.11-venv

# set up env variable for launch script
export python_cmd="python3.11"
Installation and first run
We can now start the actual installation and launch the web interface:
git clone https://github.com/AUTOMATIC1111/stable-diffusion-webui
cd stable-diffusion-webui

python3.11 -m venv venv
./webui.sh
The first run will take a few minutes, as the script will download a lot of libraries, plus the Stable Diffusion model.
You can also check webui-user.sh for additional options.
If your AMD GPU is fairly recent (it was the case for my RX7600), it may not be recognized by PyTorch, which will cause an error **RuntimeError: HIP error: invalid device function. A possible solution is to force the use of a previous GFX version:
export HSA_OVERRIDE_GFX_VERSION=11.0.0
./webui.sh
How it works
Stable Diffusion works by creating an initial random image, then iteratively tries to “denoise” the image, until the configured number of steps is reached.
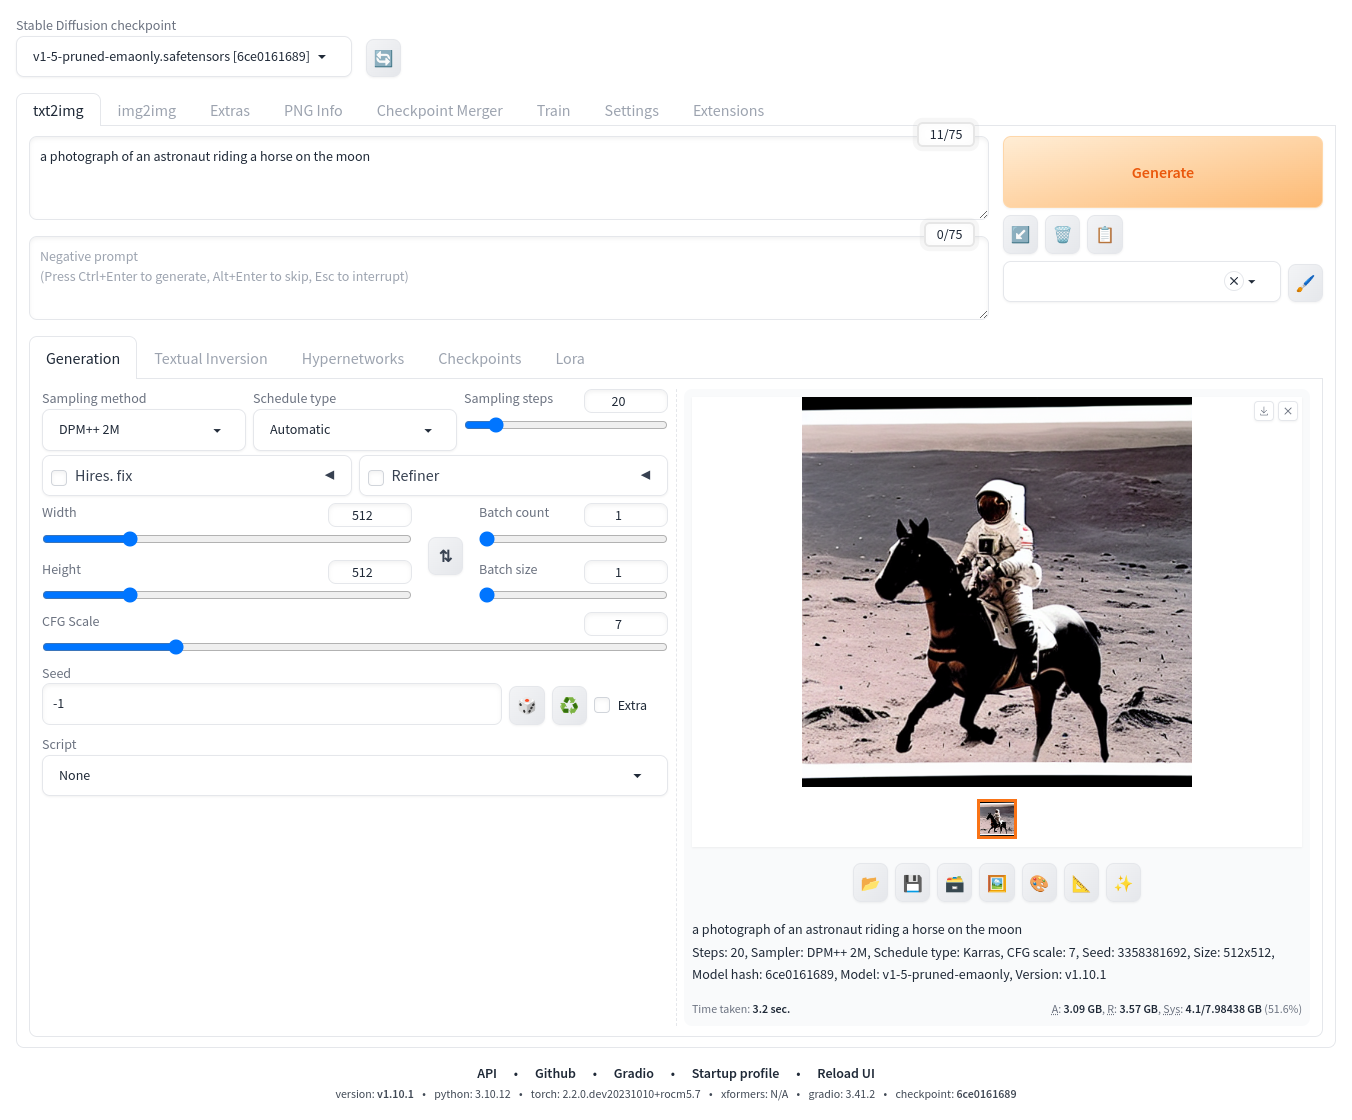
The different related parameters can be found on the web interface:
- Sampling steps controls the number of denoising steps;
- Seed (at the bottom) controls the initial seed of the Pseud-Random Number Generator (PRNG) used to create the initial random image;
- Width and Height as pretty obvious;
- CFG Scale : the Classifier Free Guidance scale controls how much the model should respect your prompt, where
1is extremely creative; - Batch count and Batch size allow to produce multiple images at once.
Limitations and controversy
Stable Diffusion was trained on images taken from LAION-5B, a publicly available dataset built using data scraped from the web.
Initial versions of the model were trained on a dataset that consisted only 512×512 images, meaning that the quality of generated images noticeably degrades when user specifications deviate from the“expected“ resolution of 512×512.
Also, the training dataset may contain some harmful images and large amounts of private and sensitive information, which may appear on the generated images.
Finally, Stability AI has been the subject of different lawsuit claiming that the company has infringed the rights of of artists by training the model using images scraped from the web without the consent of the original artists.
References
- https://github.com/AUTOMATIC1111/stable-diffusion-webui
- https://en.wikipedia.org/wiki/Stable_Diffusion
- https://www.theregister.com/2024/06/29/image_gen_guide
- https://stable-diffusion-art.com/automatic1111
This blog post is licensed under
CC BY-SA 4.0


