Configure a Wireguard VPN on OPNSense
Feb 21, 2026 by José Carrasquel Vera | 4919 views
https://cylab.be/blog/487/configure-a-wireguard-vpn-on-opnsense
On this post we will show basic usage of Wireguard on OPNSense. This is a new addition to our VPN series:
- How to Turn Your Raspberry Pi into a VPN Exit Node with Tailscale
- Configure client-server OpenVPN on OPNSense
- Securing external traffic on a budget with Wireguard
Don’t forget to read the official manual of OPNSense.
Wireguard
If you have some knowledge in IP routing then it will not be difficult to achieve a high-level understanding on how Wireguard works. It is beautifully explained in the landing page of Wireguard.
Each Wireguard instance can be seen as a VPN connection where the N really means network, unlike other VPN technologies which is more of a tunnel. Each instance determines a virtual NIC that can be governed (thanks to wg-quick) by a configuration file containing two kinds of sections:
[Interface]: Contains information related to the configuration of the virtual interface, plus your own cryptographic info.[Peer]: Contains information on the each of your peers, and the necessary cryptographic information to communicate with them. This data will also determine routing through theAllowedIPsfield.
You can imagine a Wireguard interface as a regular interface connected to a mysterious LAN in which the communication to other hosts is encrypted individually. And if you are very imaginative, you can think of the peer’s Endpoint as the MAC addresses.
It is important to understand that Wireguard is designed as peer-to-peer rather that client-server. That said, most configurations behave as client-server. If you don’t understand the above, please reread https://www.wireguard.com/.
Instance
We will create a Wireguard network interface.
Creation
Go to VPN > Wireguard > Instances and click on the plus sign.
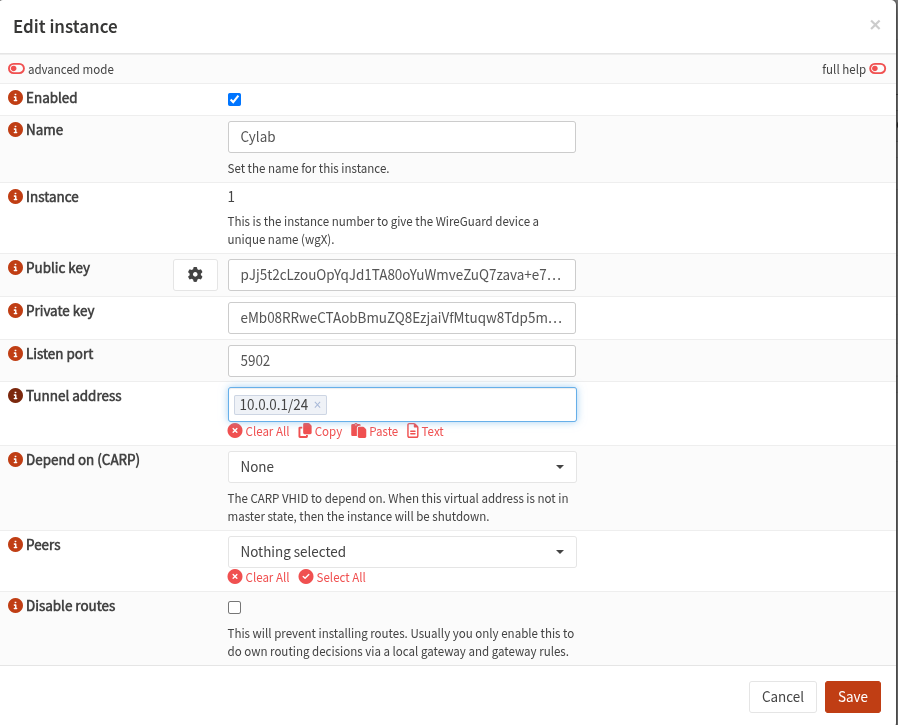
The Name field is the reference OPNSense uses for management and association with peers, it is not the name of the interface, which will always be wgN where N is the Instance field. Clicking on the ⚙ button will generate the Public and Private key for our instance. The Tunnel Address field is the IP of the Wireguard interface in CIDR notation. That is, the IP in the Wireguard VPN network. The Depend on (CARP) field is useful for OPNSense in HA mode, read this for more information. Peers is the list of Peers for this instance, there is nothing for the moment because we haven’t created any peer yet, this field will be populated as we create peers. Remember how AllowedIPs determines routing? the field Disable routes prevents automatic creation of routes.
Go ahead then and create an instance. Don’t forget to click onApply.
Under the hood
Let’s SSH into OPNSense. Remember it’s FreeBSD based.
# ifconfig wg1
wg1: flags=10080c1<UP,RUNNING,NOARP,MULTICAST,LOWER_UP> metric 0 mtu 1420
	options=80000<LINKSTATE>
	inet 10.0.0.1 netmask 0xffffff00
	groups: wg wireguard
	nd6 options=109<PERFORMNUD,IFDISABLED,NO_DAD>
# wg show wg1
interface: wg1
  public key: pJj5t2cLzouOpYqJd1TA80oYuWmveZuQ7zava+e76Eo=
  private key: (hidden)
  listening port: 5902
Here we see the virtual interface wg1 with IP assigned using the field TunnelAddress. The command wg show shows the status of a particular Wireguard interface. At the moment not much info is shown, but you can see the Public key and the Listen port we configured before. We will see much more once we’ve configured a peer and established a connection.
Peers
Now we will determine with whom and how we’re going to have Wireguard communication. The creation of a peer will
- add a
[Peer]section to the instance we just created and - create a complete configuration file for the remote host we want to communicate with, this includes their
[Instance]section and a[Peer]section referring to the OPNSense instance we configured above.
Creation
Go to VPN > Wireguard > Peer generator to create a new peer.
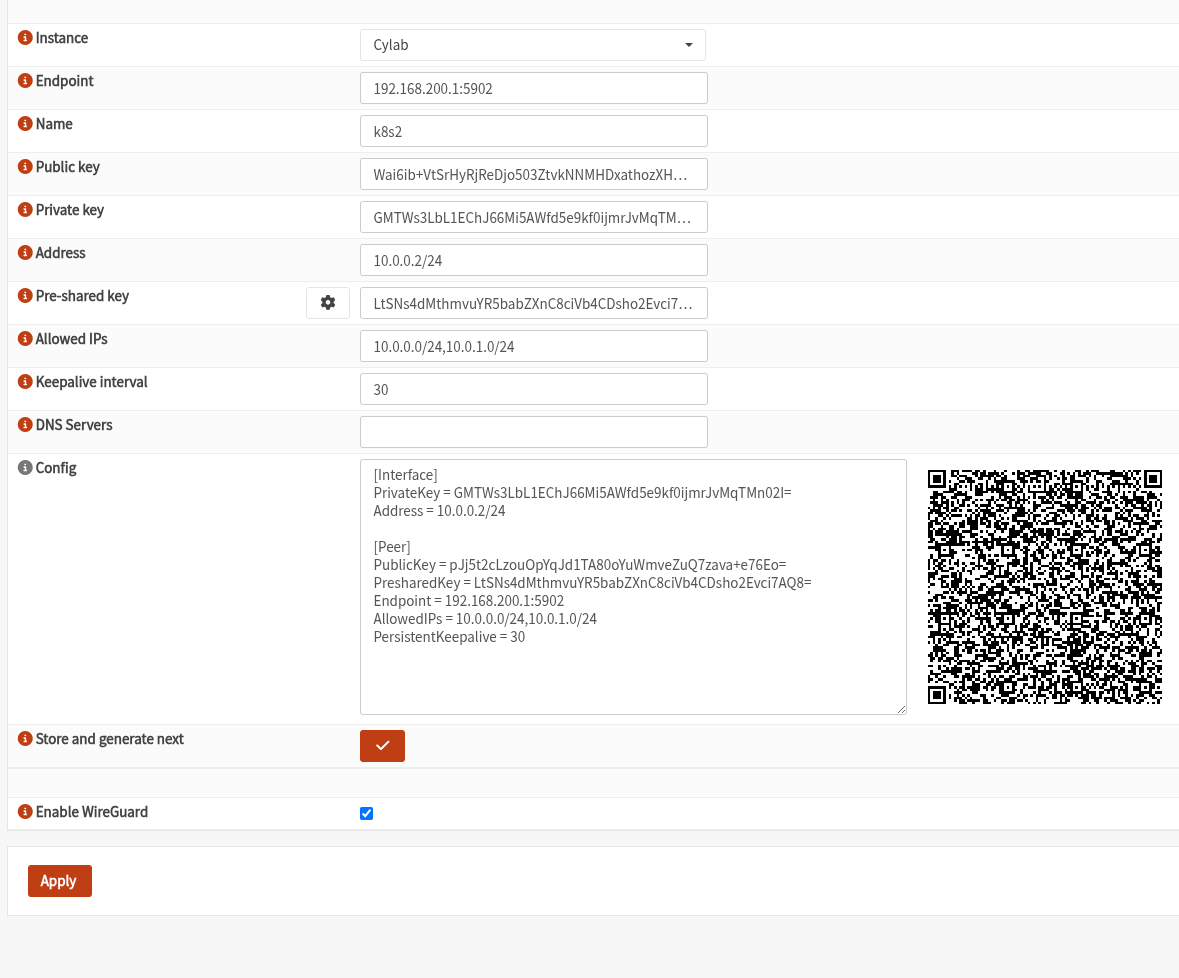
We select the instance for which we are generating a peer configuration in the Instance field. The Endpoint field is a bit tricky. It should be the address and port the peer should use to reach the OPNSense router’s Listen port of the Wireguard instance. It could be different because of NAT. The name is simply a reference for OPNSense to use. There’s the Public and Private key fields to configure the peer’s instance, and its Address which is actually the Tunnel address for the peer. The Pre-shared key can be used to have stronger cryptography. The Allowed IPs is the AllowedIPs field for the Peer section of the configuration filed to be used by the peer. In other words, it is the network ranges that OPNSense will share with the peer being created. The Keepalive interval field says how often to send empty packets to maintain the connection (perhaps for NAT reasons). The DNS Servers field specifies the DNS servers of the Wireguard interface that will be created in the peer. It can be the dns server of the OPNSense part of the network (make sure you add it to the Allowed IPs)
The Config field will show the configuration generated to be used by the peer. Copy this information or scan the QR-code. Click on Store and generate next then click on Apply.
We will use this information when configuring the peer.
[Interface]
PrivateKey = GMTWs3LbL1EChJ66Mi5AWfd5e9kf0ijmrJvMqTMn02I=
Address = 10.0.0.2/24

[Peer]
PublicKey = pJj5t2cLzouOpYqJd1TA80oYuWmveZuQ7zava+e76Eo=
PresharedKey = LtSNs4dMthmvuYR5babZXnC8ciVb4CDsho2Evci7AQ8=
Endpoint = 192.168.200.1:5902
AllowedIPs = 10.0.0.0/24,10.0.1.0/24
PersistentKeepalive = 30
Under the hood
I mentioned before that generating a peer creates a config file for the peer but also adds a new [Peer] section to the OPNSense instance. Lets go back to our OPNSense shell:
# wg showconf wg1
[Interface]
ListenPort = 5902
PrivateKey = eMb08RRweCTAobBmuZQ8EzjaiVfMtuqw8Tdp5mhzwVE=

[Peer]
PublicKey = Wai6ib+VtSrHyRjReDjo503ZtvkNNMHDxathozXHdVs=
PresharedKey = LtSNs4dMthmvuYR5babZXnC8ciVb4CDsho2Evci7AQ8=
AllowedIPs = 10.0.0.0/24
PersistentKeepalive = 30
As you can see, the peer has been added with its PublicKey. Observe that the AllowedIPs field only allows communication from the VPN network.
Configuration
We will configure an Ubuntu VM to use the configuration file generated and create a Wireguard tunnel with OPNSense. We will do it using the wg-quick util and we base ourselves on this guide
jose@k8s2:~$ sudo apt install -y wireguard
With sudo, place the content of the file generated above in /etc/wireguard/cylab.conf. You may choose the name of the file, it will actually be the interface’s name.
jose@k8s2:~$ sudo vim /etc/wireguard/cylab.conf
Now let’s use wg-quick to do all the magic.
jose@k8s2:~$ sudo systemctl enable wg-quick@cylab.service
Created symlink /etc/systemd/system/multi-user.target.wants/wg-quick@cylab.service → /usr/lib/systemd/system/wg-quick@.service.
jose@k8s2:~$ sudo systemctl daemon-reload
jose@k8s2:~$ sudo systemctl start wg-quick@cylab
Now let’s see what happened.
jose@k8s2:~$ ip a show cylab
14: cylab: <POINTOPOINT,NOARP,UP,LOWER_UP> mtu 1420 qdisc noqueue state UNKNOWN group default qlen 1000
    link/none
    inet 10.0.0.2/24 scope global cylab
       valid_lft forever preferred_lft forever
jose@k8s2:~$ ip route | grep cylab
10.0.0.0/24 dev cylab proto kernel scope link src 10.0.0.2
10.0.1.0/24 dev cylab scope link
jose@k8s2:~$ sudo wg show cylab
interface: cylab
  public key: Wai6ib+VtSrHyRjReDjo503ZtvkNNMHDxathozXHdVs=
  private key: (hidden)
  listening port: 50967

peer: pJj5t2cLzouOpYqJd1TA80oYuWmveZuQ7zava+e76Eo=
  preshared key: (hidden)
  endpoint: 192.168.200.1:5902
  allowed ips: 10.0.0.0/24, 10.0.1.0/24
  latest handshake: 2 seconds ago
  transfer: 772 B received, 396 B sent
  persistent keepalive: every 30 seconds
And voilà, we see the interface cylab created with the provided Address, we see the routes created through the AllowedIPs field and moreover the status of the connection. The tunnel is established as we can see on the latest handshake.
Back in OPNSense, we can also see this connection:
# wg show wg1
interface: wg1
  public key: pJj5t2cLzouOpYqJd1TA80oYuWmveZuQ7zava+e76Eo=
  private key: (hidden)
  listening port: 5902

peer: Wai6ib+VtSrHyRjReDjo503ZtvkNNMHDxathozXHdVs=
  preshared key: (hidden)
  endpoint: 192.168.200.12:50967
  allowed ips: 10.0.0.0/24
  latest handshake: 1 minute, 32 seconds ago
  transfer: 488 B received, 39.88 KiB sent
  persistent keepalive: every 30 seconds
Exercise
Configure the peer without using wg-quick. Follow Wireguard’s Quick Start
Packet tracing
Let’s first see the PersistentKeepalive = 30 in OPNSense:
# tcpdump -ni vtnet2 port 5902
tcpdump: verbose output suppressed, use -v[v]... for full protocol decode
listening on vtnet2, link-type EN10MB (Ethernet), snapshot length 262144 bytes
12:37:07.033256 IP 192.168.200.1.5902 > 192.168.200.12.50967: UDP, length 32
12:37:37.033299 IP 192.168.200.1.5902 > 192.168.200.12.50967: UDP, length 32
12:38:07.033328 IP 192.168.200.1.5902 > 192.168.200.12.50967: UDP, length 32
Here, you see a small UDP packet being sent every 30 seconds. Now let’s ping through the tunnel:
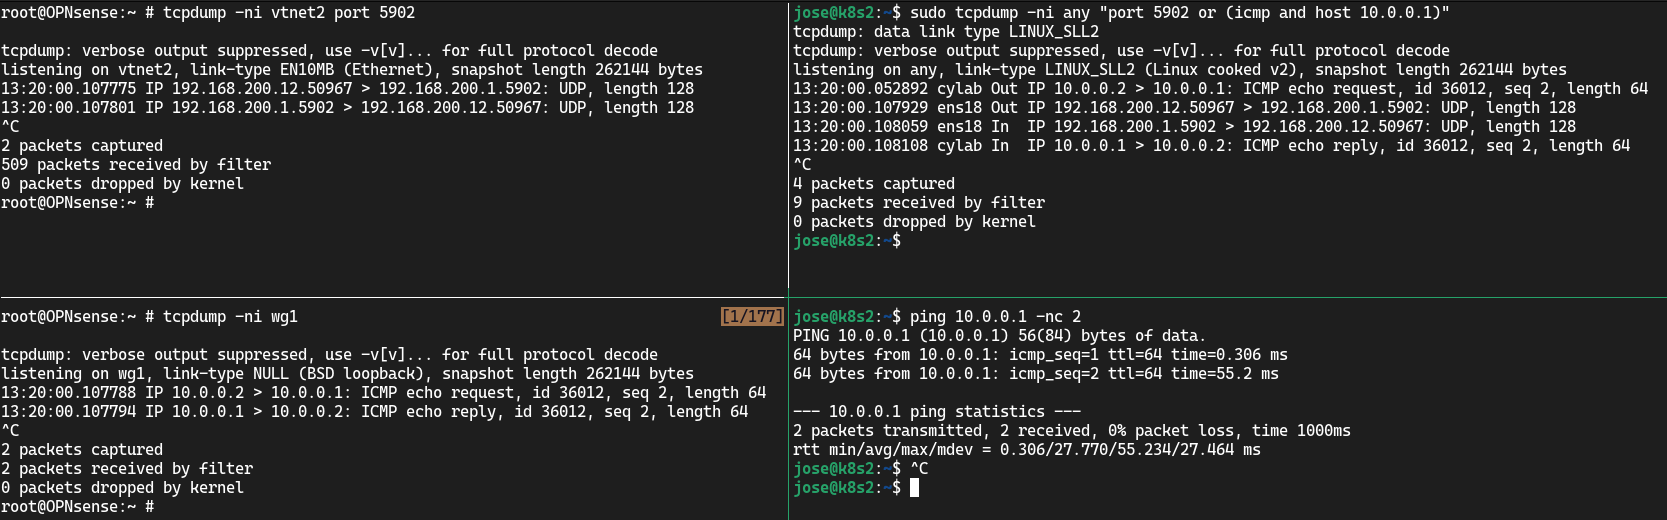
The first thing we see is the ICMP packet at the Wireguard network interface of k8s2 (top right), then the UDP packet leaving ens18 with destination the Endpoint of OPNSense, carrying the encrypted ICMP packet. We see it arrive at OPNSense’s vtnet2 interface (top left) and then see the decrypted ICMP packet arrive at OPNSense’s Wireguard interface wg1 (bottom left).
This blog post is licensed under
CC BY-SA 4.0


