Laravel & Vue.js: Quickstart
Aug 4, 2020 by Zacharia Mansouri | 7201 views
Vue.js is an open-source JavaScript framework that lets you extend HTML elements with embedded JS and CSS to easily create complex user interfaces and single page applications. Easy to integrate with Laravel, this is the perfect combination to draw a line between the front and the back ends while making them both powerful.

In this tutorial, you’ll learn to integrate Vue.js to a Laravel project. Then you’ll learn the basics through a fun project.
Setting up the project
Let’s create a project called vue-tuto by executing the following command in a bash command line:
composer create-project laravel/laravel vue-tuto
Then we can move inside the project and install the PHP and JavaScript dependencies:
cd vue-tuto
composer install
npm install
Now let’s install Vue.js using:
npm install vue --save-dev
And let’s make the components we’ll create loadable from .vue files using:
npm install vue-template-compiler --save-dev
The –save-dev option adds the installed dependency into the development dependencies. In fact, if everything went well, you should have two new lines in the devDependencies of your package.json file, containing the following content (note that the version below may of course vary):
"devDependencies": {
    ...
    "vue": "^2.6.11",
    "vue-template-compiler": "^2.6.11"
}
To enable Vue.js in the whole project, you’ll need to attach it to the window by adding the following line at the end of the /resources/js/app.js file:
window.Vue = require('vue');
In the same file, add the code that will instantiate Vue.js after the window has loaded:
window.onload = function(e) {
    const app = new Vue({
        el: '#app'
    });
}
Like you can see above, Vue.js is instanciated into an element with the app id. Therefore, you need to add this element to the /resources/views/welcome.blade.php view. Before that, let’s clean this view and delete the fonts and styles in the head element and all the content of the body element. After also changing the title to ‘Laravel & Vue’, here is what that welcome view should contain:
<!DOCTYPE html>
<html lang="{{ str_replace('_', '-', app()->getLocale()) }}">
    <head>
        <meta charset="utf-8">
        <meta name="viewport" content="width=device-width, initial-scale=1">
        <title>Laravel & Vue</title>
    </head>
    <body>

    </body>
</html>
Now you can add the following div element containing an app id in the body element:
<div id="app" style="text-align:center;margin-top:2%;margin-bottom:2%;">

</div>
Note that a style has been added to the div app. It is not required but we’ll use it to make things prettier.
Finally, don’t forget to add the app.js script into the head element of the welcome.blade.php view:
<script src="<?php echo asset('/js/app.js')?>"></script>
Adding a component
Let’s create a components folder in the /resources/js/ directory and a new file called Face.vue in this folder. Then let’s add a basic structure to this file:
<template>
</template>

<script>
export default {
}
</script>

<style scoped>
</style>
In the above code:
- the template tags will contain the HTML code,
- the script tags will hold all the properties passed to the component, its internal data, its methods, etc,
- the style tags will contain all the CSS properties that will only apply locally to the component if the scoped attribute is present, and apply globally otherwise.
Now we need to tell our application that we want to give the name face to a new component based on the content of the Face.vue file. Let’s do that by adding the following line in the /resources/js/app.js file:
Vue.component('face', require('./components/Face.vue').default);
This component should be added between the Vue.js declaration and its instanciation. Therefore the end of your /resources/js/app.js file should now look like this:
// Declaration
window.Vue = require('vue');

// New component
Vue.component('face', require('./components/Face.vue').default);

// Instantiation
window.onload = function(e) {
    const app = new Vue({
        el: '#app'
    });
}
Every new component should be added this way.
Before adding the component to the view, we’ll make it actually do something. For the time being, it’s totally empty so let’s make it show a little text by first adding the following code in the template and script tags:
<template>
    <div>
        {{ text }}
    </div>
</template>

<script>
export default {
    props: {
        text: String,
    }
}
</script>
This code makes the face component able to take a text attribute of type String and will show the text defined by this attribute in a div element. You can now create a new face component inside the div app in the welcome.blade.php view:
<div id="app" style="text-align:center;margin-top:2%;margin-bottom:2%;">
    <face text="Hello world!"></face>
</div>
There is now one more step: you need to compile the Face.vue content by running the following command:
npm run dev
It should compile successfully. Be careful, you’ll need to repeat this step each time you add a component or change the content of an already existing component. Hopefully, you can stop worrying about compiling at each modification and simply run the following command to ensure an automated compilation:
npm run watch
Now launch your server in another terminal:
php artisan serve
Your view is now available on http://localhost:8000 and should show this:

Like you can see, the curly braces in the Face.vue template replace the text property by the ‘Hello world!’ value passed through the face component in the view. Congratulations! You just created your first Vue.js component. Now comes the fun part!
Introducing our future app
Let’s build an app called FaceVue. With this app, you’ll be able to greet new friends after naming them, see the last 10 friends you’ve greeted and look at all those friends. Here is what you’ll obtain at the end of this turorial:
Styling our app
Let’s first add the bootstrap stylesheet in the head element of the welcome.blade.php view:
<link
    rel="stylesheet"
    href="https://maxcdn.bootstrapcdn.com/bootstrap/4.0.0-alpha.6/css/bootstrap.min.css">
Let’s also put the following style in the Face.vue file:
<style scoped>
    h1, h2, p {
        color: slategray;
        padding: 0%;
        margin-left: 1%;
        margin-right: 1%;
        margin-top: 0%;
        margin-bottom: 0%;
    }
    input {
        width: 50%;
    }
    #root {
        width: 100%;
        padding-left: 15%;
        padding-right: 15%;
        padding-top: 1%;

    }
    #name-input {
        padding-bottom: 5%;
    }
    #friend {
        color: darkslateblue;
    }
    #enemy {
        color: darkgreen;
    }
</style>
Don’t worry! The root, name-input, friend and enemy ids will appear later in the template.
Building our app
Let’s add more features to our face component:
<template>
    <div id="root">
        <div id="name-input">
            <input v-model="name">
        </div>
        {{ text }} {{ name }}!
    </div>
</template>

<script>
export default {
    props: {
        text: String,
    },
    data() {
        return {
            name: '',
        }
    },
}
</script>
Here above we have:
- added a root id to the main div for style purposes;
- in the script, added a data function that returns a name variable which is an empty String;
- in the template, added the new name variable inside curly braces, followed by an exclamation point. The variable inside the data function is read like the properties. However, it cannot be passed through the component in the view. That’s why we gave it a default value. This name variable is thus intern to the face component;
- in the template, added a div with the name-input id that contains an input element with a v-model attribute that refers to the name variable.
The v-model attribute, combined with the data function, allows to automatically link a form field (input, select or textarea) to a variable.
We then change the value of the text attribute of the face component in the view:
<face text="Hello"></face>
Now, every time you type something in the input field, the name variable will be refreshed, which will automatically update the view. This will happen with all the variables returned by the data function.
Here is the result you should obtain:

We’ll now add more data. First, an id variable with a default value of 0, incremented whenever we add a new friend, will serve as an id assigned to each friend. Second, a friends variable will store all our friends, each having a name and an id. We’ll also add a method that creates a new friend and add him/her to our friends list:
<template>
    <div id="root">
        <div id="name-input">
            <input v-model="name">
            <br/>
            <button v-on:click="addName">ADD A NEW FRIEND</button>
        </div>
        <div
            v-for="item in friends"
            :key="item.id">

            <p>{{ text }} {{ item.name }}!</p>
        </div>
    </div>
</template>

<script>
export default {
    props: {
        text: String,
    },
    data() {
        return {
            id: 0,
            name: '',
            friends: [],
        }
    },
    methods: {
        addName() {
            this.friends.push({
                id: this.id,
                name: this.name ? this.name : 'Stranger'
            })
            this.name = '';
            this.id++;
        },
    }
}
</script>
Let’s break this code down:
The element with the name-input id has been changed:
<div id="name-input">
    <input v-model="name">
    <br/>
    <button v-on:click="addName">ADD A NEW FRIEND</button>
</div>
The greeting it showed has been replaced by a button with a v-on:click attribute that refers to the addName method. This method is triggered whenever the button is clicked. This method is a function defined in a new field called methods that will contain all the methods that are internal to the component.
A new div element has appeared:
<div
    v-for="item in friends"
    :key="item.id">

    <p>{{ text }} {{ item.name }}!</p>
</div>
It contains a v-for attribute. This attribute iterates on the list of friends and will show a div element for each element in this list. Each element can be accessed with the item variable that could be renamed to whatever you want. The fields of the item (name and id) can be acccessed inside the div. It also needs a :key attribute, a short version for v-bind:key. This attribute is required whenever we use the v-for attribute. This is why we define an id variable for each item in the friends list.
The addName method is self-explanatory. Note that it sets the name variable to an empty String after each time a new friend is added. This will empty the input. If a friend with an empty name is added, he will have a default name ‘Stranger’. The variables defined in the data, like the name and id variables, can be accessed into a method by using the reference word this:
methods: {
    addName() {
        this.friends.push({
            id: this.id,
            name: this.name ? this.name : 'Stranger'
        })
        this.name = '';
        this.id++;
    },
}
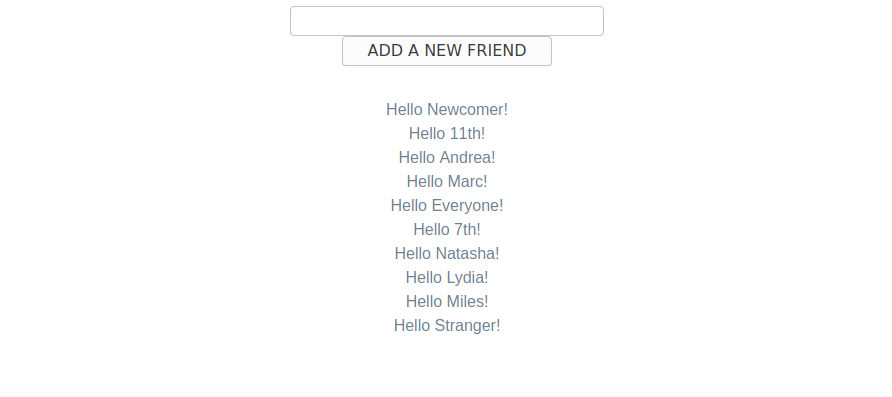
Here is the result you should obtain:
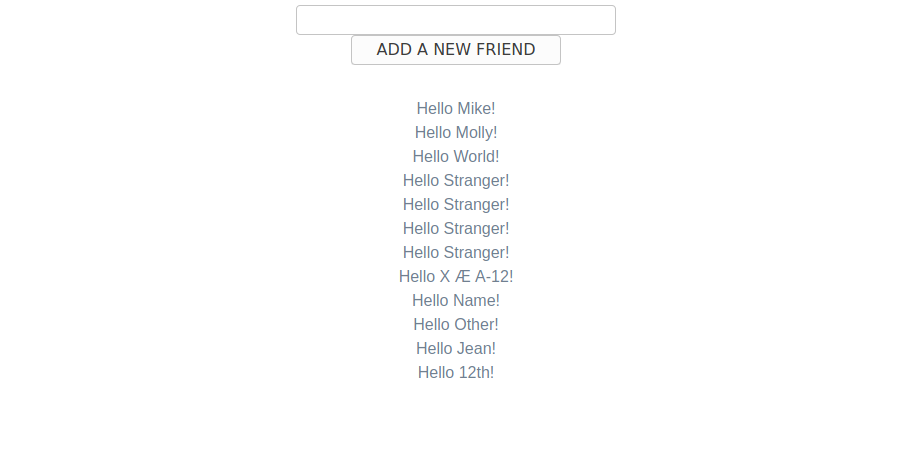
Those typical Vue.js attributes, like v-for, allow to put some JavaScript code in the value assigned to them inside the double quotes. For example, if we just want to show the greetings for the 10 last friends that have been added, in the reverse order (the newer friends are printed above the older ones) we can just replace the content of the v-for attribute by the following one:
<div
    v-for="item in friends.slice().reverse().slice(0, 10)"
    :key="item.id">
And you should obtain:
Of course, Vue.js also proposes conditional attributes. As an example, we’ll add a categoryMessage data variable that will be showed in a h1, h2 or p element depending on what we want. To achieve that, you just need to add two new props next to the text prop:
    props: {
        ...
        h1: Boolean,
        h2: Boolean,
    },
Add the new data variable :
    data() {
        return {
            ...
            categoryMessage: '10 last friends',
        }
    },
And then add the three following lines in the template, between the div with the name-input id and the loop-iterating div:
<h1 v-if="h1">{{ categoryMessage }}</h1>
<h2 v-else-if="h2">{{ categoryMessage }}</h2>
<p v-else>{{ categoryMessage }}</p>
Here we learn two new concepts:
- the Boolean values h1 and h2 are false if they are not present as attributes in the face component in the view and they are true otherwise,
- the v-if, v-else-if and v-else attributes impose a conditional rendering, meaning here that if the h1 attribute is present, the categoryMessage variable will be showed in an h1 element, otherwise if the h2 attribute is present, it will be showed in an h2 element otherwise it will be showed in a p element. The h1 and h2 props here have the same name as the elements but it is not required.
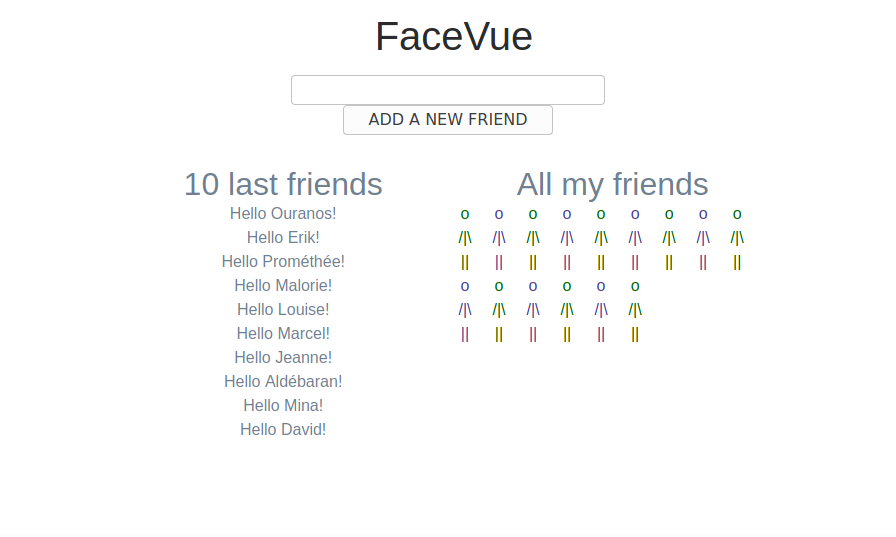
Here is the result we obtain if we add the h2 attribute to the face component in the welcome.blade.php view:
<face text="Hello" h2></face>

You can try with the h1 attribute or even no attribute and see the difference for yourself.
For the time being, we only have one column with the greetings to our 10 last friends. We would like to have another column called ‘All my friends’ where a little ASCII friend will appear everytime a new friend is added. For that purpose, we’ll add a new data variable called category that will be the title of the second column. This title can be either a h1, h2 or p element. Therefore it will implement the same logic as the categoryMessage variable. We’ll use bootstrap to get our two columns, here is what the template becomes :
<template>
    <div id="root">
        <div id="name-input">
            <input v-model="name">
            <br/>
            <button v-on:click="addName">ADD A NEW FRIEND</button>
        </div>
        <div class="row">
            <div class="col-xs-6 col-sm-6 col-md-6 col-lg-6">
                <h1 v-if="h1">{{ categoryMessage }}</h1>
                <h2 v-else-if="h2">{{ categoryMessage }}</h2>
                <p v-else>{{ categoryMessage }}</p>
                <div
                    v-for="item in friends.slice().reverse().slice(0, 10)"
                    :key="item.id">
                    <p>{{ text }} {{ item.name }}!</p>
                </div>
            </div>
            <div class="col-xs-6 col-sm-6 col-md-6 col-lg-6">
                <h1 v-if="h1">{{ category }}</h1>
                <h2 v-else-if="h2">{{ category }}</h2>
                <p v-else>{{ category }}</p>
                <div class="row">
                    <p
                        class="col-xs-1 col-sm-1 col-md-1 col-lg-1"
                        v-for="i in id" :key="i">
                         o  <br/>/| <br/> ||  <br/>
                    </p>
                </div>
            </div>
        </div>
    </div>
</template>
Some important information in this new template resides in the v-for attribute of the last p element, the one that shows our ASCII friends:
<div class="row">
    <p
        class="col-xs-1 col-sm-1 col-md-1 col-lg-1"
        v-for="i in id" :key="i">
        o  <br/>/| <br/> ||  <br/>
    </p>
</div>
This loop iterates on the id variable, and i successively iterates from 1 to the value of id meaning that one ASCII friend will appear for each friend we greeted. Note that i does not iterate from 0 to the value of id - 1.
And of course, after modifying the template, we don’t forget to add the category variable to the data in the script:
    data() {
        return {
            ...
            category: 'All my friends',
        }
    },
There is only one step left to complete our app: making one ASCII friend on two become purple (friend) and the other one become green (enemy). To achieve this, we’ll use the id attribute of the p element. Each basic HTML attribute like the id attribute can only take a String value. However, we’ve seen that using v-bind: or simply : (e.g. :key) before an attribute can make it contain JavaScript code. That way, we can put a condition that permits multiple possible String values. Therefore we now add in the template a personalized id attribute that will have the value friend or enemy depending on the value of i:
<div class="row">
    <p
        class="col-xs-1 col-sm-1 col-md-1 col-lg-1"
        v-for="i in id" :key="i"
        :id="i % 2 == 0 ? 'friend' : 'enemy'">
        o  <br/>/| <br/> ||  <br/>
    </p>
</div>
Let’s go back to the view and add an h1 title above our face component:
<h1 style="margin-top:2%;">FaceVue</h1>
And we’re done ! Here is the complete code for our face component contained in the Face.vue file:
<template>
    <div id="root">
        <div id="name-input">
            <input v-model="name">
            <br/>
            <button v-on:click="addName">ADD A NEW FRIEND</button>
        </div>
        <div class="row">
            <div class="col-xs-6 col-sm-6 col-md-6 col-lg-6">
                <h1 v-if="h1">{{ categoryMessage }}</h1>
                <h2 v-else-if="h2">{{ categoryMessage }}</h2>
                <p v-else>{{ categoryMessage }}</p>
                <div
                    v-for="item in friends.slice().reverse().slice(0, 10)"
                    :key="item.id">
                    <p>{{ text }} {{ item.name }}!</p>
                </div>
            </div>
            <div class="col-xs-6 col-sm-6 col-md-6 col-lg-6">
                <h1 v-if="h1">{{ category }}</h1>
                <h2 v-else-if="h2">{{ category }}</h2>
                <p v-else>{{ category }}</p>
                <div class="row">
                    <p
                        class="col-xs-1 col-sm-1 col-md-1 col-lg-1"
                        v-for="i in id" :key="i"
                        :id="i % 2 == 0 ? 'friend' : 'enemy'">
                         o  <br/>/| <br/> ||  <br/>
                    </p>
                </div>
            </div>
        </div>
    </div>
</template>

<script>
export default {
    props: {
        text: String,
	    h1: Boolean,
        h2: Boolean,
    },
    data() {
        return {
            id: 0,
            name: '',
            friends: [],
            category: 'All my friends',
            categoryMessage: '10 last friends',
        }
    },
    methods: {
        addName() {
            this.friends.push({
                id: this.id,
                name: this.name ? this.name : 'Stranger'
            })
            this.name = ''
            this.id++;
        },
    }
}
</script>

<style scoped>
    h1, h2, p {
        color: slategray;
        padding: 0%;
        margin-left: 1%;
        margin-right: 1%;
        margin-top: 0%;
        margin-bottom: 0%;
    }
    input {
        width: 50%;
    }
    #root {
        width: 100%;
        padding-left: 15%;
        padding-right: 15%;
        padding-top: 1%;

    }
    #name-input {
        padding-bottom: 5%;
    }
    #friend {
        color:darkslateblue;
    }
    #enemy {
        color: darkgreen;
    }
</style>
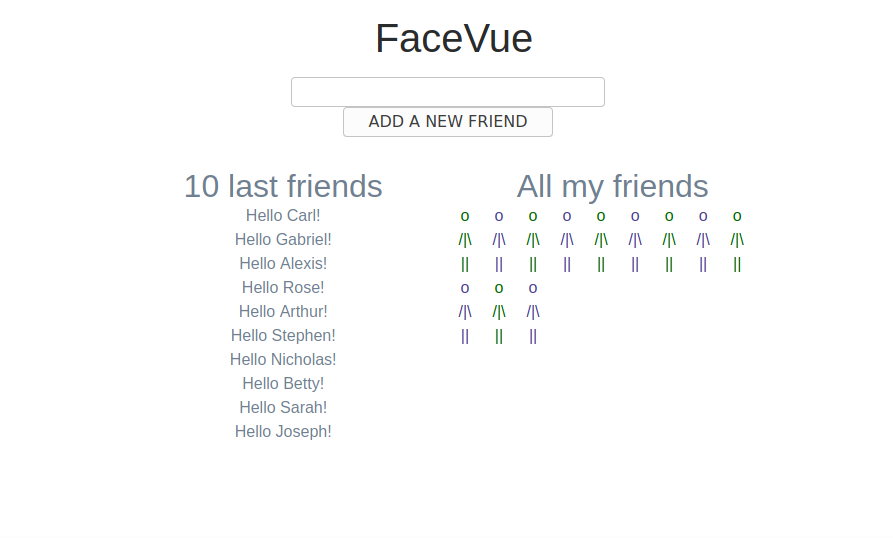
Our app is now completely built:
Going further
You’re maybe not realizing it but you just learned lot’s of Vue.js material. If you want to start mastering it, Vue.js proposes an excellent guide. Note that there are yet many things to learn like the fact that every Vue.js instance stands into a virtual DOM and has a lifecycle in that DOM.
This blog post is licensed under
CC BY-SA 4.0


